1. Locate and mark the center point where you would like to
position the Cinema Adjustable Mount. Measure 17 inches
horizontally in each direction from the center point. This area
must be clear of any obstructions in order to mount the
Cinema. Also, make certain there will be at least 6 inches of
clearance above or below in order to install the knobs and tilt
the speaker up or down.
2. Using a #2 phillips bit and an electric drill, drive a wall anchor
into the wall on the center point.
3. Unscrew the two large knobs and remove the two Metal Shelf
Brackets from the Cinema Stand. Set the 2 rubber washers,
the 2 plastic washers and the large knobs aside for use in a
later step.
4. Place the Cinema Stand carefully against the wall and align its
uppermost center hole over the wall anchor. Using one of the
1
1
/4" in. phillips head screws, mount the Cinema Stand to the
wall. Do not fully tighten the screw as you must first level the
stand before marking the remaining holes.
5. Place a level across the top edge of the Cinema Stand and
make sure that it is level. Then, consult the illustration and
mark the wall through the center of each of 5 holes in the
Cinema Stand.
6. Remove the Cinema Stand and drive a wall anchor at each of
the 5 marks.
7. With the help of an assistant, place the bracket against the
wall and attach it to the wall anchors using the (6) 1
1
/4
in.
phillips head screws. Tighten the screws but be very careful
not to over tighten them and strip out the wall anchors.
8. Attach the Metal Shelf Brackets to the Cinema Stand. Place a
carriage bolt through a Metal Shelf Bracket so that it points
inward toward the center of the stand. Place the rubber
washer between the Metal Shelf Bracket and the stand, push the
bolt through the stand, place a plastic washer over the bolt
and thread on to the large knob. Hand tighten and repeat
each step for the other side. Make certain the Metal Shelf
Brackets are parallel to the floor and tighten each large knob.
9. Remove the 2 protective foam pads from the bottom of each of the
woofer boxes if they are attached to the Cinema. Failure to remove
the foam pads may result in damage to the speaker cabinet.
10. Set the Cinema on the Metal Shelf Brackets. By hand, thread the
3
/4 in. button head Allen screws into the front two threaded inserts
that are closest to the woofers. Next, thread in the 4 remaining
screws. Tighten each screw with the
5
/32 Allen wrench.
11. To direct the speaker to the desired listening position, while
supporting the Cinema with one hand, slightly loosen the large
knobs with the other. Tilt the Cinema to its best advantage
and securely tighten each knob.
12. Attach the speaker cable and AC power cord. Enjoy!
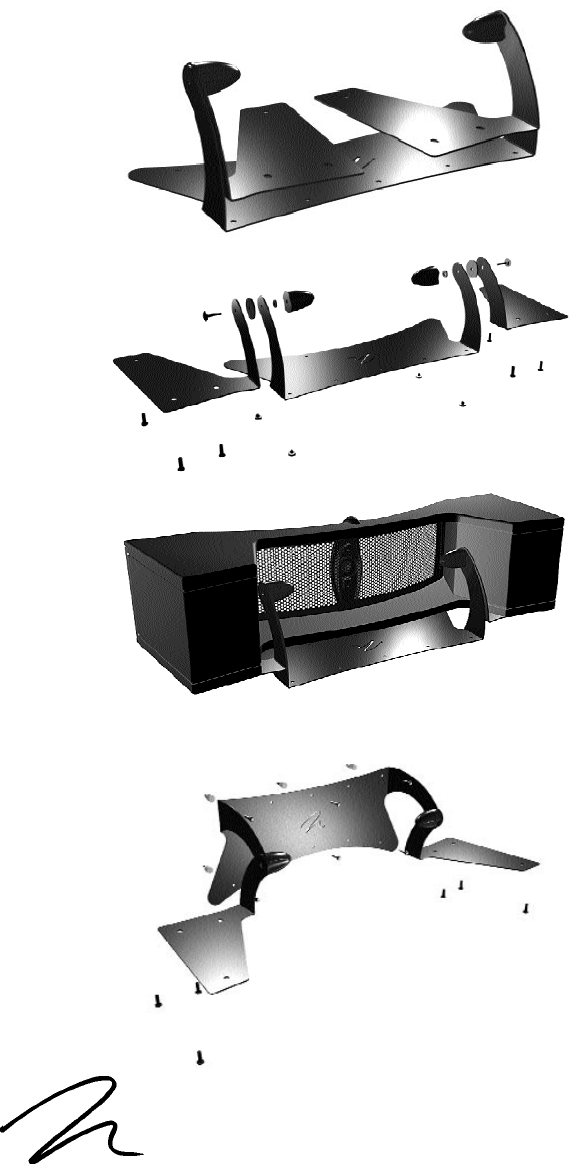
Fig. A - Unpack the Cinema
Adjustable Mount.
Fig. B - Assemble the Cinema
Adjustable Mount.
Fig. C - Attach the Cinema
Adjustable Mount to the
Cinema.
Fig. D - Attach the Adjustable Mount to a wall
or ceiling using the 6 wall anchors and 6 Allen
screws.
2101 Delaware Street, Lawrence, Kansas 66046, USA tel 785.749.0133 fax 785.749.5320 www.martinlogan.com
c l s e l e c t r o s t a t i c
M
ARTIN L OGAN
©2000 MartinLogan, All rights reserved


