


EN – 10
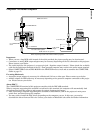
Basic connections
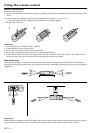
This projector can be connected to equipment such as PC, VCRs, video cameras and DVD players.
Important:
• Make sure that your equipment is turned off before connection.
• Plug in firmly and unplug by holding the plug, not by pulling the AC power cord.
• If connected units are set too close to one another, the image may be affected.
• Refer to the user manual of each component for details of connections.
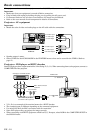
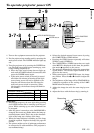
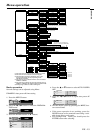
Projector + AV equipment
Important:
• Match the color of video and audio plugs on the AV cable with the connections.
L
S-VIDEO
VIDEO
AUDIO IN VIDEO IN
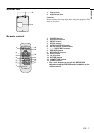
MAIN
AC IN
R
COMPUTER IN
RS-232C
COMPUTER OUT
to S-video input
to S-video output
to video input
to audio input
to video output
to audio output
VCR etc.
• Speaker output is mono.
• Select VIDEO for the AUDIO MODE in the FEATURE menu to hear and to sound for the VIDEO. (Refer to
page 17).
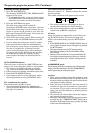
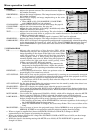
Projector + DVD player or HDTV decoder
Some DVD players have output terminal for 3 line fitting (Y, CB, CR). When connecting them to the projector, connect to
COMPUTER IN of the projector.
• Y, PB, PR is an example of the terminal names for a HDTV decoder.
• The terminal name is different depending on the connected equipment.
• Use mini D-SUB 15 pin-BNC conversion cable for connection.
• Some DVD players may not project the image correctly.
• When connecting with HDTV equipment which has R, G, B output, select RGB for the COMPUTER INPUT in
the SIGNAL menu.
L
S-VIDEO
VIDEO
AUDIO IN VIDEO IN
MAIN
AC IN
R
COMPUTER IN
RS-232C
COMPUTER OUT
B G R
C
B
(P
B
)Y C
R
(P
R
)
HD/CS VD
DVD player or HDTV decoder
No connection
BNC - RCA connector
(optional)
Mini D-SUB 15 pin-BNC
conversion cable (optional)
to AUDIO IN
to AUDIO OUT
AUDIO cable
to COMPUTER
IN