


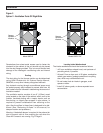


7
Locating the Exhaust Weatherhoods
The Exhaust Weatherhood should be located as fol-
lows:
* At least 4-6' from the supply inlet.
* At least 18" above grade or expected snow accu-
mulation.
* At least 3' from gas meters, combustion vents, or
dryer vents.
* Do not install in garages, crawl spaces or attics.
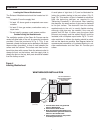
Outside Ducting the Weatherhoods
The ventilation portion of the Clean Air Furnace can be
vented off either side of the unit by removing knockouts
provided. Once the knockouts in Fig. 2 / Fig. 3 are
removed, a bead of silicone can be placed on the plastic
thermo-collars (provided), to form a seal between the
collars and the cabinet. The collars can then be fas-
tened into place with screws. Note the exhaust outlet is
always the port on the bottom, and the supply inlet is
always the port on the top, both ports should be labeled
from the factory as such.
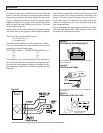
A small piece of rigid duct (1-2') can be fabricated for
joining the outside ducting to the port collars. (Fig. D,
page 12). This section of pipe is needed to accommo-
date the balancing damper, as required in the
"Balancing Procedure" in this manual. After installing
the dampers, the small section of pipe can be fastened
to the port collars. The ductwork from the outside
weatherhoods to the unit, is usually flexible ducting,
although rigid pipe may be needed if the runs are
greater than 20 feet. In either case the pipes (both
exhaust and supply and the added fittings) must be
insulated, with a complete vapor barrier Fig. 4. To mini-
mize restriction in airflows the ducting should be short,
with as few bends as possible. See diagram below for
recommended connection of insulated ducting to out-
side weatherhoods and the Clean Air Furnace port
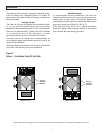
collars.
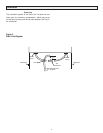
1. ThermalCollarslidesovergalvanized
sleeveofWeatherhood.
2. FastenThermalCollartoBelt.
3. SlidetheInsulatedFlexibleDuctingover
theWeatherhood'sgalvanizedsleeveand
fastenittotheThermalCollar.
4. Hoodishingedtoallowforeasyaccess
forcleaningofbirdscreen.
WEATHERHOODINSTALLATION
1/4"(6mm)SCREEN
(frontview)
EXTERIOR
WALL
SCREEN
(sideview)
COLLARISSUPPLIEDTO
ENSUREVAPOURBARRIER
IS100%SEALEDTO
WALLPLATE
12"galvanized
pipesupplied
Figure 4
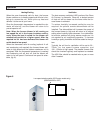
Locating Weatherhood
Installation