


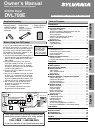


–
6
–
EN
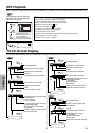
Setup
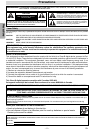
RL
AUDIO OUT
COAXIAL
R
L
DIGITAL AUDIO OUT
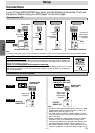
Stereo system
COAXIAL
AUDIO OUT
COAXIAL R
L
DIGITAL AUDIO OUT
AUDIO
DVD player
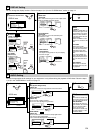
Method 1
Analog audio
input jacks
Digital audio
input jack
(Analog)
AUDIO OUT
DIGITAL
AUDIO OUT
Method 2
Connection to an Audio System
Audio cable
(supplied)
Audio Coaxial
Digital cable
(commercially
available)
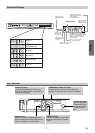
Note
• If output is Dolby Digital encoded audio, connect to a Dolby
Digital decoder, and set “DOLBY DIGITAL” to “ON” in the
AUDIO menu. (Refer to pages 14-15)
• The audio source on a disc in a Dolby Digital 5.1 channel
surround format cannot be recorded as digital sound by an
MD or DAT deck.
• Unless connected to a Dolby Digital decoder, set “DOLBY
DIGITAL” to “OFF” in the AUDIO menu. Playing a DVD
using incorrect settings may genarate noise distortion, and
may also damage the speakers. (Refer to pages 14-15)
• Set “DOLBY DIGITAL” to “OFF” in the AUDIO menu for con-
necting to an MD deck or DAT deck. (Refer to pages 14-15)
Dolby Digital decoder,
MD deck or DAT deck
AUDIO OUT
COAXIALR
LY
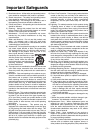
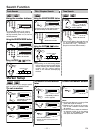
S-VIDEO
OUT
COMPONENT
VIDEO OUT
C
R
/P
R
DIGITAL AUDIO OUT
VIDEO
OUT
C
B
/P
B
RL
AUDIO OUT
COAXIAL R
L
DIGITAL AUDIO OUT
AUDIO IN
VIDEO IN
VIDEO
OUT
S-VIDEO IN
S-VIDEO
OUT
CRCBY
COMPONENT
VIDEO IN
Y
COMPONENT
VIDEO OUT
C
R
/P
R
VIDEO
OUT
C
B
/P
B
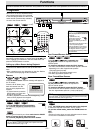
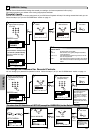
(Analog) AUDIO OUT VIDEO OUT
TV
Method 1
Good pictureBasic Audio
Method 2 Method 3
Better picture Best picture
S-VIDEO OUT COMPONENT VIDEO OUT
Video
cable
(supplied)
Audio cable
(supplied)
S-Video
cable
(commercially
available)
Component
Video cables
(commercially
available)
Note
•
Connect this unit directly to the TV. If the A/V cables are connected to a VCR, pictures may be distorted due to the copy protection system.
DVD player
Connection to a TV
Connections
If your TV has AUDIO/VIDEO input jacks, see the following instructions. If not, see
the section “Before using your DVD player” on the front page.
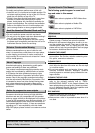
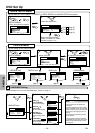
Setup
If your TV is compatible with progressive scanning (480p) and you want to enjoy
that high quality picture;
You must select the connection Method 3 above and progressive scanning mode.To set the mode,
press and hold the PLAY button on the front panel for more than 5 seconds, so that “P.SCAN” will
appear on the display of this unit.
If your TV is not compatible with progressive scanning;
Use this unit in interlace mode. Make sure that no “P.SCAN” is on the display of this unit. If not, press
and hold the PLAY button on this unit for more than 5 seconds, so that “P.SCAN” on the display of
this unit will disappear.
POWER SKIP SKIPPLAY STOP
more than 5 seconds
[Interlace mode]
[Progressive scanning mode]
[DVD]