


9
RQT8997
(Continued on the next page)
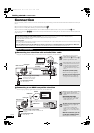
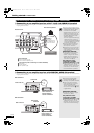
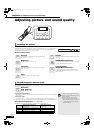
C Connecting to an HDMI compatible television and HDMI compatible
amplifier/receiver
You can connect the player to your HDMI compatible amplifier/receiver with an HDMI cable to enjoy digital surround sound along with
high quality digital video. Using an additional HDMI cable, you can connect the amplifier/receiver to your HDMI compatible television.
≥This unit comes equipped with a Dolby Digital
Plus, Dolby TrueHD and DTS-HD
§
decoder.
When connected to a compatible amplifier/
receiver using the HDMI AV OUT terminal, you
can enjoy surround sound recorded with Dolby
Digital Plus, Dolby TrueHD or DTS-HD.
§
This unit supports DTS-HD High Resolution
Audio, however it does not support DTS-HD
Master Audio. DTS Digital Surround will be
used as an alternative.
≥When you use 1080p (1125p) video output,
please use Panasonic HDMI cables 5 meters
(16.4 ft.) or shorter.
NECESSARY SETTINGS
≥From the Setup menu (➡ 23), set “HDMI Video
Mode” and “HDMI Audio Output” to “On”
≥If the speaker setup cannot be completed on
the amplifier/receiver, change multi channel
speaker settings by selecting “Multi
-channel” in
“Speaker” of “Connection” tab (➡ 23).
≥If connecting to an amplifier/receiver
incompatible with HDCP (➡ 29, Glossary),
copy-protected DVD-Audio cannot be output
through the HDMI terminal. Connect to the
amplifier/receiver with audio cables (red and
white), coaxial cable, or optical digital audio
cable (➡ 10).
With this connection, you can use EZ
Sync “HDAVI Control”
≥See page 18 for the details.
Connection methods for using other video terminals
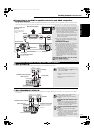
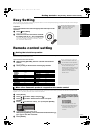
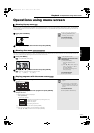
D With S VIDEO IN
The S VIDEO OUT terminal achieves a more vivid picture than the VIDEO OUT terminal.
≥High definition video cannot be output with
this connection.
Use connection B(➡ 8) or C (➡ above) for
high definition video.
≥Unplug the yellow plug of Audio/Video
cable.
≥Actual video quality depends on the
television.
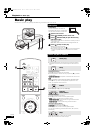
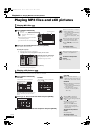
E With COMPONENT VIDEO IN
These terminals can be used for either interlace or progressive output (➡ 29, Glossary) and provide a purer picture than the S VIDEO
OUT terminal.
≥Select “Darker” from the “Black Level
Control” (➡ 22, “Video” tab).
≥Unplug the yellow plug of Audio/Video
cable.
Regarding the high definition video
output
≥Some discs prohibit high definition video
output from COMPONENT VIDEO OUT
terminals. In this case, video resolution is
converted and output as 480p.
To enjoy high definition/progressive
video
≥Connect to a progressive compatible
television.
≥From the Setup menu (➡ 22), select “480p”
, “720p” or “1080i” in “Component Video
Resolution” of “Connection” tab.
≥From the Setup menu (➡ 23), set “HDMI
Video Mode” to “Off”. Otherwise, the video
is output as 480i.
AV OUTAV OUT
Manufactured
S VIDEO
OUT
VIDEO OUT
Please connect
directly to TV.
COMPONENT
VIDEO OUT
DIGITAL AUDIO
OUT
(PCM/BITSTREAM)
COAXIAL
OPTICAL
2ch AUDIO OUT
7.1ch AUDIO OUT
L
1
2
R
FRONT R /R
CENTER
SUBWOOFER
SURROUND
R
L
SURROUND
BACK
R
L
FRONT L /L
PR
Y
P
B
AC IN
HDMI IN
HDMI OUT
HDMI IN
HDMI AV OUT
Multi channel speakers
HDMI
compatible
television
Back of the unit
AC power supply cord
(included)
Connect only after all
other connections are
complete.
To a household AC outlet
(AC 120 V, 60 Hz)
HDMI cable
HDMI compatible
amplifier/receiver
Cooling fan
NOTE
TIPS
Manufactured
S VIDEO
OUT
VIDEO OUT
Please connect
directly to TV.
COMPONENT
VIDEO OUT
DIGITAL AUDIO
OUT
(PCM/BITSTREAM)
COAXIAL
OPTICAL
2ch AUDIO OUT
7.1ch AUDIO OUT
L
1
2
R
FRONT R /R
CENTER
SUBWOOFER
SURROUND
R
L
SURROUND
BACK
R
L
FRONT L /L
PR
Y
P
B
AUDIO IN
R L
S VIDEO IN
Back of the unit
Audio/Video cable (included)
S Video cable
Television
NOTE
COMPONENT
VIDEO IN
AUDIO IN
R L
Manufactured
S VIDEO
OUT
VIDEO OUT
Please connect
directly to TV.
COMPONENT
VIDEO OUT
DIGITAL AUDIO
OUT
(PCM/BITSTREAM)
COAXIAL
OPTICAL
2ch AUDIO OUT
7.1ch AUDIO OUT
L
1
2
R
FRONT R /R
CENTER
SUBWOOFER
SURROUND
R
L
SURROUND
BACK
R
L
FRONT L /L
PR
Y
P
B
Back of the unit
Audio/Video cable (included)
Component Video cable
Connect to the terminals
that match the colors of
the plugs.
Television
NOTE
TIPS
Getting started 11 Connection
Getting started
DMP-BD10PP_Book1.book Page 9 Friday, April 6, 2007 7:06 PM