


• Timer Recording • Location of Controls (Remote Control Buttons, Front View of the VCR)
COMMERCIAL SKIP/
ZERO SEARCH
(
Starts COMMERCIAL SKIP/ Zero Search
)
INPUT
(For LINE or channel)
POWER
(Turns VCR off/on)
PLAY (Plays a tape)/
FAST FORWARD/SEARCH
(Fast forwards tape/ forward visual
search)
REWIND/SEARCH
(Rewinds tape/ reverse visual
search)
STOP (Stops tape)
CHANNEL /
TRACKING/ V-LOCK
(Selects channel/ reduces
picture noise during Play and
Slow mode)
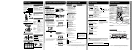
Remote Control Buttons
VCR/TV
(For TV or VCR mode)
SPEED
(Changes tape speed)
SEARCH/ ENTER
(Set search system /Tunes TV channel)
NUMBER Keys
(Selects channel directly)
TV (mode)
(Enables TV functions)
TAPE POSITION
(Locates tape position)
EJECT
(Ejects tape)
ACTION
(Displays menu)
PAUSE/SLOW
(Displays still, frame by frame,
or slow motion picture)
COUNTER RESET
(Resets counter to zero)
RECORD
(Records a program, etc.)
ADD/DELETE
(Adds or deletes a channel)
VCR (mode)
(Enables VCR functions)
VOLUME
+
/
-
(Adjusts TV volume)
SAP/Hi-Fi
(Selects audio mode for play
or record)
DISPLAY
(Displays VCR status)
COUNTER
RESET
TA PE
POSITION
PAUSE/SLOW
ACTION
SEARCH
TRACKING
EJECT
VCR/TV
INPUT
DISPLAY
CM/ZERO
VOL CH
REC
POWER
1
2
3
4
5
6
7
8
9
100
0
ADD/DLT
REW
PLAY
STOP
FF
VCR TV
SELECT
SPEED
SAP/Hi-Fi
PROG
Location of Controls
PROGRAM
(Displays Timer Program screen)
Front View of the VCR
RECORD
STOP/EJECT
Cassette Compartment
POWER
REWIND/
SEARCH
PLAY
CHANNEL
/
TRACKING/ V-LOCK
Remote
Sensor
FAST
FORWARD/
SEARCH
Video
Input
Connector
Audio Input
Connector
(L/R)
Remote Control
EJECT button:
Press to eject tape. EJECT is not available during recording.
*Important: If a remote control button does not work when pressed,
press the VCR button on the remote and try the button again.
- 7 -
PLAY, STOP, REW, and FF
function as
operation keys when menus
are displayed.
Remote keys
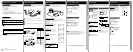
Timer Recording
1 1) Press PROG*.
2) Press
to display program screen.
Press PROG to end programming.
2
2) Set remaining items,
press
to select and
press
to set START/ STOP times, CH (channel) or
LINE input (p. 9 of Advanced Operations book), and
tape speed (p. 3).
1) Set record DATE,
press
to select:
1~31= one time,
or DAILY= MON~ FRI,
or WEEKLY= same time
each week and press
.
3
To Enter More Programs
Press
to select and
press
to set an unused program.
Then repeat step 2.
Or, press PROG to exit.
Timer Recording
Example
Today
Press to select
desired program.
4
Press POWER off to set the timer recording. (“TIMER” lights on Multi Function Display.)
(Recording is not in progress)
a 1) Press PROG.
2) Press
to select LIST.
b
c
To Replace program...
d Press PROG to end the programming.
• If you are using a Cable Box, VCR Timer Programming Channel (Step 2 above) must
be set to the Cable Box output channel and your Cable Box must be manually set to
the desired channel. The Cable Box must be left on.
• If a power interruption occurs while programming the timer, the timer program(s) may be
canceled. If “TIMER PROGRAMS WERE LOST DUE TO POWER INTERRUPTION” appears
on-screen, please re-enter the timer programs.
Important notes when using DSS receiver
• When recording programs via DSS receiver, DSS receiver must be left on.
• When recording programs via an antenna or cable, DSS receiver must be turned off.
Review, Replace, or Clear Program
1) Press to display.
2) Repeat Step 2
(above) to set new
programs.
Press ADD/DLT.
or
To Clear program...
Press POWER and then STOP within 10
seconds to cancel the Timer Recording.
(The TIMER indicator goes out on Multi
Function Display.)
Cancel a Timer Recording
(Recording is in progress)
- 6 -
Notes
DAILY
7
21
31
68 9
SELECT / Selection Order
WEEKLY
(SAT)
WEEKLY
(MON)
WEEKLY
(SUN)
TIMER PROG.
L
I
ST
C
AN
C
EL
:
A
DD
/
DLT
SELECT :
SET :
EXIT
: PROG
DT
STA
R
T
ST
O
P
CH
SPD
7 9
:
00
A
12
:
00
A
08
SP
8
10
:
00
P
12
:
00
P
02
SP
10
8
:
00
P
9
:
00
P
10
SP
S
U
9
:
00
P
10
:
00
P
L1
LP
TIMER
PROG.
LIST
SELECT START DATE
DATE START
ST
O
P
C
H
SP
T
OD
A
Y
7
SUN
9
:
00A
12
:
00A
08
SELECT
:
END
: PROG
SET:
TIMER PROG.
L
I
ST
DT
STA
R
T
ST
O
P
CH
SPD
13
2 : 00
P
3
:
20
P
0
2
SLP
--
--
:
--
--
:
--
--
--
--
--
:
--
--
:
--
--
--
--
--
:
--
--
:
--
--
--
C
AN
C
EL
:
A
DD
/
DLT
SELECT :
SET :
EXIT
: PROG
SELECT
:
END
: PROG
DATE START
ST
O
P
C
H
SLP
SET:
SELECT START DATE
T
OD
A
Y
13
SA
T
--:--
--:--
--
TIMER
PROG.
LIST
TIMER PROG.
L
I
ST
C
AN
C
EL
:
A
DD
/
DLT
SELECT :
SET :
EXIT
: PROG
DT
STA
R
T
ST
O
P
CH
SPD
--
--
:
--
--
:
--
--
--
8
10
:
00
P
12
:
00
P
02
SP
10
8
:
00
P
9
:
00
P
10
SP
S
U
9
:
00
P
10
:
00
P
L1
LP
• Connections • Initial Setup • Clock Set • Select Channel • Playback • Record • Auto Operation
This video recorder, equipped with
HQ (High Quality) system, is
compatible with existing VHS
equipment. Only use tapes with the
mark. Only tapes tested and
inspected for use in 2, 4, 6, and 8
hour machines are recommended.
*Important: If a remote control button does not work when pressed,
press the VCR button on the remote and try the button again.
- 5 -
1
Insert a tape with a record tab (p. 3).
1 Insert a tape.
Special Features During Play
2
Press PLAY to play tape.
• If tape has no rec. tab (p. 3), auto play begins.
Record on a Tape
Forward/Reverse Scene Search
➛ Press FF or REW.
➛ Press PLAY to release.
After search has begun, each additional
press of FF or REW changes speed as
shown below.
[SLP] : Approx. 21X
↔ Approx. 9X
[LP] : Approx. 9X
↔ Approx. 7X
[SP] : Approx. 7X
↔ Approx. 3X
If at 21X, 9X, or 7X speed the picture is
interrupted, change speed to 9X, 7X, or 3X.
Still (Freeze) Picture
➛ Press PAUSE/SLOW.
➛ Press PLAY to release.
Frame by Frame Picture
➛ Press PAUSE/SLOW in Still mode.
➛ Press PLAY to release.
Slow Motion Picture
➛ Hold down PAUSE/SLOW in Still mode.
➛ Press PLAY to release.
• Loose or peeling labels
may cause tape jam.
• VCR power comes on. “VCR” lights
on Multi Function Display.
If Auto VCR/TV (see p. 10 of
Advanced Operations book) is set to
“OFF,” press VCR/TV until “VCR”
lights on the Multi Function Display.
• These features work best in SP or SLP mode.
• The sound will be muted.
• To reduce picture noise, see “Manual
Tracking Control” on p. 3.
• After VCR is in Still or Slow mode 3 minutes, it
auto switches to Stop mode to protect the tape
and the video heads.
Press REW or FF in Stop mode to
Rewind or Fast Forward tape.
Press EJECT on remote,
or STOP/EJECT on VCR to eject tape.
3 Press STOP to stop tape.
Playback a Tape
• Picture interruption may occur with some TVs.
• FF and REW search speed may vary
depending on current tape position.
Notes
Playback / Record on a Tape
Auto Play
Insert a tape ➛ Power comes on ➛ Play starts if there is no record tab (see p. 3).
Auto Rewind
Play
Fast Forward
Play Auto Eject
(Repeat Play must be off)
Play ➛ Tape end ➛ Rewind ➛ Tape ejects if there is no record tab
Auto Operation Functions
Notes
➛ Tape end ➛ Rewind
Connections / Initial Setup (Ready to Play)
Connecting
Connect cable from
Antenna/Cable to VCR’s IN
FROM ANT. jack.
Connect VCR’s OUT TO TV
jack to TV’s ANT. IN jack
with included RF Cable
accessory.
For ANT./Cable
➛➛
➛➛
➛
VCR
➛➛
➛➛
➛
TV
For DSS/Cable Box
➛➛
➛➛
➛
VCR
➛➛
➛➛
➛
TV
Connect your cable box’s
OUT jack to the VCR’s IN
FROM ANT. jack with an RF
cable.
Connect VCR’s OUT TO TV
jack to TV’s ANT. IN jack
with included RF Cable
accessory.
1
2
1
2
Please make all cable or antenna connections before plugging into the AC
outlet.
Plugging the VCR Power Cord into an AC wall outlet starts auto channel and clock set.
1 Turn TV on and tune to channel 3.
2 Plug VCR Power Cord into AC wall
outlet. VCR comes on and auto
channel and clock set starts.
• If screen below does not appear, check
VCR - TV connection and, if TV is
tuned to channel 3, try switching it to
channel 4.
• To change VCR’s output channel,
please refer to “VCR’s Output Channel”
in Advanced Operations book (p. 12).
If you use a cable box, turn it on and set it
to the Public Broadcasting Station (PBS)
channel in your time zone. If you use a
DSS receiver, it must be turned off.
Initial Setup (Ready to Play)
3 Settings are made automatically.
When setup is done, this screen
appears.
VCR CLOCK CHANNEL
6
/
08
/
20
0
3
SUN
2
:
20P
M
D
S
T
:
ON
SETT
I
N
G
: CH
10
AUTO CLOCK SET
C
O
M
PLETED
If “AUTO CLOCK SET IS INCOMPLETE”
appears, manually set clock.
See below.
Manual Clock Set
If Auto Clock Set was incomplete.
1 Press ACTION* on remote to display
CLOCK menu.
VCR CLOCK CHANNEL
SELECT MONTH
DST:ON
1
/ /
:
SELECT :
SET :
EXIT
:
ACT
I
O
N
2 Press to select the month and
to set. In the same manner, select and
set the date, year, time, and DST
(Daylight Saving Time).
3 Press ACTION to start clock and exit.
- 4 -
Plugging the AC Power Plug into an AC outlet
VCR CLOCK CHANNEL
SET COMPLETED
DST:ON
6
/
08
/
20
0
3
SUN
2
:
20P
M
START
:
ACT
I
O
N
SET
:
IN FROM ANT.
TV
VCR
VHF/UHF
OUT
TO
TV
IN from
ANT./CABLE
1
2
IN FROM ANT.
TV
VCR
VHF/UHF
OUT
TO
TV
IN from
ANT./CABLE
Cable TV
Converter Box
1
2
Congratulations
on your new purchase! With proper use, this
dependable product will provide years of
enjoyment. Please fill in the information below.
(Serial number is on tag on back of VCR.)
Before Using
RF Coaxial
Cable
LSJA0372
Batteries 2 “AA”
Remote Control
LSSQ0389
Accessories
To order accessories, call toll free
1-800-332-5368.
Loading the Batteries
• Date of Purchase
• Dealer Purchased From
• Dealer Address
• Dealer Phone No.
• Model No.
PV-V4523S
• Serial No.
Battery replacement caution
• Do not mix old and new batteries.
• Do not mix alkaline with manganese batteries.
Only use tapes with the mark in this unit.
Prevent Accidental Tape Erasure
Record/Playback Time
To record again
Break off the tab to
prevent recording.
SP
(Standard Play)
2 Hours
40 Minutes
1 Hour 2 Hours
5 Hours
20 Minutes
2 Hours
4 Hours
LP
(Long Play)
3 Hours
6 Hours 8 Hours
SLP
(Super Long Play)
Type of Video Cassette
Tape Speed
Setting
T160T120T60
Power Source: 120 V AC, 60 Hz
Power Consumption:
Power On
Approx. 23 W
Power Off
Approx. 3.0 W
Video Signal: EIA Standard NTSC color
Video Recording 4 rotary heads helical
System: scanning system
Audio Track: 1 track (Normal)
2 channel (Hi-Fi Audio Sound)
Tuner:
Broadcast Channels: VHF 2 ~ 13, UHF 14 ~ 69
CABLE Channels: Midband A ~ I (14 ~ 22)
Superband J ~ W (23 ~ 36)
Hyperband AA ~ EEE
(37 ~ 64)
Lowband A-5 ~ A-1 (95 ~ 99)
Special CABLE channel 5A
(01)
Ultraband 65 ~ 94, 100 ~ 125
Operating
Temperature: 5 °C ~ 40 °C (41 °F ~ 104 °F)
Operating Humidity: 10 % ~ 75 %
Weight: 2.5 kg (5.5 lbs).
Dimensions: 360 (W) x 93 (H) x 242 (D) mm
14-3/16” (W) x 3-11/16” (H) x
9-9/16” (D) inch
Specifications
Head Cleaning
Use soft, dry cloth or dusting attachment of a
vacuum to remove dust from all cabinet vent
holes. You may moisten cloth with nonabrasive,
antistatic cleaner/ polisher.
Caution:
Alcohol and various solvents could damage
finish.
Cleaning the VCR
Note: Designs and specifications are subject
to change without notice.
Digital Auto Picture
Automatically controls the video output signal for
less noise depending on the tape condition.
Digital Auto Tracking
Continuously analyzes the signal and adjusts for
optimum picture quality.
Manual Tracking Control
(to reduce picture noise)
Use during Playback and Slow Motion mode to
reduce picture noise.
Press CH (TRACKING)
/ on the remote
control or on the VCR until the picture clears up.
To return to Auto Tracking, press POWER off,
then on again a few seconds later.
V-Lock Control (to reduce picture jitter)
In Still mode, CH (TRACKING)
/ operate as a
V-Lock control.
Features for a Quality Picture
• Important Safeguards • Accessories • Head Cleaning • Loading Batteries • Prevent Tape Erasure • Specifications • Record/Playback Time
- 3 -
COUNTER
RESET
TAPE
POSITION
PAUSE/SLOW
ACTION
SEARCH
TRACKING
EJECT
VCR/TV
INPUT
DISPLAY
CM/ZERO
VOL CH
REC
POWER
1
2
3
4
5
6
7
8
9
100
0
ADD/DLT
REW
PLAY
STOP
FF
VCR TV
SELECT
SPEED
SAP/Hi-Fi
PROG
Record Tab
Screw driver
Cover the hole
with cellophane
tape.
Video Head Clog Sensor
Screen-right appears during
play if clogging is detected.
To remove screen, press
PLAY.
• Use “dry” type head
cleaning cassette only.
(Part No. NV-TCL30PT is recommended.)
• Follow cleaning tape instructions carefully.
Excessive use of tape can shorten head life.
Old or damaged tapes may clog heads.
V
I
D
EO HEADS
M
AY
N
EED
CLE
A
N
I
NG
PLEASE
I
NSERT
HEAD
CLE
A
N
I
NG
CASSE
TT
E
OR
REFER
T
O
MANUAL
END
:
P
L
AY
R
R
R
R