


6 7
Quick Start Guide
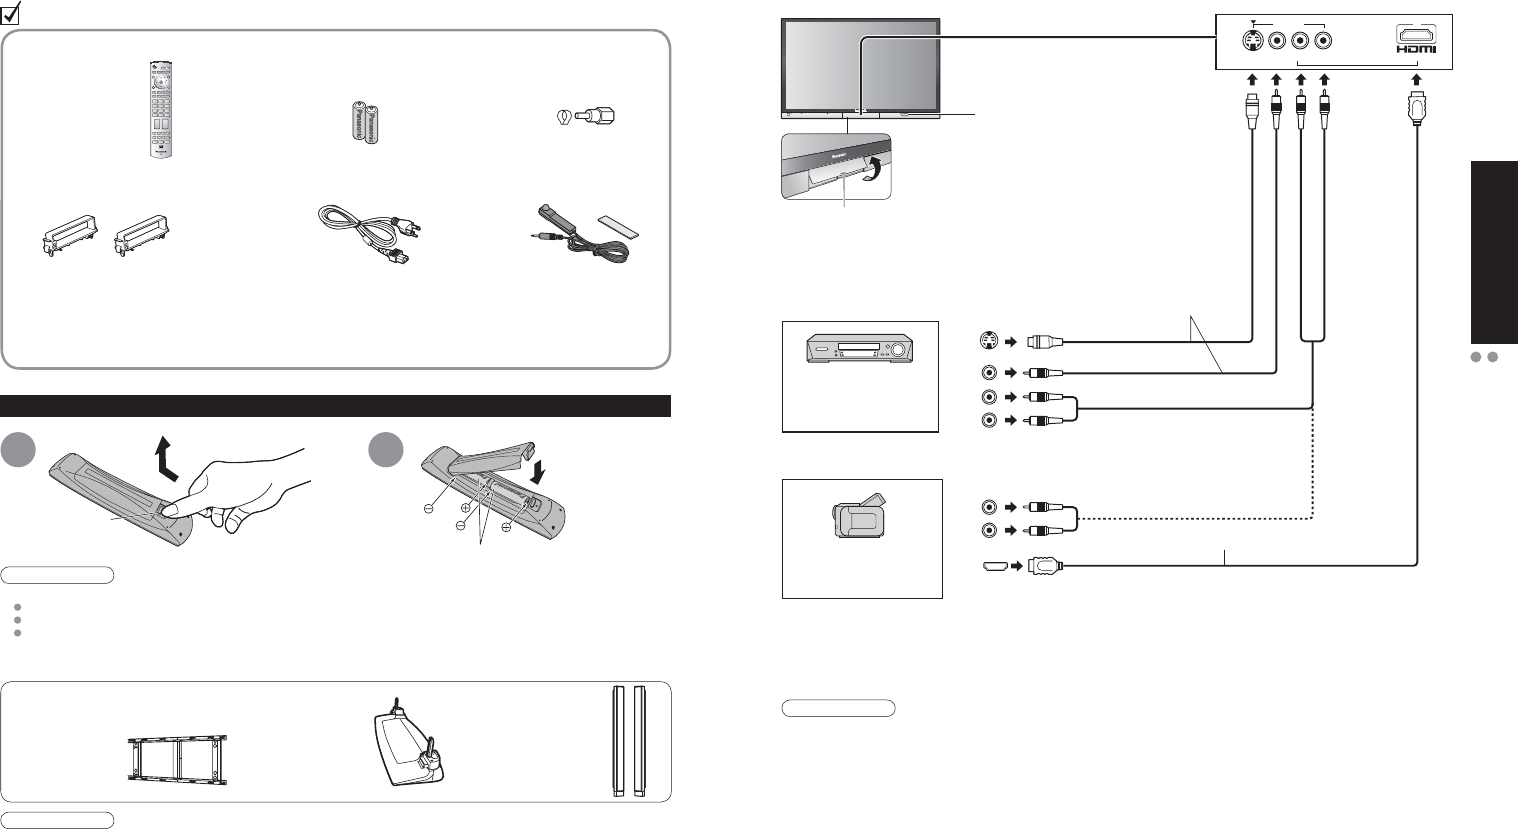
Connection
Accessories/Options
HDMI
OUT
Audio
OUT
Video
OUT
S-Video
OUT
L
R
Audio
OUT
L
R
S VIDEO VIDEO
INPUT3
L-AUDIO-R HDMI3 AUDIO IN AV IN
3
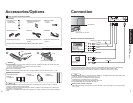
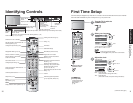
Accessories/Options
Installing remote’s batteries
1
Open
Hook
2
Note the correct polarity (+ or -).
Close
Caution
•
Incorrect installation may cause battery leakage and corrosion, resulting in damage to the remote control unit.
Do not mix old and new batteries.
Do not mix different battery types (such as alkaline and manganese batteries).
Do not use rechargeable (Ni-Cd) batteries.
•
Do not burn or break batteries.
•
Make a note of the remote control codes before changing batteries in case the codes are reset. (p. 47-48)
Wall-hanging bracket
(vertical)
•
TY-WK65PV7
Optional accessories
Ƒ
Batteries for the Remote
Control Transmitter
(2)
•
AA Battery
Ƒ
AC cord
Ƒ
Remote Control
Transmitter
•
EUR7737Z40
Ƒ
Cable clamper (2)
Ƒ
Antenna Adapter
•
F-Type
for 5C-2V
Ƒ
IR Blaster
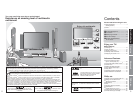
Accessories
Check you have all the items shown.
Note
•
In order to maintain the unit’s performance and safety, be absolutely sure to ask your dealer or a licensed
contractor to secure the wall-hanging brackets.
•
Carefully read the instructions accompanying the speaker or pedestal, and be absolutely sure to take steps to
prevent the TV from tipping over.
•
Handle the TV carefully during installation since subjecting it to impact or other forces may cause its paneling to
crack.
Pedestal
TY-ST65PV500
Speakers
TY-SP65PV600
Ƒ
Product Registration Card
(U.S.A.)
Ƒ
Operating Instructions
Ƒ
Customer Care Plan Card
(U.S.A.)
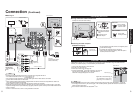
Connection
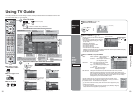
If the external device has DVI output only, use a DVI to HDMI adapter cable to connect to the HDMI terminal.
Connect the audio cables to the AUDIO L-R terminals when using a DVI to HDMI adapter cable.
Audio settings can be made on the “HDMI1 in”, “HDMI2 in” or “HDMI3 in” menu screen. (p. 28-29)
Note
•
When connecting to HDMI 3, set the input mode to “HDMI 3” (p. 26) initially before connecting to HDMI 3. After
connection, confirm the HDMI control functions (p. 32-33).
•
This input terminal is not intended for use with computers.
•
All signals will be re-formatted to view on your display.
•
If the external devices have the aspect adjustment, set to 16:9.
•
For applicable HDMI signals information see page 52.
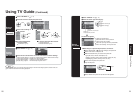
VCR / S-VIDEO VCR
DVD PLAYER
CAMCORDER /
S-VIDEO CAMCORDER
HDMI compatible
machine only
Connect the S VIDEO or VIDEO terminal.
S VIDEO
VIDEO
AUDIO
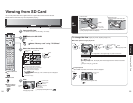
SD CARD slot
Swing up the door at “PULL”.
Ŷ
Connect the AV terminals (INPUT 3)
Ŷ
Connect the HDMI terminal (HDMI 3 AUDIO IN)
or
HDMI cable
Ŷ
Setting of this unit after connection
After making connections as shown above, set “Ctrl with HDMI” (under “Other adjust”) to “On” using the Setup
menu. (p. 32).
Ƒ
Notice about “Downloadable Region Rating Table (RRT) system”