


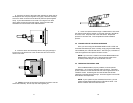


4.0 INSTALLATION
Once you have properly configured the DTE/DCE switch, you are
ready to connect the Model 222N to your system. This section tells you
how to properly connect the Model 222N to the RS-422 and RS-232
interfaces, and how to operate the Model 222N.
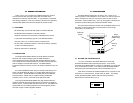
4.1 CONNECTION TO THE RS-422 INTERFACE
The Model 222N supports data-only communication distances up
to 4000 feet between itself and the RS-422 device. To function
properly, the Model 222N
must
have two twisted pairs of metallic wire.
These pairs must be dry, unconditioned metallic wire, between 19 and
26 AWG (the higher number gauges may limit distance somewhat).
For your convenience, the Model 222N is available with several
different physical interfaces on the RS-422 side: DB-25 (following the
RS-530 standard), RJ-11 jack, RJ-45 jack, and terminal blocks with
strain relief.
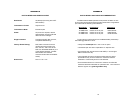
4.1.1 RS-422 CONNECTION USING THE DB-25
The DB-25 connector on the Model 222N's RS-422 side conforms to
the RS-530 interface standard (See Appendix C). When connecting to
an RS-422 device that also conforms to the RS-530 standard, your
cable should be "crossed over" in the manner shown below:
MODEL 222N RS-422 (530) DEVICE
SIGNAL
DB-25 PIN
†
DB-25 PIN SIGNAL
XMT+ 2............................3 RCV+
XMT- 14..........................16 RCV-
RCV+ 3............................2 XMT+
RCV- 16..........................14 XMT-
†
The DB-25 connector that is farthest from the DTE/DCE switch
NOTE: It is not necessary that the RS-422 device adhere to the RS-530
standard. However, you must make sure that the signals, polarities, and
pairing of your connection conform to the above diagram.
5
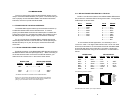
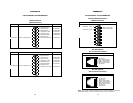
4.1.2 RS-422 CONNECTION USING RJ-11 OR RJ-45
The RJ-11 and RJ-45 connectors on the Model 222N's RS-422 side
are pre-wired for a standard TELCO wiring environment. The signal/pin
relationships are shown below:
RJ-1
1 SIGNAL RJ-45 SIGNAL
1...................GND* 1 .................N/C
2...................RCV- 2 .................GND*
3...................XMT+ 3 .................RCV-
4...................XMT- 4 .................XMT+
5...................RCV+ 5 .................XMT-
6...................GND 6 .................RCV+
7 .................GND
8 .................N/C
In most modular RS-422 applications, it is necessary to use a
"cross over" cable. The diagram below shows how a cross over cable
should be constructed for an environment where both the Model 222N
and the RS-422 device use a 6-wire RJ-11 connector. Similar logic
should be followed when using RJ-45 connectors or a combination of
the two.
MODEL 222N RS-422 DEVICE
SIGNAL
PIN# COLOR COLOR PIN# 422 SIGNAL
GND
†
1 Blue
‡
................N/C
RCV- 2 Yellow ..............Red 4 XMT-
XMT+ 3 Green...............Black 5 RCV+
XMT- 4 Red..................Yellow 2 RCV-
RCV+ 5 Black................Green 3 XMT+
GND
†
6 White ...............N/C
†
Connection to ground is optional
‡
Standard AT&T color codes—yours may be different
6
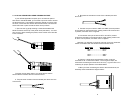
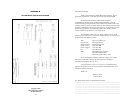
1 - Blue
2 - Yellow
3 - Green
4 - Red
5 - Black
6 - White
1 - Blue
2 - Orange
3 - Black
4 - Red
5 - Green
6 - Yellow
7 - Brown
8 - Slate