


C258M-A (4/00)
WM3026
Heavy-Duty Wall Mount
®
IMPORTANT SAFEGUARDS AND WARNINGS
Prior to installation and use of this product, the following WARNINGS should be observed.
1. Installation and servicing should only be done by qualified service and installation personnel.
2. Installation shall be done in accordance with all local and national electrical and mechanical
codes utilizing only approved materials.
3. Use only installation methods and materials capable of supporting four times the maximum
specified load.
4. Use stainless steel hardware to fasten the mount to outdoor surfaces.
5. To prevent damage from water leakage when installing a mount outdoors on a roof or wall,
apply sealant around the bolt holes between the mount and mounting surface.
The product and/or manual may bear the following marks:
Please thoroughly familiarize yourself with the information in this manual prior to installation and
operation.
This symbol indicates that there are important operating and maintenance instructions
in the literature accompanying this unit.
3500 Pelco Way,
Clovis, CA 93612-5699
USA
In North America & Canada:
Tel (800) 289-9100
FAX (800) 289-9150
International Customers:
Tel +1(559) 292-1981
FAX +1(559) 348-1120
www.pelco.com
DESCRIPTION
The WM3026 Wall Mount will support a heavy-duty enclosure and/or pan/tilt. The wall mount will
hold loads up to 300 pounds (136.08 kg) when directly attached to any vertical load-bearing
structure.
INSTALLATION
Mounting to Surface
To install the WM3026 perform the following steps:
1. Determine the mounting location. The mounting surface should be able to support four
times the combined weight of the mount, pan/ tilt, camera and enclosure.
2. Use the flanged end of the WM3026 as a template and mark the six fastener hole positions
onto the mounting surface. Set the WM3026 mount to the side and prepare the holes for the
fasteners.
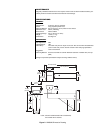
3. Use one of the following methods to prepare the wiring/cabling for power. Refer to Figure 1.
a. Thread wiring/cabling through the mount arm and exit through the top feedthrough
hole.
b. Thread the wiring/cabling through one of the 3/4-inch NPT holes on the side of the
mount arm and out the top feedthrough hole. Flexible, metal conduit connectors can
be used.
c. Bypass the mount and directly connect wiring to the camera, enclosure and/or pan/tilt.
Fold the wiring out of the way and secure.
4. Position the WM3026 mount over the mounting holes. Secure with a minimum of six, 3/8-inch
fasteners of appropriate length (not supplied). If you install the WM3026 outdoors, seal the
fastener holes with an appropriate sealant to prevent water damage. Apply the sealant be-
tween the mount and the mounting surface.