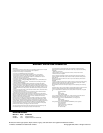
Figure 1. WM3026 Heavy-Duty Wall Mount
TILT TABLE ASSEMBLY
(TOP & LOWER BRACKETS)
PAN/TILT ADAPTOR
GUSSET
CABLE TIE HOLE
RECEIVER MOUNTING
HOLES
FASTENER HOLE
ARM
TOP FEEDTHROUGH HOLE
HEX HEAD BOLTS
3/4-NPT
THREADED
HOLE
Camera/Enclosure Mounting
To install the camera and/or enclosure directly to the mount, refer to Figure 1 and do the following:
1. Center the camera and/or enclosure on the tilt table.
2. Attach the camera and/or enclosure to the tilt table with 1/4-20 flat head fasteners (not pro-
vided).
3. Connect wiring/cabling to the camera and/or enclosure. Refer to the manual supplied with
the equipment for more information.
4. Loosen the hex head bolts on the top and lower brackets of the tilt table. Adjust the pan and
tilt to the desired settings. Tighten bolts and lock into place.
Pan/Tilt and Camera/Enclosure Mounting
To install the pan/tilt, camera and/or enclosure directly to the mount, refer to Figure 1 and per-
form the following steps:
1. Remove the tilt table from the WM3026.
2. Center the pan/tilt, camera and/or enclosure on the pan/tilt adapter. Position as needed to
align mounting holes. Secure the load to the mount using appropriate fasteners (not sup-
plied). Refer to the manuals supplied with the equipment for more information.
3. Connect wiring /cabling to the camera, enclosure and pan/tilt. For proper installation of wiring/
cabling, refer to the manuals supplied with the equipment. Be sure to leave an adequate
loop of cables to prevent binding and/or strain where applicable.
Receiver Mounting
To mount a receiver to the gusset of the WM3026 refer to Figure 1 and do the following:
1. Line up the mounting holes on the receiver with the mounting holes on the gusset.
Mount-
ing holes are six inches apart. If the receiver’s mounting holes are
not
six inches apart,
attach it to a flat, vertical surface. Refer to the manual supplied with the receiver.
2. Attach the receiver to the gusset using 1/4-inch fasteners (not supplied) of the appropriate
length.
3. Use the four cable tie holes located on the bottom edge of the gusset (cable ties not in-
cluded) and secure the wiring/cabling.


