


C2220M-A (1/06) 3
Installation
The following parts are supplied:
Qty Description
2 Preassembled rack mounts
8 Screws, 10-32 x 0.750-inch, Phillips, pan head, black
8Nylon washers
4 Screws, M4 x 0.70 x 6 mm, Phillips, pan head, stainless steel
4 Lock washers
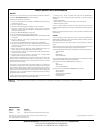
1. Tighten the lock nuts (refer to Figure 1) so they are loose enough to allow the brackets to move but tight enough to hold them in place.
2. Attach the rack mounts to the monitor using the four stainless steel, pan head screws and lock washers. Refer to Figure 1.
Figure 1. Attaching Rack Mounts to Monitor
3. Attach the rack mounts to the equipment rack using the eight black, pan head screws and nylon washers. Align the top slots of the mounts
with mounting holes on the equipment rack that have 0.5-inch spacing below them. All eight mounting slots will align with the holes in the
rack only if the mounts are in the correct position.
4. Swivel the monitor forward or backward to position it to the proper viewing angle.
(4) SCREWS,
M4 X 0.70 X 6MM,
PHILLIPS, PAN HEAD
(4) LOCK WASHERS
(2) LOCK NUTS