


7
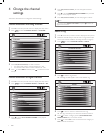
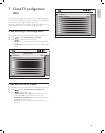
Congure SmartGuide Categories
This section provides information to congure SmartGuide Categories
icons. Guests can access these icons by pressing the CHANNEL
GUIDE button on the guest remote control to display the SmartGuide
Categories screen. Refer to the previous chapter for information to
assign TV channels to categories (see ‘Select a ring’ on page 4).
1 Press M on the setup remote control to display the setup menu.
2 Press to select CONFIGURATION > SMARTFEATURES
> SMARTGUIDE CATEGORIES.
3 Press to select one of the following to congure the
settings:
• CHANNEL GUIDE KEY: Sets the default screen that will be
shown when you press the CHANNEL GUIDE button on the
remote control. Select between SMARTGUIDE categories or
CHANNEL LIST screen.
• HIGH DEFINITION: Enables or disables the high denition icon
in the SmartGuide Categories screen.
• SPORTS: Enables or disables the sports icon in the SmartGuide
Categories screen.
• NEWS: Enables or disables the news icon in the SmartGuide
Categories screen.
• KIDS: Enables or disables the kids icon in the SmartGuide
Categories screen.
• MOVIES: Enables or disables the movies icon in the SmartGuide
Categories screen.
• NETWORK: Enables or disables the network icon in the
SmartGuide Categories screen.
• ADULT: Enables or disables the adult icon in the SmartGuide
Categories screen.
• LIFESTYLE: Enables or disables the lifestyle icon in the
SmartGuide Categories screen.
• OTHERS: Enables or disables the others icon in the SmartGuide
Categories screen.
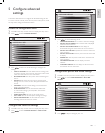
Congure SmartSecure settings
1 Press M on the setup remote control to display the setup menu.
2 Press to select CONFIGURATION > SECURITY >
SMARTSECURE.
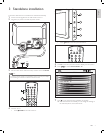
LOW POWER STANDBY
SMARTFEATURES
SMARTPOWER
OFF
NO
AUTOSENSE
NO
USB BREAK-IN
SW DOWNLOAD
NO
SMARTUPDATE
NO
>
SMARTGUIDE CATEGORIES
>
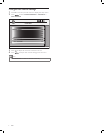
6 Configure SmartFeatures
settings
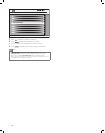
Congure SmartPower settings
Philips continuously focuses on lowering the environmental impact
of its consumer products by adopting energy efcient ways of power
management.
This section describes how to select a setting for maximum power
savings.
1 Press M on the setup remote control to display the setup menu.
2 Press to select CONFIGURATION > SMARTFEATURES.
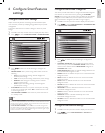
3 Press to select one of the following to congure the
settings:
• SMARTPOWER: Sets a power saving mode. Select one of the
following :
• OFF: Rich and dynamic settings, ideal for daylight use.
Disables power savings.
• LOW: A natural picture setting. Achieves low power savings.
• MEDIUM: Ideal settings for watching movies. Achieves
medium power savings.
• HIGH: Applies low-energy settings. Achieves highest
possible power savings.
• AUTOSENSE: Reduces the TV’s power consumption according
to the room’s ambient light. Select YES to enable the TV’s built-
in ambient light sensor.
• LOW POWER STANDBY: Uses minimum power when the TV
is in standby mode.
Note
• If LOW POWER STANDBY is set to YES,
• the TV can only be switched on with a remote control. Please ensure the
remote control is always available. The control buttons at the side of the
TV will not be able to switch on the TV.
• If LOW POWER STANDBY is set to YES, the TV will be congured to
the optimal energy saving mode whenever the TV is switched to standby
mode. As a result, the TV will take a little longer to switch on again. If you
need a fast switch on time, select NO.
LOW POWER STANDBY
SMARTFEATURES
SMARTPOWER
OFF
NO
AUTOSENSE
NO
USB BREAK-IN
SW DOWNLOAD
NO
SMARTUPDATE
NO
>
SMARTGUIDE CATEGORIES
>
English
EN