


4
TABLE OF CONTENTS
GETTING STARTED
PICTURE MENU
FEATURES MENU
SOUND MENU
Adjusting the Picture . . . . . . . . . . . . . . . . . . . . . .6
Turning on the Dynamic Noise
Reduction (DNR) Control . . . . . . . . . . . . . . . . . .7
Turning on the ImageMax Control . . . . . . . . . . . .8
The Convergence Control:
•Converge Red/Blue . . . . . . . . . . . . . . . . . . . .9
•Converge Multipoint Red/Blue . . . . . . . .10–11
•Undo Multipoint . . . . . . . . . . . . . . . . . . . . .12
Welcome/Product Registration . . . . . . . . . . . . . . . .2
Safety Precautions . . . . . . . . . . . . . . . . . . . . . . . . .3
Table of Contents . . . . . . . . . . . . . . . . . . . . . . . . .4
Features . . . . . . . . . . . . . . . . . . . . . . . . . . . . . . . . .5
The Timer Control:
•Setting the Clock . . . . . . . . . . . . . . . . . . . . .13
•Setting the Start Time . . . . . . . . . . . . . . . . .14
•Setting the Stop Time . . . . . . . . . . . . . . . . .15
•Selecting the Channel . . . . . . . . . . . . . . . . .16
•Setting the Activate Control . . . . . . . . . . . .17
•Constantly Displaying
the Time on Screen . . . . . . . . . . . . . . . . . .18
The AutoLock Control:
•Understanding AutoLock . . . . . . . . . . . . . . .19
•Setting up the Access Code . . . . . . . . . . . . .20
•Blocking Channels . . . . . . . . . . . . . . . . . . .21
•Blocking by Movie Rating . . . . . . . . . . . . .22
•Blocking by TV Rating . . . . . . . . . . . . . . . .23
•Turning the Blocking Control
on or off . . . . . . . . . . . . . . . . . . . . . . . . . .24
•Blocking Unrated Broadcasts . . . . . . . . . . .25
•Blocking Broadcasts
That Have No Rating . . . . . . . . . . . . . . . .26
•Reviewing Your Settings . . . . . . . . . . . . . . .27
•Clearing All Blocked Channels . . . . . . . . . .28
Using the Closed Captioning Control . . . . . . . . .29
Adjusting the Treble, Bass,
and Balance . . . . . . . . . . . . . . . . . . . . . . . . . . .30
Using the AVL (Audio Volume Leveler)
Control . . . . . . . . . . . . . . . . . . . . . . . . . . . . . . .31
Using Incredible Surround . . . . . . . . . . . . . . . . .32
Setting the TV for Stereo and SAP . . . . . . . . . . .33
Setting the Audio Out Control . . . . . . . . . . . . . . .34
Using the TV Speaker Control
and Audio Outputs . . . . . . . . . . . . . . . . . . . . . .35
Using the Bass Boost Control . . . . . . . . . . . . . . .36
REMOTE CONTROL
AutoLock, ImageMax, Incredible Surround, SmartPicture, and SmartSound are trademarks
of Philips Consumer Electronics Company. Copyright © 2001 Philips Consumer
Electronics Company. All rights reserved.
Using SmartPicture . . . . . . . . . . . . . . . . . . . . . . .37
Using SmartSound . . . . . . . . . . . . . . . . . . . . . . .38
Using Surf and Alternate Channel . . . . . . . . . . . .39
Using the Sleep Timer Control . . . . . . . . . . . . . .40
Using the Volume and AV Buttons . . . . . . . . . . .41
Setting the TV Remote to Work
Accessory Devices . . . . . . . . . . . . . . . . . . .42–46
NOTE: This owner's manual is used with several different tele-
vision models. Not all features (and illustrations) discussed here-
in will necessarily match your television set. This is normal and
does not require that you contact your dealer or request service.
Because of continuous product improvements, the information
mentioned in the documents accompanying your product are
subject to change without notice.
THE PICTURE-IN-PICTURE (PIP) FEATURE
Using PIP (Basic Connections) . . . . . . . . . . . . . .47
Using the PIP Remote Control Buttons . . . . . . . .48
Adjusting the PIP Color and Tint Controls . . . . .49
More PIP Connections . . . . . . . . . . . . . . . . . . . .50
GENERAL INFORMATION
Helpful Hints . . . . . . . . . . . . . . . . . . . . . . . . . . .51
Glossary of Television Terms . . . . . . . . . . . . . . .52
Index . . . . . . . . . . . . . . . . . . . . . . . . . . . . . . . . . .53
Factory Service Locations . . . . . . . . . . . . . . .54–55
Limited Warranty . . . . . . . . . . . . . . . . . . . . . . . .56
ON-SCREEN FEATURES
Refer to the simple Quick Use and Setup Guide
(supplied with your TV) for details on the follow-
ing:
• Basic TV Connections
• Television and Remote Operation
• On-screen Menu Controls
• How to Use the Installation Features
• Connection Options for Accessory Devices
QUICK USE AND SETUP GUIDE
1
3135035 20201
ANTENNA IN 75Ω
MONITOR OUTAV1 INAV2 IN
S-VIDEO
Y
Pb
Pr
VIDEO
MONO/L
AUDIO
R
ANTENNA IN 75Ω
MONITOR OUT AV1 IN AV2 IN
S-VIDEO
Y
Pb
Pr
VIDEO
MONO/L
AUDIO
R
ANTENNA IN 75Ω
1
2
IN
OUT
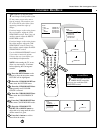
Y
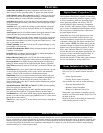
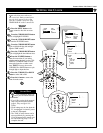
our Cable TV input into
your home may be a
single (75 ohm) cable or a
converter box installation.
In either case, the connec-
tion to the TV is very easy.
Just put the threaded end
of the cable signal to the
TV’s antenna plug and
screw it down tightly.
CABLE TV
CABLE INPUT/CONVERTER
OR
OUT TO TV
IN FROM ANT.
1
ANTENNA IN 75Ω
MONITOR OUTAV1 INAV2 IN
S-VIDEO
Y
Pb
Pr
VIDEO
MONO/L
AUDIO
R
ANTENNA IN 75Ω
MONITOR OUT AV1 IN AV2 IN
S-VIDEO
Y
Pb
Pr
VIDEO
MONO/L
AUDIO
R
2
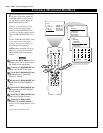
F
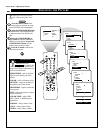
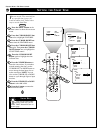
ollow the steps to the
right to connect a
basic antenna or cable TV
signal to a VCR, and then
the VCR to the TV. For
information on other
hookups (possible when
cable/descrambler boxes
are included), refer to the
owner’s manuals for the
VCR and the cable con-
verter.
TV TO VCR
BASIC CONNECTION
If yourCable TV signal
comes from a single round
cable (75 ohm), then you're
ready to connect to the TV.
If you have a cable converter
box, connect the cable TVsignal
to the cable signal IN(put) plug
on the converter.
Connect the cable TVcable to the
ANTENNAIN 75Ω plug on the TV.
If you have a cable converterbox,
connect the OUT(put) plug from the
converter to the ANTENNAIN 75Ω
(ohm) plug on the TV.
Connect your anten-
na or cable TVsignal to the
IN FROMANT(enna) plug on
the VCR.
Connect the OUT TO
TV plug on the VCR to the
ANTENNA IN 75Ωplug on
the TV(connecting cable sup-
plied with the VCR).
Back of TV
Round Cable
75Ω(Ohm)
Cable TVConverter
Box Connection
Cable TVCompany
Use the
Auto Program fea-
ture to store in the
TV’s memory only
the channels with
active broadcast sta-
tions. See page page
3 for details.
SMART
HELP
Cable TVSignal Input
Round Cable
75Ω(Ohm) Supplied with VCR
Outdoor
VHF/UHF
Antenna
300Ω(Ohm) to
75Ω(Ohm) Adapter
Cable TVsignal
Back of TV
Refer to the owner's
manual included with your
VCR for other possible con-
nections and TV/VCR operat-
ing details.
OR
NOTE: The connecting cable
for the converter is supplied
by the cable TVcompany.
VCR
1
ANTENNA IN 75Ω
MONITOR OUTAV1 INAV2 IN
S-VIDEO
Y
Pb
Pr
VIDEO
MONO/L
AUDIO
R
ANTENNA IN 75Ω
MONITOR OUT AV1 IN AV2 IN
S-VIDEO
Y
Pb
Pr
VIDEO
MONO/L
AUDIO
R
ANTENNA IN 75Ω
2
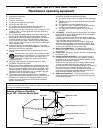
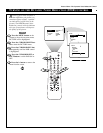
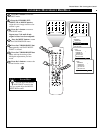
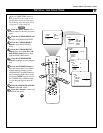
A
combination antenna
receives normal broad-
cast channels (VHF 2–13
and UHF 14–69). Your
connection is easy because
there is only one ANTENNA
IN 75Ω (ohm) plug on the
back of your TV, and that’s
where the antenna goes.
ANTENNA
COMBINATIONUHF/VHF
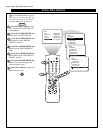
To get optional
accessories to make the
connections shown
here, contact your deal-
er, or our Parts
Information Center at
1-800-851-8885.
SMART
HELP
If yourantenna has a
round cable(75 ohm) on the
end, then you're ready to connect it
to the TV.
If yourantenna has flat, twin-
lead wire (300 ohm), you first need
to attach the antenna wires to the
screws on a 300- to 75-ohm
adapter.
Push the round end of the
adapter (or antenna) onto the
ANTENNAIN 75Ωplug on the
back of the TV. If the round
end of the antenna wire is
threaded, screw it down finger
tight.
300Ω(Ohm) to
75Ω(Ohm) Adapter
Combination VHF/UHF
Antenna
(Outdoor or Indoor)
Twin–Lead
Wire
Round Cable
75Ω(Ohm)
Back of TV
OR
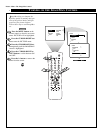
NOTE: For homes with separate UHF and
VHF antennas, you will need an optional com-
biner to connect to the TV.
ANTENNA IN 75Ω
MONITOR OUTAV1 INAV2 IN
S-VIDEO
Y
Pb
Pr
VIDEO
MONO/L
AUDIO
R
U/V
Combiner
300- to 75-Ohm Adapter
Back of TV
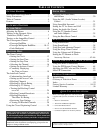
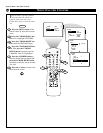
TABLE OF
CONTENTS
Getting Started
Warning/Important Notice . . . . . . . . . . . . .1
Making Basic Antenna/Cable Hookups . . . .1
Using the TVButtons . . . . . . . . . . . . . . . . . . . . . . . .2
Using the Remote Control Buttons . . . . . . . . . . . . . .2
Setting the TV’s on-screen menu language . . . . . . . .3
Setting the Tuner Mode Control . . . . . . . . . . . . . . . .3
Running Auto Program . . . . . . . . . . . . . . . . . . . . . . .3
Editing Channels . . . . . . . . . . . . . . . . . . . . . . . . . . .4
Using AutoChron to Set the TV’s Clock . . . . . . . . . .4
Naming Channels . . . . . . . . . . . . . . . . . . . . . . . . . . .4
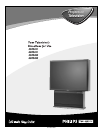
Projection
Television
Projection
Television
Quick Use and Setup Guide
1
2
1
2
3
4
5
6
7
8
9
1
0
1
1
HOOKING UPYOURTV (BASIC TV C
ONNECTIONS)
Quick Use and Setup Guide
IMPORTANT
NOTE: This owner's manual is used with several
different television models. Not all features (and
drawings) discussed in this manual will necessar-
ily match those found with your television set.
This is normal and does not require you contact-
ing your dealer orrequesting service.
WARNING: TO PREVENTFIRE OR SHOCK
HAZARD DO NOT EXPOSE THIS UNITTO
RAIN OR EXCESSIVE MOISTURE.
AutoChron, SmartPicture, and SmartSound are trademarks of Philips Consumer Electronics Company. Copyright ©2001 Philips Consumer Electronics
Company. All rights reserved.