


1
2
3
456
789
0
SLEEP
M
E
N
U
S
U
R
F
M
U
T
E
S
T
A
T
U
S
P
O
W
E
R
CH
CH
VOL
+
VOL
-
EXIT
1 OF 3
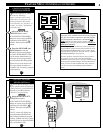
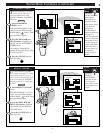
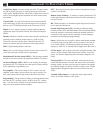
PICTURE
SOURCE
MORE...
CLOSED
CAPTIONS
FEATURE MENU
CHANNEL
MEMORY
CABLE
TUNING
3
3
PICTURE SOURCE SELECT
HELP
EXIT
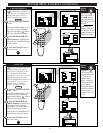
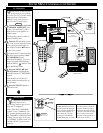
ANTENNA
AUX 1 S-VIDEO
AUX 2 VIDEO
AUX 1 Y P
B
P
R
VIDEO OUT
AUDIO OUT
L
R
FIXED
VAR
ANT /CABLE
75
⍀
UHF/VHF
INPUTS
VIDEO
AUDIO
AUX 1 AUX 2
R
L
S-VIDEO
ANTENNA
OUT
IN
OUT
IN
AUDIO
R
L
VIDEO
IN
OUT
S-VIDEO
OUT
4
1
2
T
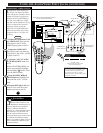
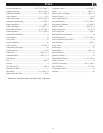
he S(uper)-Video connection on
the rear of the TV can give you
better picture detail and clarity, for
the playback of S-VHS VCR tapes or
Video Discs, than the normal anten-
na picture connections.
Note: The VCR (or Video Disc
Player) must have a S-VIDEO
OUT(put) jack in order for you to
complete the connections shown on
this page.
Connect the S-VIDEO (S-
VHS) OUT jack from the VCR to
the S-VIDEO AUX 1 IN(put) jack
on the TV.
The S-VIDEO connecting cable
will be supplied with the S-VHS
VCR (or Video Disc Player).
Connect the AUDIO OUT
jacks R(ight) and L(eft) from the
VCR to the AUDIO AUX 1
IN(put) jacks on the TV.
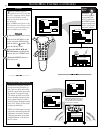
S
elect the "AUX 1 S-VIDEO"
PICTURE SOURCE control.
With the FEATURES MENU on
screen, move the RED highlight
with the MENU buttons. Then
press the MENU button.
The "AUX 1 S VIDEO" picture
source option appears only when a
S-VIDEO cable has been connected
to the TV’s AUX 1 IN(puts).
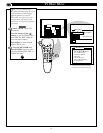
Turn the VCR ON and place it
in the S-VIDEO (or S-VHS) play-
back mode. Insert S-VHS cassette
tape and playback in a normal man-
ner.
AUX1 - S-VIDEO INPUTS
STOP
1
2
3
4
S-VHS VCR
AUDIO OUT
(RED/WHITE)
S-VIDEO OUT
BACK OF TV
PICTURE AND SOUND FROM PLAYBACK
OF S-VHS VCR TAPE PLAYBACK
BEGIN
S-VIDEO
CABLE
NOTE: A CD-i (Compact Disc Interactive)
player, Video Game, or other S-VIDEO acces-
sory can be hooked up to the TV using this
type of connection. Please be aware that such
video sources, which show a constant non-
moving pattern on the TV screen, can cause
picture tube damage. When not in use turn
your video accessories OFF. Also, regularly
alternate the use of video sources with normal
TV viewing.
USING THE AUDIO/VIDEO INPUT JACKS (CONTINUED)
29
SMART HELP
Remember, if you have
added AUX 1 to the TV's
channel memory, you can just
press the CHANNEL ▲▼ buttons
to select the S-VIDEO mode
(when active).
NOTE: Connections and use of the
TV's AUX 2 S-VIDEO Input jacks are
the same as for the AUX 1 S-VIDEO
jacks (except "AUX 2 S-VIDEO" is
selected as the Picture Source in step 3).