


1
Connect
2
Set up
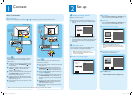
Basic Connection
Before Connecting
Select one of the following basic connections ( A or B ) according to the type of connecting devices you have.
Option A
Use this connection if you are connecting the antenna
cable directly from the antenna wall socket or from a
cable TV socket.
A
Unplug the antenna cable that is connected to your
TV and plug it into the ANTENNA-IN socket
on this recorder.
B
Connect the supplied RF antenna cable from the
TV-OUT socket on the recorder to the
Antenna In socket on the TV.
C
Connect a composite video cable (yellow end) from
the CVBS OUTPUT socket on the recorder to
the video input socket on your TV.
D
Connect an audio cable (red/white ends) from the
AUDIO L/R sockets on the recorder to the audio
input sockets on your TV.
E
Plug in the power cord from the recorder to an AC
power outlet.
Television (rear)
Note See the accompanying user manual for other possible connections (e.g. Component Video, S-VIDEO).
Philips Recorder (rear)
Option B
Use this connection if your current antenna cable is
connected to a cable box.
A
Keep the existing antenna connection from the cable
box to your TV.
B
Connect the supplied RF antenna cable from the
ANTENNA-IN socket on the recorder to the
RF Out socket on the cable box/ satellite receiver.
C
Follow steps
C
to
D
under ‘Option A’ before you
proceed to step
D
below.
D
Connect a composite video cable (yellow end) from
the VIDEO IN-CVBS socket on the recorder to
the video output socket on your cable box/satellite
receiver.
E
Connect an audio cable (red/white ends) from the
AUDIO IN L/R sockets on the recorder to the
audio output sockets on your TV.
F
Plug in the power cord from the recorder to an AC
power outlet.
S-VIDEO
COAXIAL
(DIGITAL AUDIO)
R
P
R
S-VIDEO
R
CVBS
LY
P
B
VIDEO
AUDIO
AUDIO IN
VIDEO IN
COMPONENT VIDEO
OUTPUT
HDMI OUT
EXT 1
ANTENNA-IN
TV-OUT
L
CVBS
1
RF
S-VIDEO
OUT
IN
AUDIO
R L
VIDEO
CVBS
L
VIDEO IN
AUDIO IN
EXT 1
R
RF
S-VIDEO
OUT
IN
AUDIO
R L
VIDEO
From an off-air
antenna wall
socket
Television (rear)
Cable Box (rear)
B
Set the date.
Use the numeric keypad 0-9 or STWX keys to
enter the correct date. Press OK to confirm.
C
Set the time.
Use the numeric keypad 0-9 or STWX keys to
enter the correct time. Press OK to confirm.
D
Automatic channel search begins.
Previous
BACK
Next
OK
Auto Search
Stop Search
Searching channels. Please
wait.
Channels found 5
38%
Note If you have used Option B in ‘Basic
Connection’ press OK to skip channel search and
proceed to the next step. No preset channels will be
stored.
E
All available TV channels are stored.
The first preset channel appears.
Previous
BACK
Exit
OK
Installation Complete
Please enjoy using your
DVD recorder.
F
Press OK to exit.
The recorder is now ready for use.
A
Finding the viewing channel
A
Press 2 on the recorder.
B
Switch on the TV and other connected devices (e.g.
Cable box, Satellite receiver). The installation menu is
displayed.
Select a menu
language.
Next
OK
Menu Language
English
⁚㇂Ŷဟ
ኘͧˊஔ
C
In case you don’t see the recorder’s installation menu,
press the channel down button on the TV’s remote
control repeatedly (or AV, SELECT, ° button) until you
see the menu. This is the correct viewing channel for
the recorder.
B
Start basic setup
Use the recorder’s remote control and follow the on-
screen instructions to complete the installation.
Note Press S T keys to toggle through the
options. Press right X to select an item. To con rm
your selection, press OK.
A
Select the menu display language.
Select a menu
language.
Next
OK
Menu Language
English
⁚㇂Ŷဟ
ኘͧˊஔ
S-VIDEO
COAXIAL
(DIGITAL AUDIO)
R
P
R
S-VIDEO
R
CVBS
LY
P
B
VIDEO
AUDIO
AUDIO IN
VIDEO IN
COMPONENT VIDEO
OUTPUT
HDMI OUT
EXT 1
ANTENNA-IN
TV-OUT
L
CVBS
R
1
CVBS
S-VIDEO
L
R
VIDEO
AUDIO
OUTPUT
From an off-air
antenna wall or
cable TV socket
Philips Recorder (rear)
DVDR3600_97-75_QSG_En_28981.indd2 2DVDR3600_97-75_QSG_En_28981.indd2 2 2008-02-15 1:54:11 PM2008-02-15 1:54:11 PM