


QUICK USE GUIDE
12nc: 3139 246 14151
DVDR615
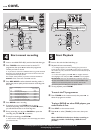
1 Remove the antenna cable plug from your TV (or Satellite
Receiver/Cable Box). Connect it to the ANTENNA input
socket at the back of the DVD recorder.
2 Use the supplied antenna cable to connect the DVD
recorder’s TV output socket to the antenna input socket at
the back of your TV set
3 Use the supplied AV cables (yellow plug) to connect the
DVD recorder’s VIDEO (CVBS) (OUT 2) socket to the
Video In socket at the back of your TV set.
4 Use the supplied AV cables (red/white plugs) to connect the
DVD recorder’s AUDIO L/R (OUT 2) socket to the audio
input socket at the back of your TV set.
5 Connect the power cable from the DVD recorder’s
~ MAINS to the power supply.
Helpful Hint:
If your TV does not have the above-mentioned
connectors, please refer to the user manual for more
information on others possible connection to your
TV set.
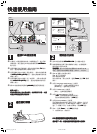
Prepare the remote control
1 Press STANDBY-ON 2 on the DVD recorder to switch
it on.
2 Switch on the TV set and select the correct video in channel,
the First Installation menu appears on the TV.
NO PICTURE! Press the TV/AV button or CHANNEL 3 4
button on the TV to select the correct video in channel, for
example, 'EXT', '0', or 'AV'.
3 Press 3 4 to select an item in the menu.
Press 2 to access the selected item’s options.
Press 1 to confirm your selection.
When you complete, select { Done } in the menu and press
OK to continue.
4 { Language and Country } menu appears.
{ Language } – select on-screen display language.
{ Country } – select country of your residence.
5 { TV Format } menu appears.
{ TV Format } – select TV screen display.
6 { Channel Search } menu appears.
Press OK to start automatic TV channel search.
Once the TV channel search complete, the total number of
channels found appears.
7 { Time and Date } menu appears.
If the time and date shown on the TV are not correct,
press 2 to enter the respective time/date field. Press 3 4 to
change the first digit and press 2 to go to the next digit field.
Once complete, press OK to confirm.
8 Press 4 to select { Done } and press OK to save the changes.
➜ The first installation is now complete.
The DVD recorder is ready for use!
See next page for basic recording and playback.
Start first installation Connect DVD recorder
1 3
1
3
2
2
1.3
CH- CH+
IS
TH
E
TV
O
N?
Select Language and Country
Language
Country
Done
Menu
English
Spanish
French
Select your TV format
TV format
Done
4:3 Panscan
4:3 Letterbox
16:9
Automatic channel search will find and
store all channels. Make sure to connect
the Antenna.
Channel Search
Skip Search
Start
Check time and date and correct if
necessary
Time
Date
Done
09:00 PM
30.06.2004
OK
CH-
CH+
LANGUAGE AND COUNTRY
TV FORMAT
CHANNEL SEARCH
TIME AND DATE
4
2
3
5
6
1
7
1
2
3
5
8
DVD recorder back panel
ANTENNA/
CABLE SIGNAL
4