


1
Connect
Start with the ‘Basic connection’.
If you have a VCR, follow the instructions for ‘Connection with VCR or similar device’.
If you have a set-top box, follow the instructions for ‘Connection with set-top box’.
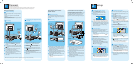
Basic Connection
A
Before Connecting
Unplug the antenna cable that is currently connected to
your TV.
If you have only a single off-air antenna, follow ‘B1’
connection.
If you have both the off-air antenna and digital terrestrial
antenna, follow ‘B2’ connection.
Connecting
A Disconnect the antenna cable from your TV and
connect it to the ANTENNA socket on this
recorder.
B Use the supplied RF coaxial cable to connect the TV
socket on this recorder to the Antenna In socket
on the TV.
C Use the supplied Tuner interlink cable to connect
the two ‘A’-sockets on this recorder.
D Use the supplied scart cable to connect the
EXT1 TO TV-I/O scart socket on this recorder to
the SCART IN socket on your TV.
E Plug in the power cable from the recorder to an AC
power outlet
A Disconnect the antenna cable from your TV and
connect it to the socket on this recorder.
B Connect the indoor DVB-T antenna cable to the
ANTENNA socket on this recorder.
C Use the supplied RF coaxial cable to connect the
TV socket on this recorder to the Antenna In
socket on the TV.
D Use the supplied scart cable to connect the
EXT1 TO TV-I/O scart socket on this recorder to
the SCART IN socket on your TV.
E Plug in the power cable from the recorder to an AC
power outlet
2
Set up
A
Finding the viewing channel
A Presss STANDBY-ON on the recorder.
The recorder will display ‘IS THE TV ON?’.
B Turn on the TV.
You should see the { EASY SETUP } menu.
Note If your VCR is connected to this recorder,
ensure it is turned off or in standby before proceeding.
C In case you don’t see the recorder’s setting menu,
press the Channel Down button on the TV’s remote
control repeatedly (or AV, SELECT,
°
button) until
you see the menu. This is the correct viewing
channel for the recorder.
B
Start basic setup
Use the recorder’s remote control and follow the on-
screen instructions to complete the installation.
A Select the desired menu language, your country and
the TV shape.
Note Select { Done } in the menu and press
to go
to the next screen.
B Activate automatic channel search for analogue and
digital tuner/radio.
C Check the date and time and press
.
D To continue with the GUIDE Plus+ installation,
select { Continue } and press
.
Otherwise, select { Do not install now } and press
. Wait until the recorder has finished initialising
the system, then press
again.
C
Install the GUIDE Plus+ system
A Follow the on-screen instructions to select your
language, country and enter the postal code of your
area.
Note If no or wrong postal code is entered, it will
cause no GUIDE Plus+ (EPG) service information.
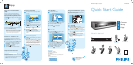
A Follow step 1 to 5 of ‘Basic connection’ to connect
this recorder before you proceed to step 2 below.
Above illustration shown the connection without
the digital terrestrial antenna.
B Use another scart cable (not supplied) to connect
the EXT2 AUX-I/O scart socket on this recorder to
the SCART OUT socket on your VCR.
C Connect the power cable from the VCR to an AC
power outlet.
Note In this setup, the VCR cannot record TV
programmes.
Connection with set-top box
Your new Philips Recorder provides a G-LINK
transmitter which allows you to control the tuner of the
set-top box (satellite receiver, cable TV box) through
the GUIDE Plus+ system. You can record the TV
programmes that are received through the set-top box.
Connecting
To source
A Follow step 1 to 5 of ‘Basic connection’ to connect
this recorder before you proceed to step 2 below.
Above illustration shown the connection without
the digital terrestrial antenna.
B Connect the supplied G-LINK cable to the G-LINK
socket on this recorder.
C Place the G-LINK transmitter in front of your set-
top box in such a way that it can acquire the signal
broadcasted by the transmitter.
D Connect the power cable from the set-top box to
an AC power cable.
B1
Connecting (with digital terrestrial
antenna)
B2
Connection with VCR or
similar device
A
Before Connecting
Your new Philips Recorder replaces the VCR for your
recording needs. First, unplug all the connections from
your VCR.
B
Connecting
From an off-air
antenna or
cable box
Television ( rear)
Television (rear)
From an off-
air antenna or
cable box
Philips Recorder (rear)
Philips Recorder (rear)
From digital
terrestrial
antenna
Note See the accompanying user manual for other possible connections (e.g. S-Video, Component Video)
Television ( rear)
Television ( rear)
VCR or similar
device (rear)
Philips Recorder
(rear)
G-LINK transmitter
Set-top box
Positioning of G-LINK
transmitter
Set-Top Box (rear)
D
Install the set-top box
If you do not have a set-top box, skip ‘D’ and go to ‘E’.
A Press T down to select ‘External Receiver 1’ and
press
.
B Press again to continue.
C Select the type of reception, service provider and
brand name of the connected set-top box.
Note Press
to go to the next screen. Select
{ None } if none of the entries are applicable.
D Select the recorder socket through which your set-
top box is connected (e.g. ‘EXT2’ for EXT2 AUX-I/O
socket) and press .
E Turn on your set-top box and select channel
number 02 on the set-top box.
F Read the instructions on the TV and press .
Setup External Receiver 1
Has the External Receiver 1 changed to
Programme Number 101?
G If the set-top box has switched to the same
programme number as displayed on the TV, select
{ Yes } in the menu and press .
Note If not, select { No } and press
to try a
different code.
H Your set-top box is now installed. Press the green
button to exit.
Note To switch the GUIDE Plus+ system’s host
channel manually, go to { Host Channel Setup }.
E
Load the TV listing data
A Press GUIDE
to exit GUIDE Plus+ system.
Leave the recorder in ‘standby’ mode and turn ‘on’
the set-top box overnight to collect the TV listing
data, this may take up to 24 hours.
Note If you tune to your Host Channel before going
to ‘standby’ mode, this recorder will start downloading
the TV listings data immediately.
B Check the { Editor } screen the next day to ensure
the source and programme numbers are matching
for all channels.
From an off-air
antenna or cable box