


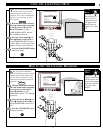
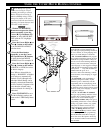
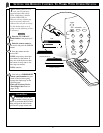
USING THE AUDIO OUTPUT JACKS
EXTERNAL SPEAKERS
88
+ R – – L +
INT
SPEAKERS
EXT
VARIABLE
AUDIO OUT
EXTERNAL
SPEAKER
SMART
PLUG
75Ω
ANT/
CABLE
OUT VIDEO LOOP IN
OUT S-VIDEO LOOP IN
IN
R AUDIO LOOP L
OUT
IN
R AUDIO LOOP L
OUT
VIDEO
OUT
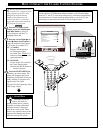
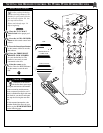
EXTERNALEXTERNAL SPEAKERS SPEAKERS
88
+ R + R – – L +
INTINT
SPEAKERSSPEAKERS
EXTEXT
VARIABLEARIABLE
AUDIO OUTAUDIO OUT
AUX/TV INPUT
PHONO INPUT
R
L
2
1
R
L
W
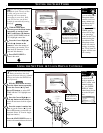
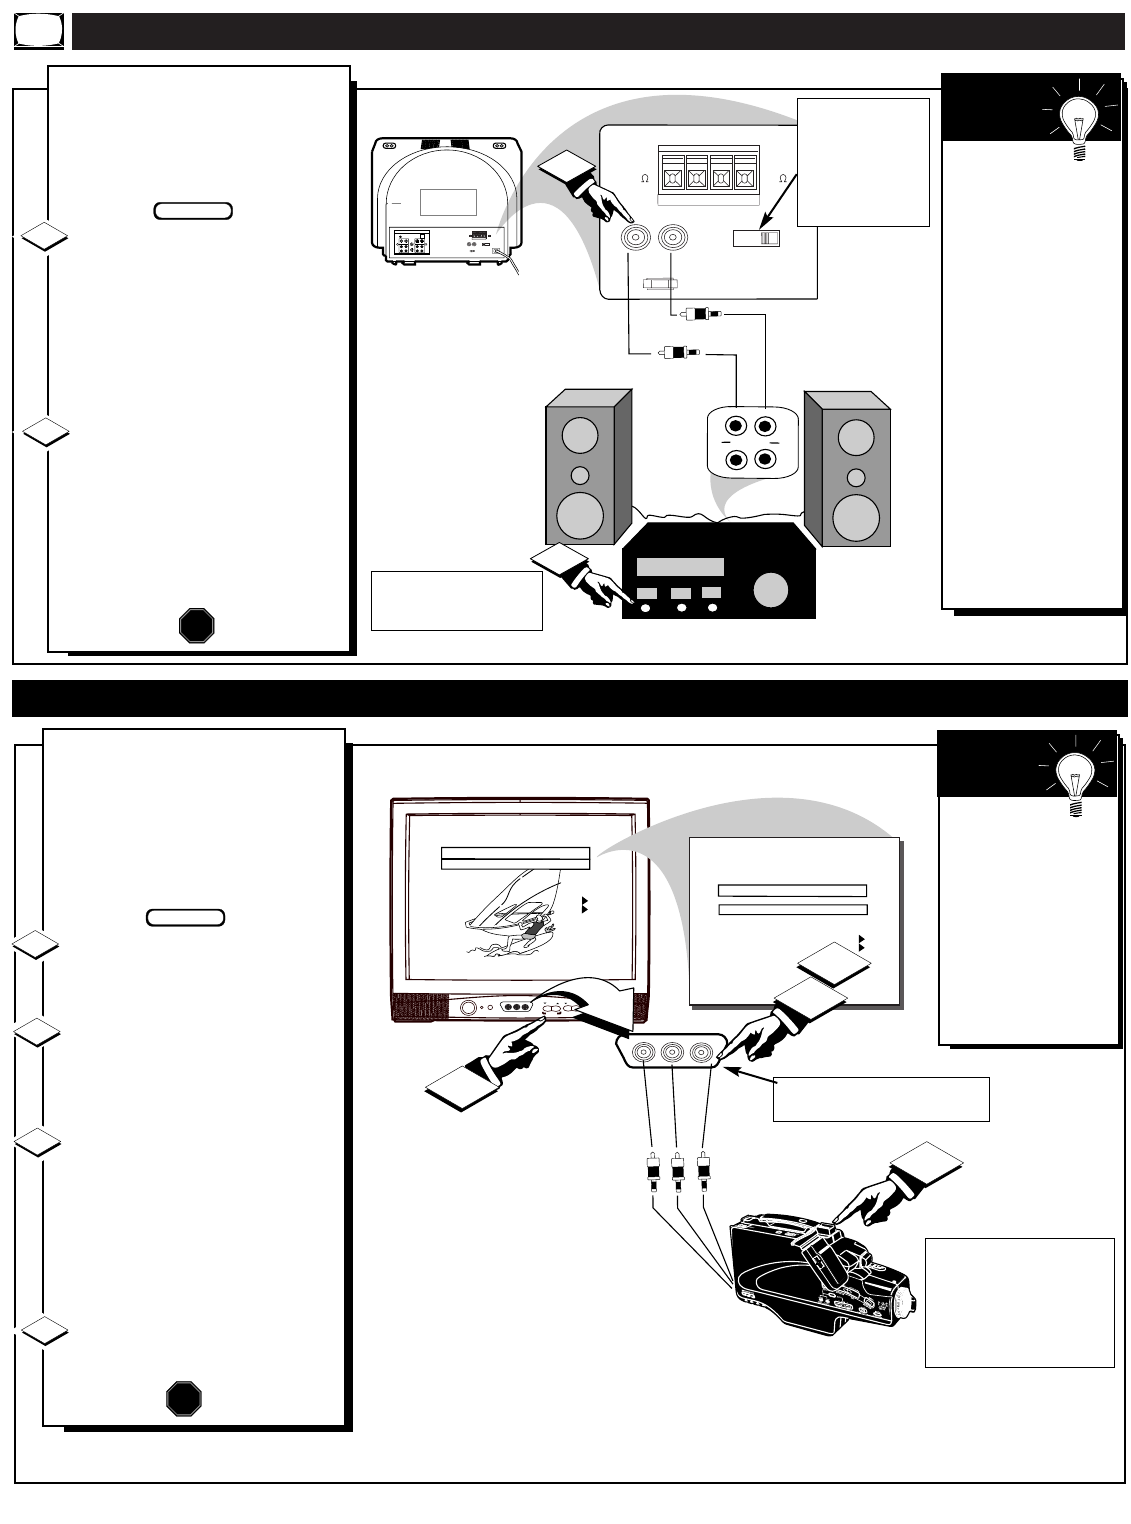
ould you like to hear TV pro-
grams through your audio hi-
fi system? The TV's Audio Output
jacks offer you this sound playback
option.
Connect the R(ight) and L(eft)
VARIABLE AUDIO OUT jacks
on the TV to the R and L Audio
Input jacks on your amplifier or
sound system.
Set the audio system's volume to
normal listening level.
Turn On the TV and the audio
system. You can now adjust the
sound level coming from the audio
system with the Volume ▲▼ but-
tons on the TV or remote. (Also
see the Smart Help section for fur-
ther audio mode and sound adjust
details.
STOP
1
2
BACK OF TV
AUDIO SYSTEM
AUDIO OUT
(RED/WHITE)
RCA PHONO PLUG
CABLES (NOT
SUPPLIED)
BEGIN
Note: You can
use the TV’s
AUDIO OUT Menu
control to set the
rear Audio Outputs
to operate in either a
Fixed or Variable
sound mode.
“VARIABLE”
allows you to adjust
the playback of pro-
gram sound using
TV’s Volume con-
trol buttons.
“FIXED” is intend-
ed to make sound
adjustments on the
external Audio
System equipment.
SMART
HELP
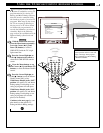
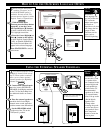
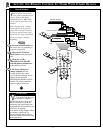
USING THE FRONT AUDIO/VIDEO INPUT JACKS
CHANNEL
VOLUME
POWER
VIDEO L AUDIO R
A V SWITCH
VIDEO L AUDIO R
CHANNEL
CHANNEL RING
INPUT
LABEL
AUTO PROGRAM
EXIT
CHANNEL INSTALLATION
FRONT
SAVED
FRONT
( )
CHANNEL
CHANNEL RING
INPUT
LABEL
AUTO PROGRAM
EXIT
CHANNEL INSTALLATION
FRONT
DELETED
FRONT
( )
4
2
1
3
F
or more convenient Direct
playback connections the TV's
Front Input jackpanel can be used.
These easily accessed Audio/Video
Inputs allow for quick playback
connections, particularly for view-
ing of Camcorder tape recordings.
Connect the VIDEO OUT jack
from the Camcorder to the VIDEO
IN jack on the front of the TV.
Connect the AUDIO OUT
jacks R(ight) and L(eft) from the
Camcorder to the AUDIO IN jacks
on the front of the TV.
Select the "FRONT" INPUT
source control on the TV.
Note: You can use the A/V
SWITCH buttons on the front of
the TV. (Or, you can Save the
FRONT Inputs as part of the TV’s
Channel Ring. See Smart Help).
Turn the Camcorder ON and
press PLAY to view the tape on
the TV.
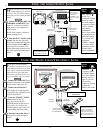
1
2
3
4
STOP
FRONT PANELAUDIO/VIDEO
INPUT JACKS
VIDEO IN
(YELLOW)
AUDIO IN
(RED/WHITE)
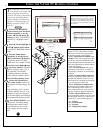
If you have a single (monaural)
Audio Output Camcorder, "Y"
connectors are available to
complete your connection.
Contact your dealer, or local
electronic parts supply store, to
order optional accessories.
CAMCORDER
PICTURE AND SOUND FROM PLAYBACK
OF CAMCORDER TAPE
BEGIN
AUDIO/VIDEO
OUTPUT JACKS
ON CAMCORDER
Remember,
if you have added
the FRONT Inputs
to the TV's channel
memory ring (see
page 12), you can
just press the
Channel +,- buttons
to select the
FRONT A/V mode.
SMART
HELP
The audio system may have
to be in AUX(iliary) mode
to play sound from the TV.
Sound from the TV's
internal speakers
may be eliminated
by setting the
SPEAKERS switch
on the rear of the set
to EXT.
24