7
D Note
For safety reasons it is required that
all 4 bolts are used when mounting
your TV.
4 Final installation and operation
4.1 Final installation
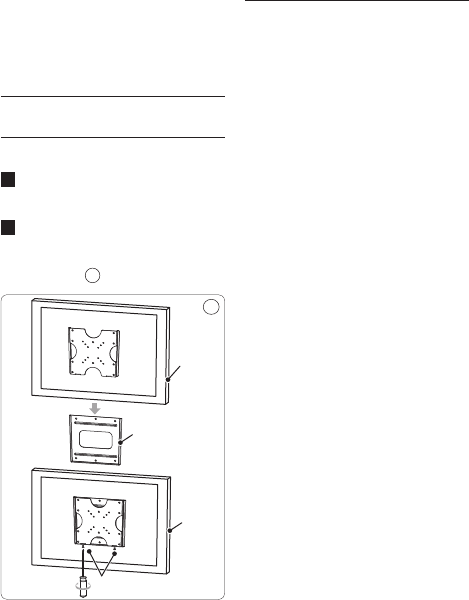
1 To complete the installation, simply slide
the mount with your LCD attached into
the wall piece.
2 For additional security and stability, insert
the M4x12 bolts into the holes located
on the base of the unit and tighten with a
screwdriver. 5
Display
M4 x 12 Bolt (C)
Installed Wall Piece
Display
5
B Warning
Insert the M4x12 bolts at the bottom
of the mount to avoid having the display
accidentally knocked off the mount.
5 Guarantee and service
Please contact Philips directly if you have any
questions in the installation process of the
wall mount. Call 1-919-573-7854.
Limited Two-Year Warranty
Philips warrants that this product shall be free
from defects in material, workmanship and
assembly, under normal use, in accordance
with the specications and warnings, for two
years from the date of your purchase of
this product. This warranty extends only to
the original purchaser of the product, and
is not transferable. To exercise your rights
under this warranty, you must provide proof
of purchase in the form of an original sales
receipt that shows the product name and the
date of purchase. For customer support or to
obtain warranty service, please call
919-573-7854. THERE ARE NO OTHER
EXPRESS OR IMPLIED WARRANTIES.
Philips’ liability is limited to repair or, at its
sole option, replacement of the product.
Incidental, special and consequential damages
are disclaimed where permitted by law. This
warranty gives you specic legal rights. You
may also have other rights that vary from
state to state.
Register your product and get support at
www.philips.com/welcome


