


2
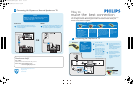
Connecting Input Device to TV (eg. DVD player, Digital Recorder, VCR, Video Camera, Games Console)
OR
Component Video Input
A
Insert Component
Video connectors into
their corresponding
jacks on both DVD
player/DVD recorder
and TV (sometimes
labeled Y, Pb and Pr).
Connect red/white
audio cables to the
audio output jacks
on DVD player/DVD
recorder and audio
AV inputs on TV.
B
Turn on TV and DVD
player/DVD recorder.
Press the AV button
on the remote control
until CVI appears on
TV screen.
C
Insert a pre-recorded
DVD into DVD player/
DVD recorder and
press PLAY to verify
correct connection.
D
AV1 in
AV2 in
R
VIDEO
COMPONENT VIDEO INPUT
TV
Back of DVD Player/Recorder
AV Buttons
Remote
Control
TV Jack Panel
S-VIDEO
OUT
OUT
OUT
L
R
AUDIO
VIDEO
COM
P VIDEO
Y
Pb
Pr
A
B
C
Note: When using CVI, it is best not to connect a video
signal to the other AV input on the TV.
Monitor out
Monitor out
L/Mono
Component Video
Input (CVI)
Provides superior picture quality
by separating the green, blue and
red luminance signals. Typically
used with red/while audio cables.
Better
S-Video
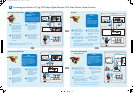
Connect audio cables
(red/white) to audio AV
inputs on back of TV and
Audio outputs on back
of VCR.
B
Insert pre-recorded
videotape into VCR and
press PLAY to verify
correct connection.
D
C
Turn on TV and VCR.
Press the AV button
on the remote control
until S-Video appears
on TV screen.
TV Jack Panel
Back of VCR
AV Button
B
TV
S-VIDEO
AV1 in
Y
Pb
Pr
AV2 in
AUDIO
R
L/Mono
VIDEO
COMPONEN
T VIDEO INPUT
AUDIO OUT
L R
S-VIDEO
OUT
ANT/CABLE
OUT
VIDEO
OUT
A
CH+ and CH- Buttons
Remote
Control
C
A
Connect S-Video
cable to S-Video input
on back of TV and
S-Video output on
back of VCR.
Note: When you connect S-Video and AV2 at the same time,
Monitor out
Monitor out
Good
S-Video
Supplies a better picture
than RF and Composite
connections. Used with
red/white audio cables.
you can only hear sound coming from S-Video.
S-Video will dominate over the Video of AV2.
Composite Audio/Video
Connect the video
cable (yellow) to the
VIDEO AV input on
back of TV and the
corresponding video
output on back
of VCR.
A
Connect audio cables
(red/white) to audio
AV inputs on back of
TV and the
corresponding audio
outputs (L & R) on
back of VCR.
B
Turn on the TV and
VCR. Press the AV
button on the remote
control until AV1 or
AV2 appears on TV
screen.
C
Insert pre-recorded
videotape into VCR
and press PLAY to
verify correct
connection.
D
TV
TV Jack Panel
Back of VCR
B
S-VIDEO
A
V1 in
AV2 in
AUDIO
R
L/Mono
VIDEO
COMPONEN
T VIDEO INPUT
AUDIO OUT
R L
S-VIDEO
OUT
ANT/CABLE
OUT
VIDEO
OUT
AV Button
Remote
Control
C
A
Monitor out
Monitor out
Basic
Composite Audio/Video
Separate video (yellow) and
audio (red/white) cables that
provide a basic connection from
the set-top box and other devices.
: The color of audio inputs
may differ, e.g. red/white or
red/black.
Note
Composite Audio/Video
TV Side Jack Panel
VIDEO
AUDIO
L
R
S-VIDEO
VIDEO
AUDIO
LEFT RIGHT
AV Button
Remote
Cont r ol
Video Camera
TV
Video Camera Jack Panel
A
B
C
D
B
C
A
Note:
for mono devices,
connect only white audio
cable from
output to white audio input
on the side of TV.
device’s audio
OR
OR
OR
Basic
Composite Audio/Video
Separate video (yellow) and
audio (red/white) cables that
provide a basic connection from
the set-top box and other devices.
: The color of audio inputs
may differ, e.g. red/white or
red/black.
Note
Connect the video
cable (yellow) from the
video output on camera
(or other device) to the
video input (yellow)
located on the side of TV.
Connect audio cables
(red/white) from audio outputs
on device to audio inputs
(red/white) on the side of TV.
Press PLAY on the
device to verify
connection
Turn on TV and the
device. Press the AV
button on the remote
control until FRONT /
SIDE appears on TV
screen.
TV Side Jack Panel
AUTO
PICTURE
AUTO
SOUND
A/D
FORMAT CLOCK SLEEP GUIDE
AV SAP CC INFO
1 2 3
4
5 6
7 8 9
0
VOL CH
MENU OK
MUTE
AUTO
PICTURE
AUTO
SOUND
A/D
FORMATCLOCK SLEEP GUIDE
POWER
AV SAP
A/CH
CC INFO
AUTO
PICTURE
AUTO
SOUND
A/D
FORMAT CLOCK SLEEP GUIDE
AV SAP CC INFO
AUTO
PICTURE
AUTO
SOUND
A/D
FORMAT CLOCK SLEEP GUIDE
AV SAP CC INFO
1 2 3
4
5 6
7 8 9
0
VOL CH
MENU OK
MUTE
AUTO
PICTURE
AUTO
SOUND
A/D
FORMATCLOCK SLEEP GUIDE
POWER
AV SAP
A/CH
CC INFO
1 2 3
4
5 6
7 8 9
0
VOL CH
MENU OK
MUTE
AUTO
PICTURE
AUTO
SOUND
A/D
FORMATCLOCK SLEEP GUIDE
POWER
AV SAP
A/CH
CC INFO
1 2 3
4
5 6
7 8 9
0
VOL CH
MENU OK
MUTE
AUTO
PICTURE
AUTO
SOUND
A/D
FORMATCLOCK SLEEP GUIDE
POWER
AV SAP
A/CH
CC INFO
AUTO
PICTURE
AUTO
SOUND
A/D
FORMAT CLOCK SLEEP GUIDE
AV SAP CC INFO
C
M
Y
CM
MY
CY
CMY
K
New_BestConnGuide_LO6SDTV_Eng_31Page 1 2006-07-31 11:24:01 AM