


7
English
En
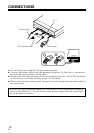
INTERFACE
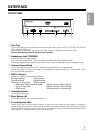
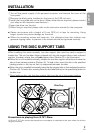
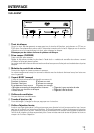
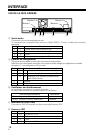
FRONT VIEW
1 Disc Tray
Open the loading tray by pressing the eject button, then place a CD or DVD disc into the slit
with the label facing up.
Press the eject button or push the front part of tray to load the tray with the disc.
Do not attempt to pull out the disc tray forcibly.
2 Headphone Jack (PHONES)
Stereo mini jack for head-phone.
Set “Volume Control Knob” minimum position before inserting headphone jack.
The audio output of rear panel is active even when a jack is inserted into the headphone plug.
3 Volume Control Knob
This is the volume control knob for adjusting sound level on the headphone.
When the knob is turned to the right, the headphone volume goes up, when turned to the
left, the volume goes down.
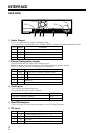
4 BUSY Indicator
Operation status is indicated as follows.
During reading Lights green
During writing Lights orange
When an error occurs Blinks orange
• Abnormal rise of internal temp. • Blinks with a certain period.
• Lens or disc dirty • Blinks with 2x of the period.
• Other error • Blinks with 3x of the period.
5 Ventilation Holes
Do not block this part.
6 Eject Button (0)
To unload /load the disc, press the button.
7 Forced Ejection Hole
Insert a stiff rod into the hole and push to eject the tray when the tray doesn’t unload by
pressing the Eject button. In the normal operation, the eject button should be used to unload
the tray. Make sure the power of the drive is turned off and wait more than one minute till the
disc rotation is stopped when access the eject hole.
PHONES
36
BUSY
52
1
7
4