


AV IN PTV-701
A/V OUT DVD Player
Safety precautions Legal information Limited Warranty
4
5
3
CAUTION
RISK
OF
ELECTRIC
SHOCK
DO
NOT
OPEN
WARNING
:
TO
REDUCE
THE
RISK
OF
ELECTRIC
SHOCK
,
DO
NOT
REMOVE
COVER
(
OR
BACK
).
NO
USER
SERVICEABLE
PARTS
INSIDE
.
REFER
SERVICING
TO
QUALIFIED
SERVICE
PERSONNEL
.
The lightning ash with arrowhead
symbol, within an equilateral triangle,
is intended to alert the user to the
presence of uninsulated “dangerous
voltage” within the product’s enclosure
that may be of sucient magnitude
to constitute a risk of electric shock
to persons.
The exclamation point within the
equilateral triangle is intended to alert
the user to the presence of important
operating and maintenance (servicing)
instructions in the literature
accompanying the product.
TO PREVENT FIRE OR SHOCK HAZARD, DO NOT USE THE PLUG WITH AN EXTENSION CORD,
RECEPTACLE OR OTHER OUTLET UNLESS THE BLADES CAN BE FULLY INSERTED TO PREVENT
BLADE
EXPOSURE.
TO REDUCE THE RISK OF FIRE OR ELECTRIC SHOCK, DO NOT EXPOSE THIS APPLIANCE TO RAIN
OR
MOISTURE. TO PREVENT ELECTRICAL SHOCK, MATCH WIDE BLADE PLUG TO WIDE SLOT,
FULLY INSERT.
Adjusting the volume
The volume can be adjusted from 0-100.
1. Press the [VOL+] button on the TV or the remote to raise the volume.
2. Press the [VOL-] button on the TV or the remote to lower the volume.
3. Press the [MUTE] button on the remote to mute the TV sound.
Press the [MUTE] button again to restore sound.
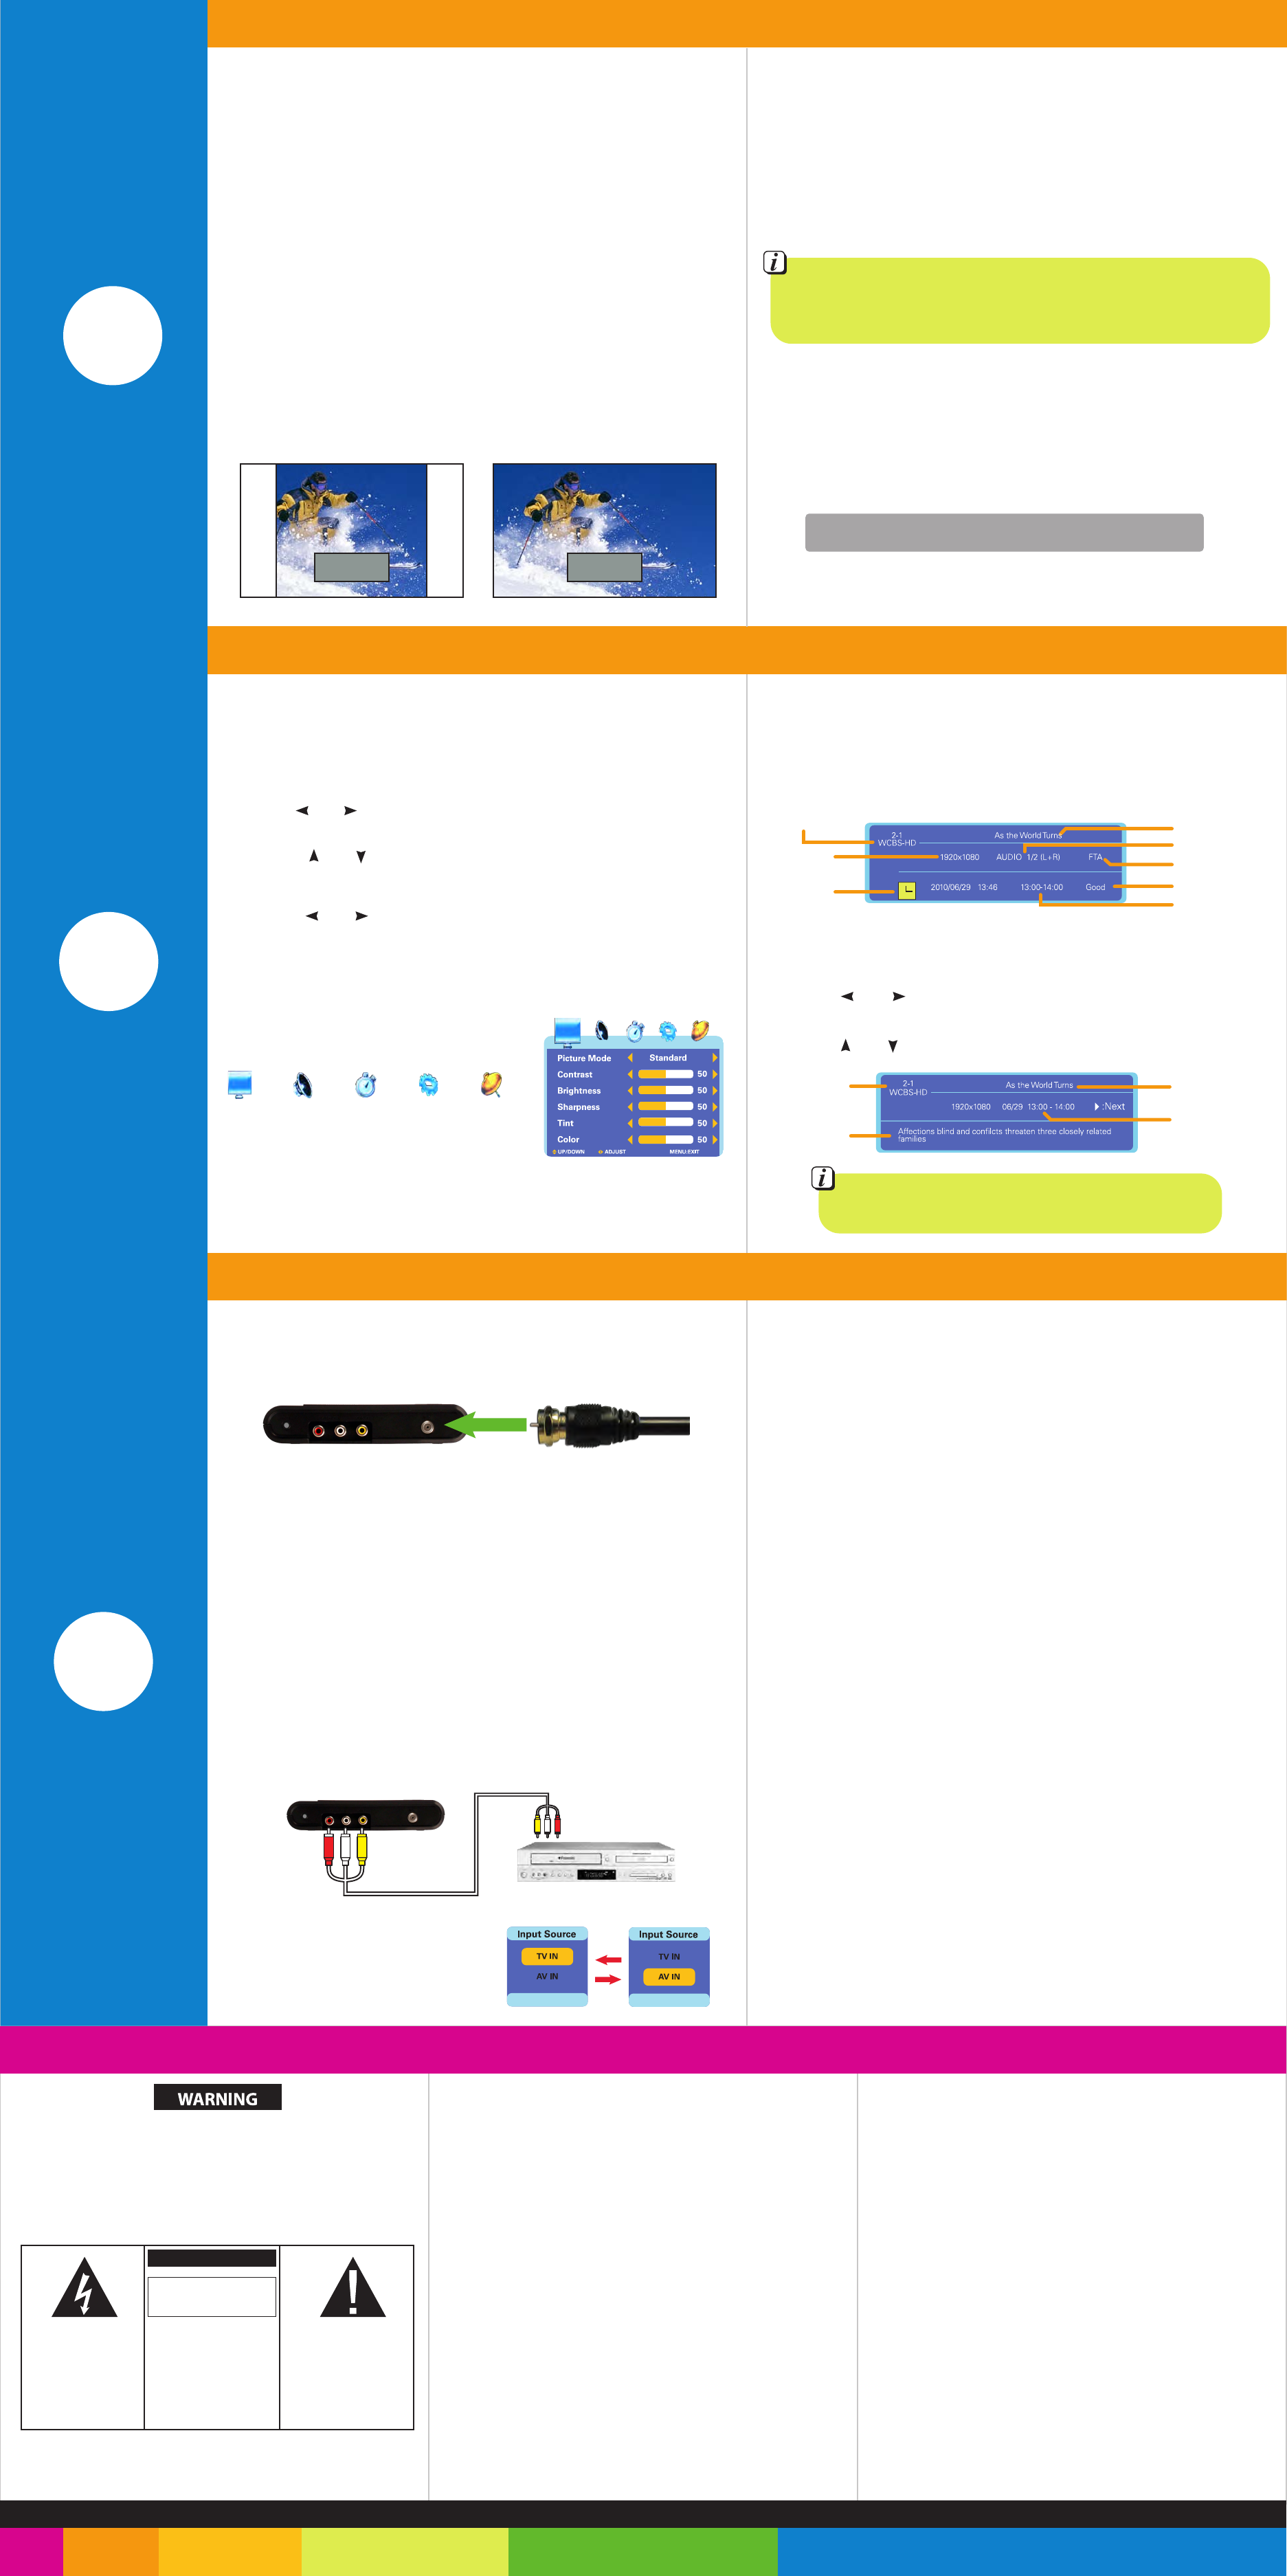
Choosing picture mode
1. Press the [PICTURE] button on the remote to enter the picture mode options.
2. Keep pressing the [PICTURE] button to choose between the following
picture modes: Standard, Dynamic, Soft or Personal.
Choosing picture size
1. Press the [ZOOM] button on the remote to enter the zoom mode options.
2. Keep pressing the [ZOOM] button to choose between WIDE and NORMAL
zoom modes.
Channel selection
Note: The TV’s receiver stores up to 69 channels, and each channel can
store up to 8 subchannels.
1. Press the [CH+] button to play the next channel/subchannel.
2. Press the [CH-] button to play the previous channel/subchannel.
3. To select a specific channel using the remote, use the numeric keypad.
Sleep timer
1. Press the [SLEEP] button on the remote to enter the sleep timer
mode options.
2. Keep pressing the [SLEEP] button to choose between the following sleep
timer options:
3. The TV will go into standby mode after the chosen time allotment.
Choose “OFF” to disable the sleep timer and return to normal viewing.
OFF / 15 / 30 / 60 / 90 / 120 / 180 / 240 minutes
Cable TV
1. Disconnect the external antenna from the unit and attach the
coaxial cable antenna to the RF IN antenna jack.
2. Press the [AUTO/OK] button on the TV to enter the channel
scanning screen.
3. Press the [VOL+] button to select “Yes” and press the [AUTO/OK] button
to confirm. The TV will start scanning for available cable channels and store
them into memory.
4. To scan for channels with the remote, connect the cable antenna to the
RF IN jack and refer to “Scanning by remote control”.
2. Press the [EPG] button on the remote to bring up the Electronic Program
Guide to view information on past, current or future programming on the
selected channel/program.
3. Use the [ ] or [ ] button to scroll through past or future program
information.
4. Use the [ ] or [ ] button to scroll through different channel information.
Information Guide
You can access the information guide to display current, past and future
programming information.
1. Press the [INFO] button on the remote to bring up the current program
information:
• No picture and sound – Check that the AC adaptor is properly attached
and plugged in, and check that the battery is charged. Make sure that the TV
input is set to TV.
• No picture – The TV reception signal might be weak. Try scanning for
channels again or move the TV to a different location and scan for channels.
• No sound – Check that the volume is turned up and the mute function is not
on and that headphones are not plugged into the TV. Also, the signal might be
weak, try moving the TV to a new location and scanning for channels again.
• Poor reception – Try adjusting the antenna or scanning for channels again.
• Dark or blurred picture – Try adjusting the brightness and contrast in the
picture settings menu, also check that the battery is charged enough.
• Unclear or unstable picture - Try adjusting the antenna or scanning for
channels again.
• Snow in picture – Most likely a power interference issue such as radio
frequency, power lines, etc. is interfering with the reception. Try adjusting the
antenna or moving the TV to a different location and scanning for channels again.
Changing the TV settings
You can change the settings on the TV by entering the different settings menus
and using the following procedure to navigate them:
1. Press the [MENU] button.
2. Use the [ ] or [ ] button on the remote or the [VOL-] or [VOL+] button
on the TV to scroll left or right to select the preferred settings menu.
3. Press the [ ] or [ ] button on the remote or the [CH+] or [CH-]
button on the TV to scroll up or down on the menus to select the desired
settings.
4. Press the [ ] or [ ] button on the remote or the [VOL+] or [VOL-] button
on the TV to scroll left or right to change to the desired settings.
5. Press the [MENU] button to confirm the new settings and return to the
menu options.
6. Press the [EXIT] button to close the settings menu.
External DVD or VCR
1. Using the supplied A/V Cable, plug the Yellow (Video), Red (Audio R),
and White (Audio L) plugs into the corresponding ”OUT” jacks on the
external source.
2. Plug the other ends into the corresponding “AV IN” jacks on the side of the TV.
3. Press the [TV/AV] button on the
remote or the [MODE] button on
the TV to switch the input to “AV IN”.
There are 5 different settings menus
The TV will remember the settings until they are changed, even if the player is
set to standby mode. To restore the settings to factory default, scroll right to
the “Options Settings” menu, then scroll down to “Restore Default”, and
scroll right to open the options menu and select “Yes” to confirm (you will have
to scan for channels again after restoring default settings).
Channel
settings
Audio
settings
Time & date
setting
Picture
settings
Options
settings
Note: Program information and/or availability may vary by
area depending on local service providers.
Note: If a channel has more than one subchannel associated with it (for
example channel 16.4), press the [1] button then press the [6] button then
press the [ ---- ] button then press the [4] button.
Basic operation
Normal Wide
Audio mode
Program name
Signal strength
Program time
Channel type
Current channel
Resolution
Date & Time
Current
channel
Program
summary
Date
& Time
Program
name
This Product is supplied and distributed new by AIT, Inc. (“AIT”) to the original consumer
purchaser and is warranted by AIT against defects in material and workmanship for a period
of one year from your date of purchase (“Warranty”).
In the unlikely event that this product is defective, or does not perform properly, you may within
one year from your original date of purchase return it to the authorized service center for
repair or exchange.
TO OBTAIN WARRANTY SERVICE:
- Provide proof of the date of purchase within the package (Dated bill of sale)
- Prepay all shipping costs to the authorized service center, and remember
to insure your return.
- Include a return shipping address (no P.O. Boxes), a telephone contact
number, and the defective unit within the package.
- Describe the defect or reason you are returning the product. Your product
will be repaired or replaced, at our option, for the same or similar model of equal value if
examination by the service center determines this product is defective. Products received
damaged as a result of shipping, will require you to file a claim with the carrier.
The shipping address of the authorized service center is:
AIT, Inc.
ATTN: Returns Department
14-C 53rd Street
Brooklyn, NY 11232
IN NO EVENT WILL AIT, ITS MANUFACTURERS, DISTRIBUTORS OR PLR IP HOLDINGS, LLC
BE LIABLE FOR ANY INCIDENTAL, DIRECT, INDIRECT, SPECIAL, PUNITIVE OR CONSEQUENTIAL
DAMAGES (SUCH AS, BUT NOT LIMITED TO, DAMAGES FOR LOSS OF PROFITS, BUSINESS,
SAVINGS, DATA OR RECORDS) RELATED TO THIS PRODUCT. EXCEPT AS STATED HEREIN,
NO OTHER WARRANTIES SHALL APPLY.
Should you have any questions or problems concerning this product, please contact our
customer service department at:
Customer Support:
1-877-768-8483 (Toll Free)
polaroidsupport@southerntelecom.com
Monday - Thursday: 9AM - 5PM (EST)
Friday: 9AM - 3PM (EST)
FCC Part 15:
This equipment has been tested and found to comply with the requirements for a Class B digital device
under Part 15 of the Federal Communications Commission (FCC) rules. These requirements are intended
to provide reasonable protection against harmful interference in a residential installation. This equipment
generates, uses and can radiate radio frequency energy and, if not installed and used in accordance with
the instructions, may cause harmful interference to radio communications. However, there is no
guarantee that interference will not occur in a particular installation. If this equipment does cause harmful
interference to radio or television reception, which can be determined by turning the equipment off and
on, the user is encouraged to try to correct the interference by one or more of the following measures:
● Re-orient or relocate the receiving antenna.
● Increase the separation between the equipment and receiver.
● Connect the equipment into an outlet on a circuit different from that to which the receiver
is connected.
● Consult the dealer or an experienced radio/TV technician for help.
Do not attempt to repair or modify this equipment.
Warning: Changes or modifications to this equipment not expressly approved by the party responsible for
compliance could void the user’s authority to operate the equipment.
“This device complies with Part 15 of the FCC Rules. Operation is subject to the following two conditions:
(1) this device may not cause harmful interference, and
(2) this device must accept any interference received, including interference that may cause
undesired operation.”
PLR IP Holdings, LLC, its licensees and affiliates, fully supports all electronic waste initiatives. As
responsible stewards of the environment, and to avoid violating established laws, you should properly dispose
of this product in compliance with all applicable regulations, directives or other governances in the area where
you reside. Please check with local authorities or the retailer where you purchased this product to determine
a location where you can appropriately dispose of the product.
You may also go to HYPERLINK "http://www.polaroid.com" www.polaroid.com and reference About /
Electronic Recycling to learn more about the specific laws in your area and to locate a collection facility
near your home.
If your electronic device has internal memory on which personal or other confidential data may be stored, you
may want to perform a data sanitization process before you dispose of your device to assure another party
cannot access your personal data. Data sanitization varies by the type of product and its software, and you
may want to research the best sanitization process for your device before disposal. You may also check with your
local recycling facility to determine their data sanitization procedures during the recycling process.
External connections Troubleshooting