


B
B
C
C
D
D
A
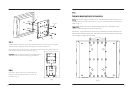
Using an electronic stud finder, locate the center of the wooden stud.
Position the Wall Plate (2) in desired mounting location over stud.
Level the Wall Plate, and then using the Wall Plate as a template, mark
mounting hole locations over the center of the stud.
Using a 5mm drill bit, drill 3 mounting holes into the stud to a depth of 80mm.
Securely mount Wall Plate with supplied Long Bolts (J) and Washers (K). (Fig. 2)
Dab a bit of liquid soap onto the bolt threads before the driving
bolt into the stud. This makes the installation easier, and will prevent damage
from occurring to the bolt.
Step 2
Wooden Stud Mounting
Important:
Step 2
Wooden Stud Mounting
Important:
Masonry Mounting
Caution:
NEVER
Position the Wall Plate (2) in desired mounting location on wall.
Level the Wall Plate , and then using the Wall Plate as a template, mark
mounting hole locations on wall.
Using a 10mm masonry bit, drill 3 mounting holes into masonry to a depth
of 80mm.
Insert Wall Anchors (L) into the mounting holes, and lightly tap them flush
to the wall with a hammer, as shown in Fig 2.
Wall Anchors should only be used for masonry mounting.
use wall anchors to mount this mount to drywall.
Securely mount Wall Plate with supplied Long Bolts (J) and Washers (K). (Fig. 2)
Masonry Mounting
Caution:
NEVER
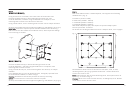
Attach Monitor Plate to back of the monitor with 4mm, 5mm, or 6mm
mounting Screws. (A-F) (Fig. 4) Check the monitor’s owners manual for
correct size screws to use.
Some monitors with recessed mounting lands, will require the use of
Spacers (I), as shown in Fig. 4.
Never force screws into the monitor, as damage may occur. NEVER
use an electric drill to secure screws.
Note:
Caution:
Note:
Caution:
Fig. 2
Step 3
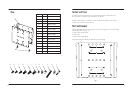
This mount Monitor Plate is VESA compliant, and supports the following
VESA Patterns ( Fig. 3):
A: VESA 75 (75mm x 75mm)
B: VESA 100 (100mm x 100mm)
C: VESA 200 (100mm x 200mm)
D: VESA 200 (200mm x 200mm)
Non VESA compliant displays will require an optional adaptor plate.
Contact your dealer for details.
For details on attaching the Monitor Plate to a Adaptor Plate, turn to page 8.
Step 3
Fig. 3
-5-
-4-
J
K
L