


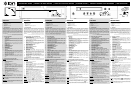

ENGLISH
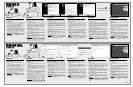
1. Insert included CD into your computer’s CD drive.
2. Connect power cable of VCR 2 PC to power outlet.
3. Turn on the VCR 2 PC.
4. Connect USB cable from the VCR 2 PC to a USB port on your
computer.
5. The driver installation process should begin automatically and
you will see the “Found New Hardware Wizard” dialog. When
the dialog asks you to connect to Windows Update to search for
software, select “Yes, this time only” and click “Next”.
6. Select “Install software automatically” and click “Next”.
7. The driver installation process will begin. Allow for this process
to complete. When the process has completed, click “Finish”
8. Once your device has been successfully installed, you will see
the message “Your new hardware is installed and ready to use.”
9. Lastly, install the software by clicking the “Install EZ VHS
Converter Software” button. Follow the on-screen instructions to
complete the software installation process.
IMPORTANT
: Making sure your software is up-to-date ensures
best performance. Go to Setup
X
General
X
About EZ VHS
Converter
X
Update to check for available updates. (Internet
connection required)
ESPAÑOL
1. Inserte el CD incluido en el lector de CD de la computadora.
2. Conecte el cable de alimentación del VCR 2 PC al tomacorriente.
3. Encienda el VCR 2 PC.
4. Conecte el cable USB desde el VCR 2 PC a un puerto USB de la
computadora.
5. El proceso de instalación del driver debe comenzar
automáticamente y verá el diálogo “Found New Hardware Wizard”
(Encontrado asistente de nuevo hardware). Cuando el diálogo le
solicite conectarse a Windows Update para buscar el software,
seleccione “Yes, this time only” (Sí, sólo esta vez) y haga clic en
“Next” (Siguiente).
6. Seleccione “Install software automatically” (Instalar software
automáticamente) y haga clic en “Next”.
7. Comienza el proceso de instalación del driver. Espere que
termine este proceso. Cuando haya terminado el proceso, haga
clic en “Finish” (Terminar).
8. Una vez que su dispositivo se haya instalado exitosamente, verá
el mensaje “Your new hardware is installed and ready to use.” (Su
nuevo hardware está instalado y listo a usar).
9. Finalmente, instale el software haciendo clic en el botón “Install
EZ VHS Converter Software” (Instalar el software EZ VHS
Converter). Siga las instrucciones de la pantalla para completar el
proceso de instalación del software.
IMPORTANTE:
Asegurar que su software esté actualizado
garantiza el mejor rendimiento. Vaya a Setup
X
General
X
About EZ VHS Converter
X
Update (Configuración > General >
Acerca de EZ VHS Converter > Actualización) para verificar las
actualizaciones disponibles. (Se requiere conexión a Internet).
FRANÇAIS
1. Insérez le CD fourni dans le lecteur CD de l’ordinateur.
2. Branchez le câble d’alimentation du VCR 2 PC à prise électrique.
3. Mettez le VCR 2 PC sous tension.
4. Branchez le câble USB du VCR 2 PC au port USB de l’ordinateur.
5. Le processus d’installation des pilotes devrait commencer
automatiquement et la fenêtre « Ajout de nouveau matériel
détecté » devrait apparaître. Lorsqu'une fenêtre vous demande si
vous désirez vous connecter à Windows Update pour chercher un
logiciel, sélectionnez « Oui, cette fois seulement », puis cliquez
sur « Suivant ».
6. Sélectionnez « Installer le logiciel automatiquement », puis cliquez
sur « Suivant ».
7. Le processus d’installation du pilote sera lancé. Veuillez attendre
que le processus soit terminé. Lorsque le processus est terminé,
cliquez sur « Terminé ».
8. Une fois l’appareil correctement installé, le message « nouveau
matériel installé et prêt à l'emploi » apparaît.
9. Installez le logiciel en cliquant sur « Install EZ VHS Converter
Software ». Suivez les instructions à l’écran pour compléter le
processus d’installation.
IMPORTANT :
Veuillez vous assurer que la version du logiciel est
à jour pour un meilleur rendement. Allez à to Setup
X
General
X
About EZ VHS Converter
X
Update afin de vérifier pour les
mises à jour disponibles. (Connexion internet requise)
DEUTSCH
1. Beigelegte CD in das CD-Laufwerk Ihres Computers einlegen.
2. Netzkabel vom VCR 2 PC an Steckdose anschließen.
3. VCR 2 PC einschalten.
4. USB-Kabel vom VCR 2 PC an den USB-Port Ihres Computers
anschließen.
5. Die Installation der Treiber sollte automatisch beginnen und das
Dialogfenster “Neue Hardware gefunden” erscheinen. Sobald die
Aufforderung, mit Windows Update in Verbindung zu treten, um
Software zu finden, erscheint, auf “Ja, nur dieses Mal ” und
“Weiter” klicken.
6. “Software automatisch installieren” wählen und auf “Weiter”
klicken.
7. Der Treiberinstallationsprozess beginnt. Dieser Prozess muss
fertiggestellt werden. Nach Fertigstellung auf “Beenden” klicken.
8. Sobald Ihr Gerät erfolgreich installiert wurde, erscheint die
Nachricht “Ihre neue Hardware ist installiert und betriebsbereit.”
9. Zuletzt die Software installieren, indem Sie auf “EZ VHS
Konvertierungssoftware installieren” klicken. Folgen Sie den
Anweisungen auf dem Bildschirm, um die Installation
durchzuführen.
WICHTIG
: Für beste Ergebnisse ist es wichtig, dass die Software
standing auf dem letzten Stand gehalten wird. Über Setup
X
General
X
About EZ VHS Converter
X
Update kann
nachgeprüft werden, ob Aktualisierungen vorhanden sind. (hierzu
wird eine Internetverbindung benötigt)
.
ITALIANO
1. Inserire il CD in dotazione nel lettore CD del computer.
2. Collegare il cavo di alimentazione del VCR 2 PC alla presa elettrica.
3. Accendere il VCR 2 PC.
4. Collegare il cavo USB dal VCR 2 PC ad una porta USB del computer.
5. Il processo di installazione dei driver dovrebbe iniziare
automaticamente e apparirà la finestra di dialogo “Found New
Hardware Wizard” (trovato nuovo hardware). Quando vi viene
richiesto di collegarvi a Windows Update per cercare il software,
selezionare “Yes, this time only” (Sì, solo per questa volta) e quindi
cliccare su “Next” (Avanti).
6. Selezionare “Install software automatically” (Installa software
automaticamente) e cliccare su “Next” (Avanti).
7. Avrà inizio il processo di installazione dei driver. Lasciare che il
processo venga portato a termine. Una volta completato il processo,
cliccare su “Finish” (Finito).
8. Una volta che il dispositivo è stato installato con successo, verrà
visualizzato il messaggio “Your new hardware is installed and ready to
use” (Il nuovo hardware è stato installato ed è pronto per l’uso).
9. Infine, installare il software cliccando sul pulsante “Install EZ VHS
Converter Software” (Installa il Software EZ VHS Converter). Seguire
le istruzioni a display per completare il processo di installazione del
software.
IMPORTANTE
: assicurarsi che il software sia sempre aggiornato ne
garantisce le migliori prestazioni. Recarsi su Setup
X
General
X
About EZ VHS Converter
X
Update per verificare l’eventuale
presenza di aggiornamenti disponibili. (Richiede il collegamento ad
Internet.)
NEDERLANDS
1. Plaats de bijgeleverde CD in het CD-station van uw PC.
2. Sluit het netsnoer van de VCR 2 PC aan op een
wandcontactdoos.
3. Schakel de VCR 2 PC in.
4. Sluit de USB-kabel van de VCR 2 PC aan op een USB-poort op
de PC.
5. Het installatieproces van de stuurprogramma's moet automatisch
starten en u zult het venster met de wizard "Nieuwe hardware
gevonden" zien. Wanneer er gevraagd wordt naar Windows
Update te verbinden om te zoeken naar software kiest u voor "Ja,
alleen deze keer" en klikt op "Volgende".
6. Selecteer: "Software automatisch installeren" en klik op
"Volgende".
7. Het installatieproces voor het stuurprogramma zal beginnen. Geef
het proces tijd voor afronding. Wanneer het proces is afgerond,
klikt u op "Einde".
8. Nadat het apparaat succesvol is geïnstalleerd ziet u het bericht:
"De nieuwe hardware is geïnstalleerd en klaar voor gebruik".
9. Als laatste installeert u de software door te klikken op knop “Install
EZ VHS Converter Software”. Volg de instructies op het scherm
om het installatieproces voor de software af te ronden.
BELANGRIJK
: Zorg ervoor dat uw software up-to-date blijft om
een goede prestatie te waarborgen. Ga naar Setup
X
General
X
About EZ VHS Converter
X
Update om te controleren of er
updates beschikbaar zijn. (Internetverbinding vereist)
ENGLISH
1. Insert included CD into your computer’s CD drive.
2. Connect power cable of VCR 2 PC to a power outlet.
3. Turn on the VCR 2 PC.
4. Connect USB cable from the VCR 2 PC to a USB port on your
computer.
5. The driver installation process should begin automatically and
you will see the “Found New Hardware Wizard” dialog. Click
“Locate and install driver software automatically”.
6. Windows will ask you to insert a CD. Click “Next”.
7. You may see a “Windows can’t verify the publisher of this
software” warning. Click “Install this driver software anyway”.
8. The driver installation process will begin. Allow for this process
to complete. When the process has completed, click “Close”.
9. Lastly, install the software by clicking the “Install EZ VHS
Converter Software” button. Follow the on-screen instructions to
complete the software installation process.
IMPORTANT
: Making sure your software is up-to-date ensures
best performance. Go to Setup
X
General
X
About EZ VHS
Converter
X
Update to check for available updates. (Internet
connection required)
ESPAÑOL
1. Inserte el CD incluido en el lector de CD de la computadora.
2. Conecte el cable de alimentación del VCR 2 PC a un
tomacorriente.
3. Encienda el VCR 2 PC.
4. Conecte el cable USB desde el VCR 2 PC a un puerto USB de la
computadora.
5. El proceso de instalación del driver debe comenzar
automáticamente y verá el diálogo “Found New Hardware Wizard”
(Encontrado asistente de nuevo hardware). Haga clic en “Locate
and install driver software automatically” (Localizar e instalar el
software driver automáticamente).
6. Windows le solicitará que inserte un CD. Haga clic en “Next”
(Siguiente).
7. Es posible que aparezca la advertencia “Windows can’t verify the
publisher of this software” (Windows no puede verificar el editor
de este software). Haga clic en “Install this driver software
anyway” (Instale este software driver de todos modos).
8. Comienza el proceso de instalación del driver. Espere que
termine este proceso. Cuando haya terminado el proceso, haga
clic en “Close” (Cerrar).
9. Finalmente, instale el software haciendo clic en el botón “Install
EZ VHS Converter Software” (Instalar el software EZ VHS
Converter). Siga las instrucciones de la pantalla para completar el
proceso de instalación del software.
IMPORTANTE:
Asegurar que su software esté actualizado
garantiza el mejor rendimiento. Vaya a Setup
X
General
X
About EZ VHS Converter
X
Update (Configuración > General >
Acerca de EZ VHS Converter > Actualización) para verificar las
actualizaciones disponibles. (Se requiere conexión a Internet)
FRANÇAIS
1. Insérez le CD fourni dans le lecteur CD de l’ordinateur.
2. Branchez le câble d’alimentation du VCR 2 PC à prise électrique.
3. Mettez le VCR 2 PC sous tension.
4. Branchez le câble USB du VCR 2 PC au port USB de l’ordinateur.
5. Le processus d’installation des pilotes devrait commencer
automatiquement et la fenêtre « Ajout de nouveau matériel
détecté » devrait apparaître. Cliquez sur « Trouver et installer
logiciel automatiquement ».
6. Windows vous invite à insérer un CD. Cliquez sur « Suivant ».
7. Il se peut que la mise en garde « Windows ne peut vérifier la
signature de ce logiciel » apparaisse. Cliquez sur « Installer quand
même le logiciel ».
8. Le processus d’installation du pilote sera lancé. Veuillez attendre
que le processus soit terminé. Lorsque le processus est terminé,
cliquez sur « Fermer ».
9. Installez le logiciel en cliquant sur « Install EZ VHS Converter
Software ». Suivez les instructions à l’écran pour compléter le
processus d’installation.
IMPORTANT :
Veuillez vous assurer que la version du logiciel est
à jour pour un meilleur rendement. Allez à Setup
X
General
X
About EZ VHS Converter
X
Update afin de vérifier pour les mises
à jour disponibles. (Connexion internet requise)
DEUTSCH
1. Beigelegte CD in das CD-Laufwerk Ihres Computers einlegen.
2. Netzkabel vom VCR 2 PC an Steckdose anschließen.
3. VCR 2 PC einschalten.
4. USB-Kabel vom VCR 2 PC an den USB-Port Ihres Computers
anschließen.
5. Die Installation der Treiber sollte automatisch beginnen und das
Dialogfenster “Neue Hardware gefunden” erscheinen. Auf
“Treibersoftware finden und automatisch installieren” klicken.
6. Windows wird Sie auffordern, eine CD einzulegen. Auf “Weiter”
klicken.
7. Die Warnung “Windows kann den Verleger dieser Software nicht
verifizieren” erscheint unter Umständen. Auf “Treibersoftware
trotzdem installieren” klicken.
8. Der Treiberinstallationsprozess beginnt. Dieser Prozess muss
fertiggestellt werden. Nach Fertigstellung auf “Beenden” klicken.
9. Zuletzt die Software installieren, indem Sie auf “EZ VHS
Konvertierungssoftware installieren” klicken. Folgen Sie den
Anweisungen auf dem Bildschirm, um die Installation
durchzuführen.
WICHTIG
: Für beste Ergebnisse ist es wichtig, dass die Software
standing auf dem letzten Stand gehalten wird. Über Setup
X
General
X
About EZ VHS Converter
X
Update kann
nachgeprüft werden, ob Aktualisierungen vorhanden sind. (hierzu
wird eine Internetverbindung benötigt)
ITALIANO
1. Inserire il CD in dotazione nel lettore CD del computer.
2. Collegare il cavo di alimentazione del VCR 2 PC ad una presa
elettrica.
3. Accendere il VCR 2 PC.
4. Collegare il cavo USB dal VCR 2 PC ad una porta USB del computer.
5. Il processo di installazione dei driver dovrebbe iniziare
automaticamente e apparirà la finestra di dialogo “Found New
Hardware Wizard” (trovato nuovo hardware). Cliccare su “Locate and
install driver software automatically” (Individua e installa
automaticamente i driver del software).
6. Windows chiederà di inserire un CD. Cliccare su “Next” (Avanti).
7. Potrebbe apparire l’avviso “Windows can’t verify the publisher of this
software” (Windows non è in grado di verificare l’autore di questo
software). Cliccare su “Install this driver software anyway” (Installa
comunque questo driver).
8. Avrà inizio il processo di installazione dei driver. Lasciare che il
processo venga portato a termine. Una volta completato il processo,
cliccare su “Close” (Chiudi).
9. Infine, installare il software cliccando sul pulsante “Install EZ VHS
Converter Software” (Installa il Software EZ VHS Converter). Seguire
le istruzioni a display per completare il processo di installazione del
software.
IMPORTANTE
: assicurarsi che il software sia sempre aggiornato ne
garantisce le migliori prestazioni. Recarsi su Setup
X
General
X
About EZ VHS Converter
X
Update per verificare l’eventuale
presenza di aggiornamenti disponibili. (Richiede il collegamento ad
Internet.)
NEDERLANDS
1. Plaats de bijgeleverde CD in het CD-station van uw PC.
2. Sluit het netsnoer van de VCR 2 PC aan op een
wandcontactdoos.
3. Schakel de VCR 2 PC in.
4. Sluit de USB-kabel van de VCR 2 PC aan op een USB-poort op
de PC.
5. Het installatieproces van de stuurprogramma's moet automatisch
starten en u zult het venster met de wizard "Nieuwe hardware
gevonden" zien. Klik op "Software voor stuurprogramma's
automatisch vinden en installeren".
6. Windows zal vragen om een CD. Klik op "Volgende".
7. U kunt een waarschuwing "Windows kan de uitgever van deze
software niet verifiëren" te zien krijgen. Klik op "Het
stuurprogramma toch installeren".
8. Het installatieproces voor het stuurprogramma zal beginnen. Geef
het proces tijd voor afronding. Wanneer het proces is afgerond,
klikt u op "Sluiten".
9. Als laatste installeert u de software door te klikken op knop “Install
EZ VHS Converter Software". Volg de instructies op het scherm
om het installatieproce voor de software af te ronden.
BELANGRIJK
: Zorg ervoor dat uw software up-to-date blijft om
een goede prestatie te waarborgen. Ga naar Setup
X
General
X
About EZ VHS Converter
X
Update om te controleren of er
updates beschikbaar zijn. (Internetverbinding vereist)
WINDOWS XP
DRIVER INSTALLATION
WINDOWS VISTA
DRIVER INSTALLATION
MANUAL VERSION 1.1