


2
3
Compatible Discs
This DVD Player is capable of playing the following types of
discs: DVDs, Audio CDs, Video CDs, and CDs with mp3 files,
WMA files (Windows Media Audio), and JPEG files on them.
Before you put a disc in the player, make sure it is compatible.
You can’t play the following types of discs: Laserdiscs, CD-I,
CD-ROM (computer-only discs), DVD-ROM, or discs recorded
using other broadcast standards (i.e., PAL or SECAM); CD-G
discs.
Notes: Some discs may not be compatible due to laser pickup, recording
formats, and software used.
Some technologies and methods used for mp3 file recording on CD-Rs can
prevent optimal playback of these files on your DVD player by degrading the
sound quality and/or the ability of the player to read the file.
Playing Discs
DVD+Rewritable
Regional Coding
Both the DVD Player and the discs are coded by region. These regional codes must
match in order for the disc to play. This player’s code is Region 1.
Turn on the DVD Player
1. Plug the power cord into the outlet once the DVD player is connected to your TV.
2. Turn on the TV and tune to its Video Input Channel, if necessary.
3. Press the STANDBY/STOP on the DVD player or the ON/OFF button on the
remote control to turn it on.
4. Press the OPEN/CLOSE button on the front of the player or remote control to
open the disc tray.
5. Place a disc gently into the tray with the disc’s label facing up (double-sided discs
have content on both sides, so you can place the disc with either side up.)
6. Press OPEN/CLOSE again to close the disc tray. Play starts automatically. If a menu
appears, one of its options can be selected to start playing the disc. Highlight it and
press OK.
7. Press STOP to stop playback. The player remembers the point where disc was
stopped. If you press PLAY again, playback resumes from this point. To stop playback
completely or to start again from the beginning, press STOP twice. If the player
is left in STOP mode for more than one minute without any user interaction, the
screen saver is activated.
Basic Playback Options
Search - To search a disc, you can use the FORWARD button or REVERSE button.
You can also use the following search features:
Picture Scan - When you’re playing a disc, each time you press FORWARD or
REVERSE, your DVD player scans the disc faster until you reach the fastest scan speed.
To resume normal playback, press PLAY or continue to press FORWARD or REVERSE.
Freeze Frame and Frame Advance – While a disc is playing, press PAUSE to
freeze the picture. To advance one frame at a time, press PAUSE repeatedly. To resume
normal playback, press PLAY.
Note: After approximately one minute in PAUSE with no user interaction, the player goes into screeen saver
mode.
Slow Motion – While a disc is playing, press PAUSE. Press REVERSE or FORWARD
(each time you press reverse or forward, the slow motion will get even slower until
you reach the slowest speed). To resume normal playback, press PLAY.
Chapter/Track Advance – While a disc is playing, you can skip forward or backward
a chapter or track at a time by pressing the SKIP | and SKIP .
Note: Use the numeric buttons to directly access a specific track or chapter number. For single digit tracks
or chapters, enter a 0 before single digit numbers; for example, enter 0, then 3 for chapter/track 3.
Zoom – While a disc is playing, press ZOOM (the player zooms in on the image).
Each time you press ZOOM, the picture is magnified even more (until you get to the
maximum zoom level). To see other parts of the picture when you’ve zoomed in on
the image, try pressing the ,, and buttons to go in corresponding directions.
This feature is called pan and scan.
Playback Modes
Repeat Playback
While the disc is playing, press REPEAT button repeatedly to select a play mode:
DVD play modes: Title repeat, Chapter repeat, A-B repeat;
CD play modes: All tracks repeat, Track repeat, A-B repeat;
A-B Repeat
To repeat a segment between two points (A and B), press the A-B button at the
beginning of the segment you want to repeat. Allow the disc to play to the end of the
segment or use FORWARD to advance to the end point (B). Press the A-B button
again at the end of the segment. The segment plays repeatedly until you press A-B to
resume normal playback.
Program Playback (all discs except WMA and mp3)
With this option you choose and program the playback order.
1. Insert a disc.
2. In Stop mode, press the PROGRAM button. The Program menu appears.
3. Use the number buttons to enter the title and/or chapter number (for DVD) or
track number (for VCD and Audio CD). Repeat Step 3 as often as necessary.
4. Use the ,, and buttons to select Start.
5. Press the PLAY button to start playback. Tracks are played in the order of the
playback list. Playback stops once all tracks have been played.
6. Press the STOP button to stop program playback. Press the STOP button twice or
the OPEN/CLOSE button to cancel program playback.
Notes: The playback list remains until the disc is removed from the player.
Press PROGRAM repeatedly to take you back to the beginning or toggle between the lists.
Random Playback (VCD and audio CD only)
All the tracks are played in a random order (chosen by the DVD player)
1. Insert a disc.
2. In Stop mode, press the RANDOM button (Random appears).
3. Press the PLAY button to start random playback. Once 20 tracks have been
randomly played, the player automatically stops playback.
4. Press the RANDOM button again to stop playback (Random disappears).
Advanced Playback Features
Audio (DVD, VCD and CD)
Some discs have several audio tracks used for different languages or different audio
formats. To change the language or audio format during play, press the AUDIO button
one or more times to select one of the available audio formats or languages.
Note: This option is only available if the disc offers a number of languages or formats.
Bookmarks
The Bookmark feature lets you mark a point on the disc so you can quickly start
playing the disc from that location. The player stores bookmarks as long as the disc
remains in the player and the unit remains on.
1. Press the BOOKMARK button during playback (a menu is displayed).
2. To create a bookmark, select a empty bookmark using the andbuttons and
press the PLAY button.
3. Repeat Step 2 as often as necessary.
4. To start playback from a bookmark, press the BOOKMARK button, select the
bookmark using the andbuttons and press the PLAY button.
5. To delete a bookmark, press the BOOKMARK button, select the bookmark using
the andbuttons and press the CLEAR button.
6. Exit the Bookmark feature, by pressing the BOOKMARK button.
Display
The Display appears across the top of the screen when you press the DISPLAY button
on the remote while playing a disc. Press the DISPLAY button repeatedly to scroll
through playback information.
Preview
The Preview feature enables you to view contents of the disc on the screen. To
preview the disc:
1. Press the PREVIEW button during playback.
2. Highlight the preview selection.
• Digest: shows all the available contents. Input the number of the item you want
to play using the numeric buttons and press OK to confirm.
• Interval: shows all tracks in 10-minute intervals. Input the number corresponding
to the interval where you want to start playback from and press OK to confirm.
3. Select NEXT to view the next page, MENU to return to the Select Disc Type menu,
or START to begin playback.
Introscan (Audio CDs only)
Use this feature to preview the first few seconds of each track on a CD. Press
PREVIEW button on the remote control to start the Introscan.
Playback Control (PBC)
The Playback Control feature is available only on Video CDs. Press the TITLE MENU
button to turn the PBC feature on and off. The Playback Control feature supports the
menus of the VCD format similar to a DVD menu.
Playing mp3, WMA, or JPEG files
mp3 is an audio file format which compresses recorded music. It was developed by
Fraunhofer Gesellschaft in collaboration with Thomson Inc. The main advantage of the
mp3 format is the ability to store CD-quality music tracks on a personal computer in
a user-friendly, compressed files. WMA (Windows Media Audio) is another audio
file format, developed by Microsoft. JPEG files are image files (make sure they have a
resolution of less than 5 megapixels.)
Note: The time taken for the contents of the disc to be displayed varies according to the size and number
of JPEG files actually on the disc. If nothing is displayed after a few minutes, it is likely that certain files are
too large. In this case, reduce the files’ resolution to less than 5 megapixels and write another disc.
Before inserting a disc, check that it is compatible with the player:
1. Turn on the DVD and open the disc tray by pressing OPEN/CLOSE.
2. Place the disc in the tray with the printed side facing up and close the tray.
3. Select a folder using the andbuttons on the remote control; press OK to see
the folder’s contents.
4. Select a track using the andbuttons on the remote control; press OK to start
playback.
5. Press the STOP button to stop playback.
6. To go back to the folder list, press the button in stop mode.
Repeat Play Modes
1. Press the REPEAT button repeatedly to select a play mode:
Repeat One: Repeats the current track until the STOP button is pressed.
Repeat Folder: Repeats the current folder until the STOP button is pressed.
2. To cancel the repeat playback mode, press the REPEAT button until FOLDER
appears on the TV screen.
JPEG / mp3
To play all mp3 or JPEG files in a folder, highlight the first file in the folder and press
PLAY. Also, you can play JPEG and mp3 files simultaneously by starting the music first
and then using the menu to select a photo.
Program Playback (WMA and mp3)
You can choose and create a playback list:
1. Highlight the song that you want added to the play list and press BOOKMARK.
(add to playlist appears at bottom of screen).
2. Repeat step one until you have the list of specific songs that you want to play.
3. Press BOOKMARK to delete a song from the playlist.
4. Press PROGRAM to display the playlist and press PLAY.
Notes: The playback list remains until the disc is removed from the player.
Press PROGRAM repeatedly to take you back to the beginning or toggle between the lists.
Menu System
The DVD Player Menu System
The DVD player menu system is not the same as the disc menu. The DVD player menu
appears when there’s no disc playing.
-- General Setup Page --
TV Display PS
Menu Lang English
Setup
Dolby
Preferences
To access the DVD player menus:
• Press the SETUP button to display the main
menu.
• Select a menu icon using the and
buttons.
• Use the andbuttons to select one of
the options in the menu.
• Press the button to access the submenu.
• Use the andbuttons select one of the options in the submenu.
• Press OK to confirm your selection.
• Return to a previous menu using the button.
• To exit from the player menus, press the SETUP button repeatedly.
The General Setup Menu (shown above)
TV Display
You can choose a display that affects how a disc’s content appears on your TV screen.
Normal/PS (4:3 Standard): reproduces a 4:3 picture with some distortion,
Normal/LB (4:3 Letterbox): gives best reproduction of pictures recorded in this
format (i.e., with horizontal bands at the top and bottom of the screen),
Wide (16:9 Widescreen): reproduces 16:9 format films in full, on a 16:9 screen.
Menu Lang (Language)
The Menu Lang feature enables you to set the preferred on-screen menu language:
English, Spanish, or French.
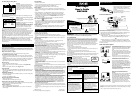
Front of the DVD Player (buttons appear left to right below)
1
2
4
5
6
7
8
9
3
1 Card Slot 1 Accepts cards: Only Multi-Media Card (MMC); Secure Digital
(SD); Memory Stick (MS) or Smart Media (SM)
2 Card Slot 2 Accepts cards: Compact Flash (CF) Type 1; or Compact Flash
(CF) Type 11
3 Display Area
4 Remote Sensor Receives the remote control signal.
5 Standby Light Lights when DVD player is turned off.
6 OPEN/CLOSE Opens and closes disc tray.
7 PLAY Begins disc play.
8 SELECT Switches between memory card Slot 1, Slot 2 and disc tray.
9 STANDBY/STOP Turns the DVD player on and off. During playback, places
disc in stop mode. In stop mode, press and hold to put DVD
player in standby mode.
Card Readers
The Card reading formats for slot playback are mp3, WMA, and JPEG. When using a
memory card, the file name must be seven characters in order to be displayed, unlike
the file name of a disc.
1. Insert a compatible memory card (type described above) into Slot 1 or Slot 2.
2. Press the SELECT button to choose Card 1; press again to choose Card 2.
Repeatedly pressing the SELECT button switches between the Card 1, Card 2, and
disc tray.
3. Use the navigation buttons (,,,) to move up, down, left, or right through
the folders; press OK to select the highlighted folder or item.
Note: To play all of the files in a folder, highlight the first file and press PLAY.
4. Press PLAY to begin playback.
5. Press STOP to stop playback.
6. To remove the information from the screen, repeatedly press the SELECT button
or remove the card.
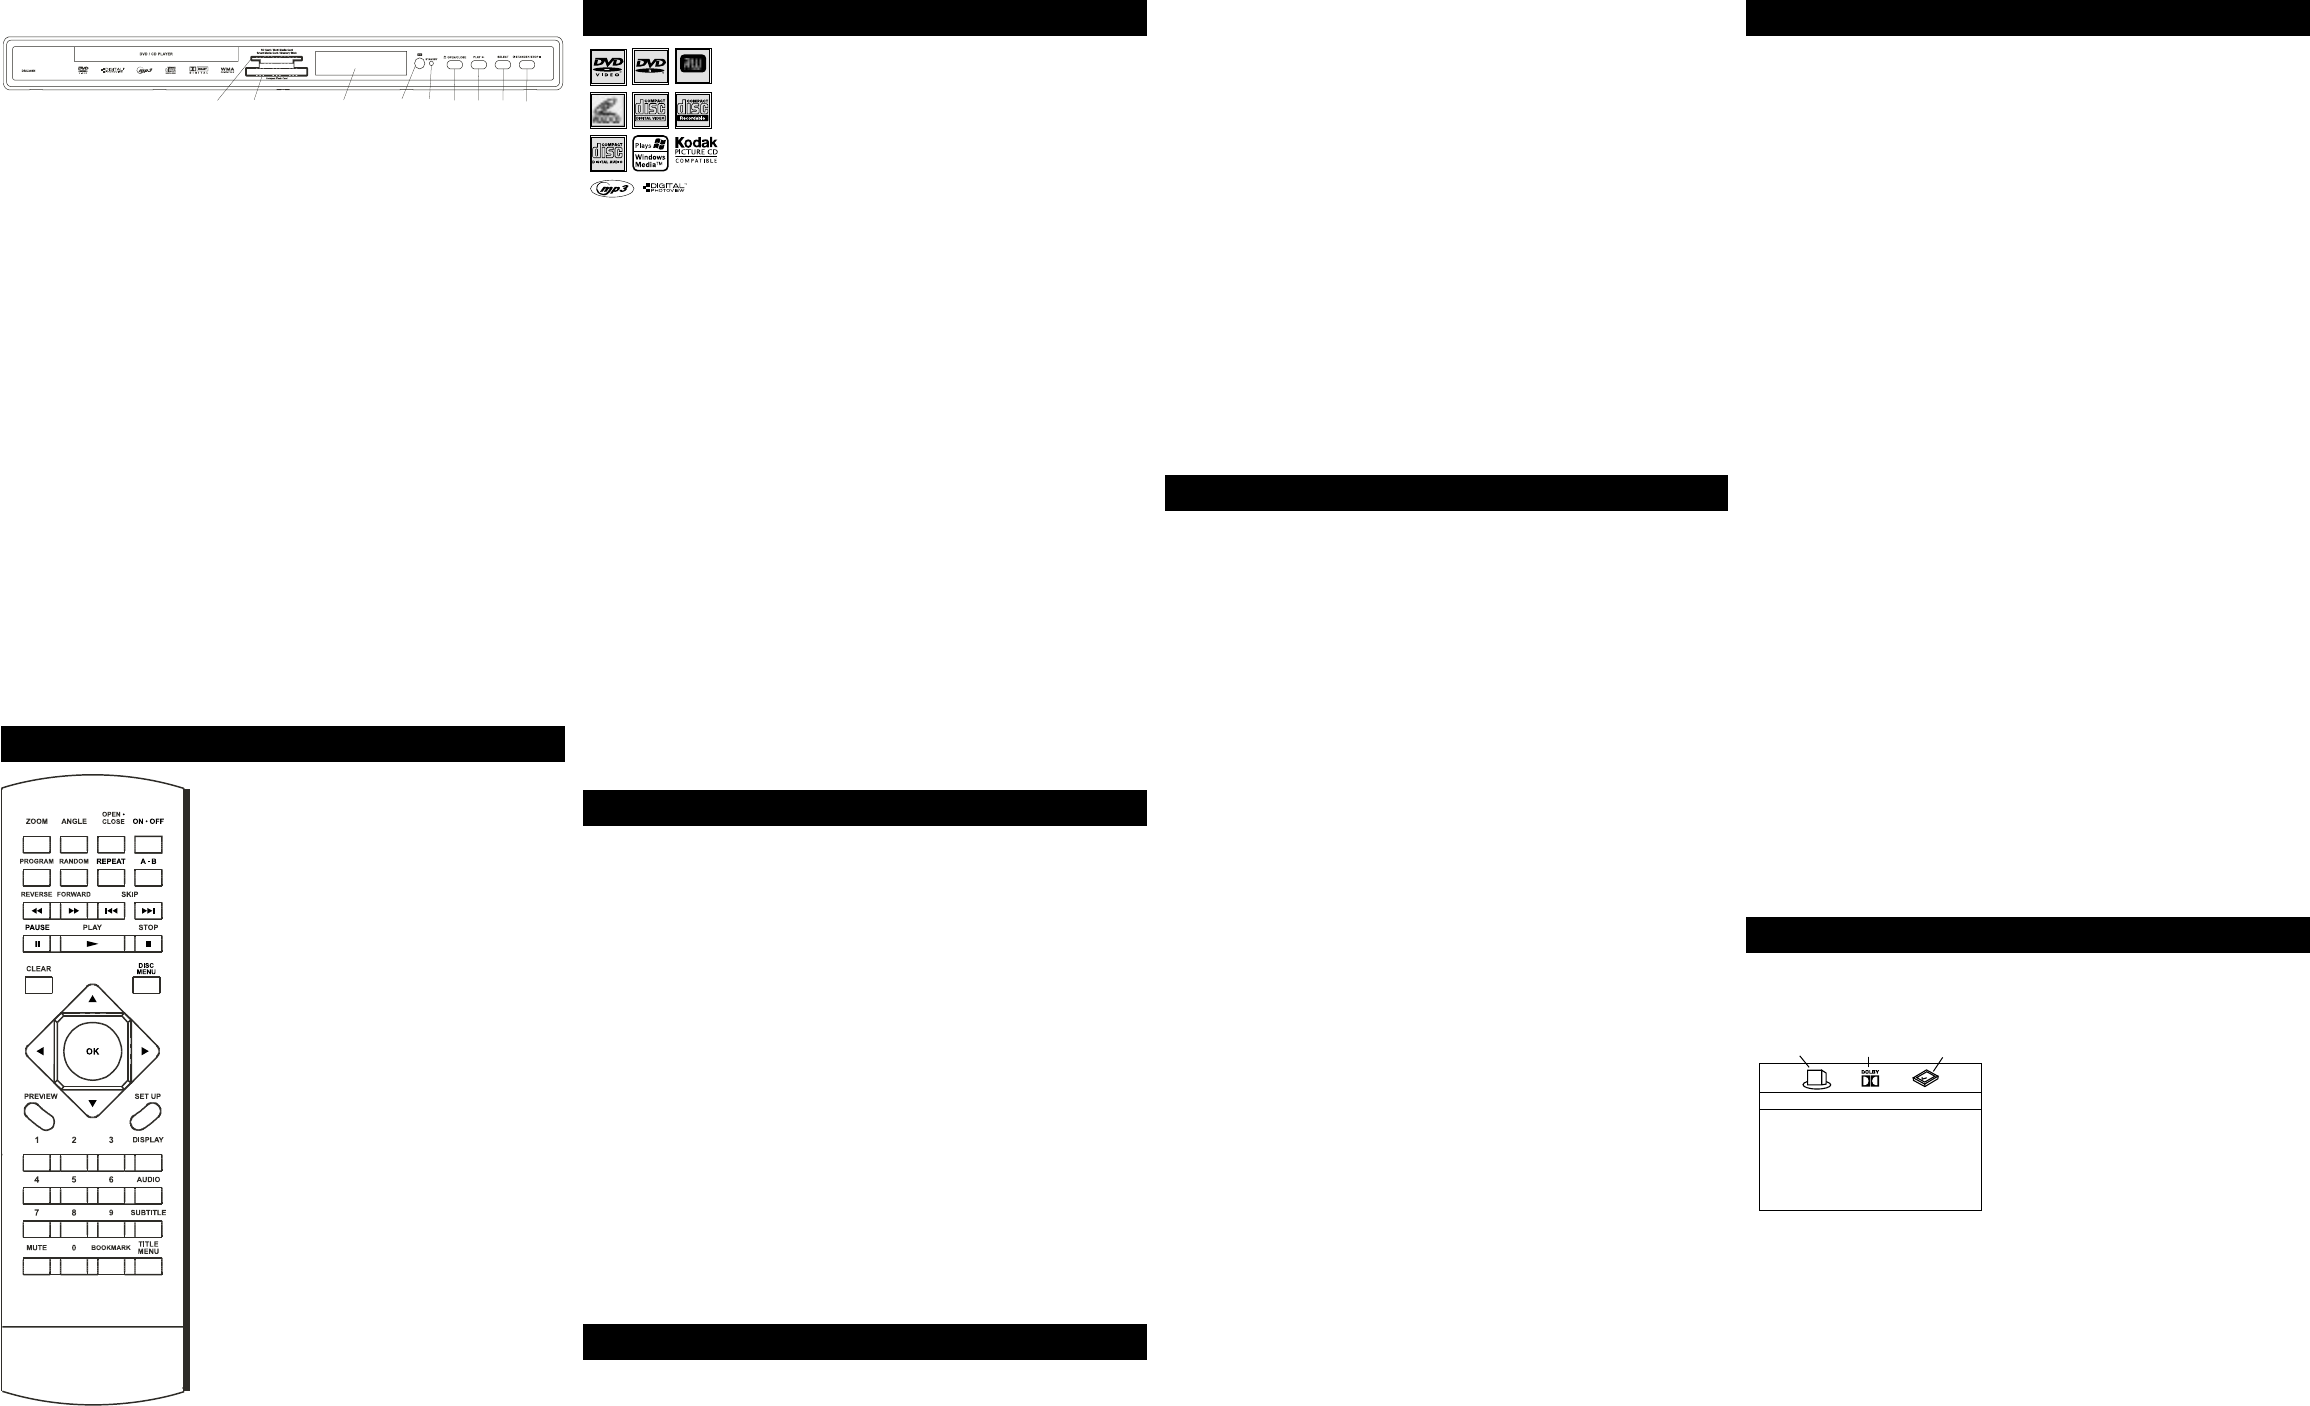
Remote Control
,,, Navigates through the menus.
0 - 9 Number entry.
A-B Accesses the A-B repeat
playback mode.
ANGLE Accesses the camera angle.
AUDIO Selects the audio language.
BOOKMARK Accesses the bookmark
feature.
CLEAR Clears some functions.
DISC MENU Accesses the disc’s menu
(if available).
DISPLAY Provides playback status.
FORWARD Searches forward through
the disc.
MUTE Lowers and restores the
volume.
OK Selects item highlighted in
menu.
ON/OFF Turns the player on and off.
OPEN/CLOSE Opens and closes the tray.
PAUSE Freezes frame, frame advance,
and slow motion.
PLAY Starts playing a disc or card.
PREVIEW Previews contents of disc.
PROGRAM Accesses the Program
playback mode.
RANDOM Starts the Random playback
mode.
REPEAT Accesses the Repeat playback
mode.
REVERSE Searches back through the
disc.
SETUP Accesses and exits the General
Setup main) menu.
SKIP Advances to the next/
preceding chapter or track.
STOP Stops playback.
SUBTITLE Turns the subtitle on and off.
TITLE MENU Accesses the title of the disc
and turns Playback Control
PBC) for VCDs only on and off.
ZOOM Accesses the Zoom feature
(if available).
continued on next page
Playback of mp3, WMA, or JPEG files