


LANGUAGE SETUP
1. Press the SETUP button in stop mode.
2. Press button to select Player Menu, Subtitle, Audio
and Disc Menu.
3. Press button, then use / button to select your
preferred language.
4. PresstheOKbuttontoconrm.
5. Press the SETUP button to exit the menu.
Note:
•SomeDVDs maybe setto displaysubtitles ina
different language other than the ones you selected.
A prior subtitle language may be programmed on the
disc.
• SomeDVDsallowyoutochangesubtitleselectionsusingthediscmenuonly.Ifthisisthecase,
press the MENU button and choose the appropriate subtitle language from the selection on the disc
menu.
•SomeDVDsmaynotbeplayedinthelanguageyouselected.Apriorlanguagemaybeprogrammed
on the disc.
• SomeDVDsmaynotincludeyourpre-selectedlanguage.Inthiscase,theDVDplayerautomatically
displays disc menus consistent with the disc’s initial language setting.
VIDEO SETUP
1. Press the SETUP button in stop mode.
2. Press button to select Video.
3. Press / button the setting item: Aspect Ratio,
HDMI Res. or JPEG Interval.
4. Press button, then use / button to select the
setting choice on the right.
5. PresstheOKbuttontoconrm.
6. Press the SETUP button to exit the menu.
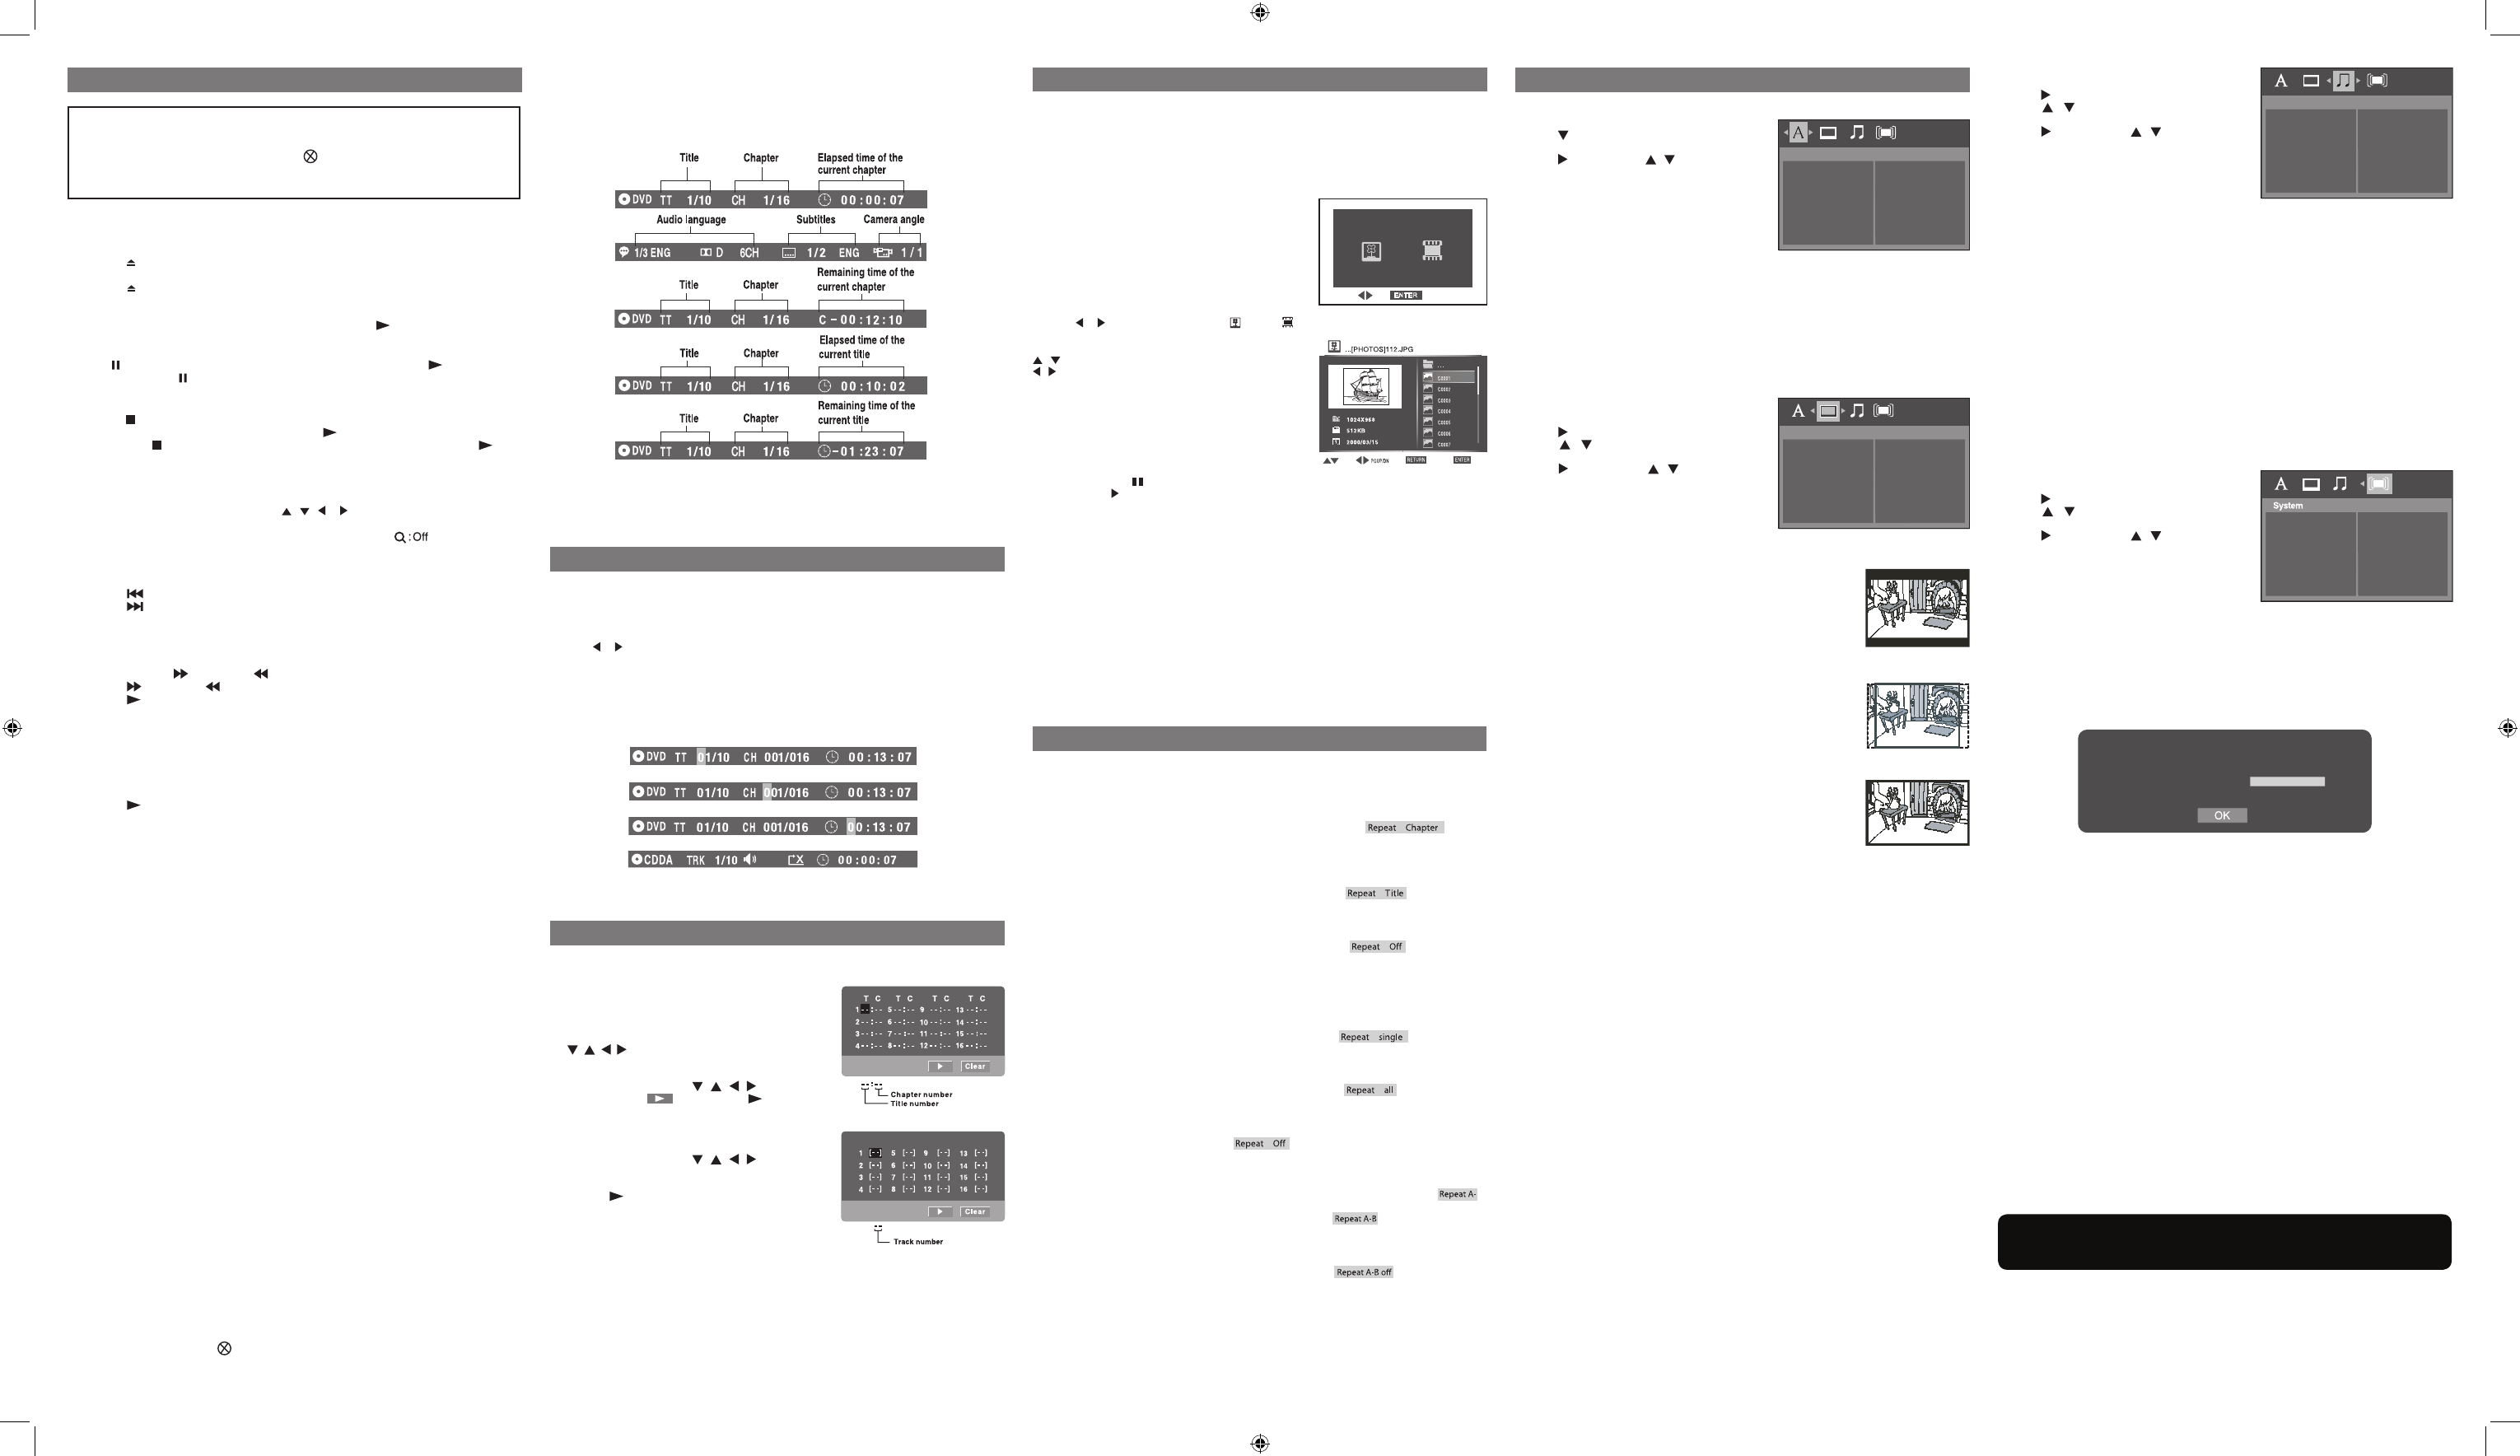
Aspect Ratio
Depending on the format of the DVD disc, you can choose the picture format
(aspect ratio) best suited the format of your TV screen.
4:3 LB
• Whenwide-screenvideoisplayedinthismodeonaconventionalscreen,
black bands appear at the top and bottom of the screen.
4:3 PS
• Whenwide-screenvideoisplayed,thismodeclipstherightandleftsides
of the image so that it can be viewed on a conventional screen.
• Somewide-screenDVDsthatdonotpermitPanScanmodeplaybackare
automatically played in letterbox mode (black bands that appear at the
top and bottom of the screen).
16:9
• Thisisthecorrectmodeforplayingwide-screenvideosontheunitor
other external wide-screens.
Note:
• ThedisplayablepicturesizeispresetontheDVD.Therefore,theplayback
picture of some DVDs may not conform to the picture size you select.
• WhenyouplayDVDsrecordedinthe4:3picturesizeonly,theplayback
picture always appears in the 4:3 picture size regardless of the Aspect
Ratio setting.
• Select16:9toconformtotheLCDscreenontheunit.Alwaysbesurethat
your Aspect Ratio conforms to the actual TV in use if you connect the unit to a TV.
HDMI Res. (Resolution)
You can set the HDMI Res. (Resolution) to be Auto, 480p, 720p, 1080i or 1080p, according to the
connected TV.
Note:
• SelecttheHDMIresolutionaccordingtotheperformanceoftheconnectedTV.
• IftheVideooutisnotsettoHDMI,youcannotselecttheHDMIRes.
JPEG Interval
To set the JPEG Interval for slide show playback. Select Off to disable the slide show feature.
Off: Playsbackoneleatatime.
5 seconds Plays back images in the form of a slide show at 5 seconds interval.
10 seconds Plays back images in the form of a slide show at 10 seconds interval.
15 seconds Plays back images in the form of a slide show at 15 seconds interval.
Playing Titles/Chapters in a Favorite Order
You can combine your favorite titles/chapters and play them
in the order you determine.
1. Press the MEMORY button and a program screen
appears.
2. Select the items in the order you want by pressing the
number buttons. Each time you press the Cursor buttons
( , , , ), the space is highlighted. Highlight where
you want to enter, then press the corresponding number
buttons.
3. Press the Cursor buttons ( , , , ) to move the
highlighted bar to , then press the PLAY or OK
button. The DVD player starts memory playback.
4. To resume normal playback from memory playback
a) Press the MEMORY button in stop mode.
b) Press the Cursor buttons ( , , , ) to move the
highlightedbarto“Clear”,thenpresstheOKbutton.All
the input programs will be cleared.
c) Press the PLAY button to resume normal playback.
Note:
• Ifthetitleorchapternumbersyouenteredisnotpermitted
by the DVD, after you press the OK button, it will restore to [- -]. You should re-enter correct
numbers.
• Somediscsmaynotpermitmemoryplaybackoperation.
• If youselect repeat duringmemory playback, theDVD playerrepeats the currentmemory
playback.
• Ifyou presstheMEMORY buttonwhilethe displayappears ontheTV screen,thedisplay
disappears.
• TheprogrammedselectionswillbeclearedwhenyouopenthedisctrayorturnofftheDVD
player.
AUDIO SETUP
1. Press the SETUP button in stop mode.
2. Press button to select Audio.
3. Press / button the setting item: Digital Out or
Night Mode
4. Press button, then use / button to select the
setting choice on the right.
5. Press the OK button.
6. Press the SETUP button to exit the menu.
Digital Out
Selects the output sound format corresponding to your system connection.
PCM(STEREO):
SelectwhenconnectedtoaMulti-channeldigitalstereoamplier.
RAW (DVD FORMAT):
Disc audio raw data will be output.
Note:
If you connected to a TV using HDMI, and are using the TV’s speakers for audio playback, make sure
toselect“PCM(STEREO)”.
Night Mode
NightmodeisequivalenttoDynamicRangeCompression.Ifturnedon,“NightMode”willlimitthe
volume on loud passages of movies (such as action sequences) while still allowing you to hear quiet
passages (such as dialog).
Note: Night mode is Dynamic Range Control (DRC) option for analog audio output.
SYSTEM SETUP
1. Press the SETUP button in stop mode.
2. Press button to select System.
3. Press / button the setting item: Default, View
DivX(R) VOD or Screen Saver.
4. Press button, then use / button to select the
setting choice on the right.
5. Press the OK button.
6. Press the SETUP button to exit the menu.
Default
Resets all settings to their initial factory state.
Note: It will take 3-5 seconds to reset the DVD player to the factory default.
View DivX(R) VOD
DivX
®
Registration
DivX
®
registration code allows you to rent and purchase movies using the DivX
®
VOD service from
the internet. This menu setting will display the registration code of your unit as follows:
Go to the website http://vod.divx.com to activate your DivX registration code.
This website will also give you information on how to purchase and download movies, and how to
enable video content to be played on your product. You will have the options of transferring content
toaUSBashdrive,SDcardordisc(CD-R/RW,DVD+R/-RorDVD+RW/-RW)forplaybackonyour
product.
Note:
• ThisregistrationcodeisforDivX
®
Video-On-Demand only. Do not apply this code for other
applications or websites.
• Ifyouhavealreadyregisteredthisproduct,selectingtheViewDivX(R)VODsettingwillallowyouto
deregister (deactivate) the product for DivX playback - we recommend you DO NOT deregister
the product.
Screen Saver
To turn on or off the screen saver (screen protection to prevent image burn).
Note: When you leave the unit in DVD stop mode for approxiamtely 5 minutes, the screen saver of
the unit automatically appears if you set the Screen Saver to On mode. To turn off the screen saver,
press the PLAY button.
Locating a specic chapter / track / title / time
Ifyouknowthechapter/track/title/timenumberyouwanttoplay,youcanlocateaspecicchapter
/ track / title / time by directly selecting a chapter / track / title / time number.
1. Press the GOTO button to search your desired chapter / track / title / time.
2. Press or button to highlight a chapter / track / title / time and press the corresponding number
button(s) for the chapter / track / title / time you want.
3. Press the OKbuttontoconrm.Theunitwillstartplaybackabout3secondslater.
Note:
• Somediscsmaynotrespondtothisprocess.
• Somescenesmaynotbelocatedaspreciselyasyouspecied.
• ThismethodforaccessingspeciclocationsisavailableonlywithinthecurrenttitleoftheDVD
disc.
Youcanplayaspecictitleorchapterrepeatedly.(Titlerepeat,chapterrepeat,A-Brepeat)
Repeating a chapter
You can play the same chapter repeatedly.
1. While the disc is playing, press the REPEAT DISC button until the indicator
displays on the screen. The current chapter is played repeatedly.
Repeating a title
You can play the same title repeatedly.
2. While the disc is playing, press the REPEAT DISC button until the indicator displays
on the screen. The current title is played repeatedly.
To resume normal playback
3. While the disc is playing, press the REPEAT DISC button until the indicator displays
on the screen.
You can play a single track and whole disc repeatedly.
Repeating a single track
You can play the same track repeatedly.
1. While the disc is playing, press the REPEAT DISC button until the indicator displays
on the screen. The current track is played repeatedly.
Repeating a whole disc
2. While the disc is playing, press the REPEAT DISC button until the indicator displays
on the screen. The whole disc is played repeatedly.
To resume normal playback
3. Press the REPEAT DISC button until the indicator displays on the screen.
Youcanplayaspecicsectionrepeatedly.
Repeating a specic section
1. While the disc is playing, press the REPEAT A-B button at the beginning of the section ( is
displayed) you want to play repeatedly.
2. Press the REPEAT A-B button again at the end of the section ( is displayed).
3. The unit will immediately begin replaying your selection.
To resume normal playback
4. While the disc is playing, press the REPEAT A-B button until the indicator displays on
the screen.
Note:
• SomediscsmaynotpermitA-Brepeatoperation.
• A-Brepeatcanonlybeusedwithinthesametitle.Ifthestartandendofthesectiontoberepeated
are in different titles, A-B repeat is cancelled.
• Youcanspecifyasegmentonlywithinthecurrenttitleortrack.
• TheA-Brepeatfunctiondoesnotoperateinsceneswheredifferentcameraanglesarerecorded.
PLAYING A DISC
This user manual explains the basic instructions
for operating this unit. Some DVDs are
producedinamannerthatallowsspecicor
limited operation during playback. Therefore,
this unit may not respond to all operating
commands. THIS IS NOT A DEFECT. Please
refer to the instructions accompanying the
specicDVDinquestionformoreinformation
about the options available on that DVD.
may appear on the screen during operation.
It means that the desired operation is not
permitted by the unit or disc.
PROGRAMMABLE MEMORY
CUSTOMIZING THE FUNCTION SETTINGS
REPEAT PLAYBACK
ThisunitcanplayDivX®andpicturelesstoredonUSBashdrives,SDcards,CD-R/CD-RW,
DVD+R/-RorDVD+RW/-RWdiscs.
To play video les on this product you must rst convert them to DivX format using
the DivX Plus Player on your PC or MAC. This application can be downloaded at
www.divx.com. Please do so, and then install on your PC or MAC.
Playing DivX
®
Video/ Picture Files
IfplayingDivXvideoorpicturelesfromaUSBdriveorSD
card, see note below.
1. Press SOURCE key to select DISC mode after turning on
the unit.
2. Open the disc door.
3. Place a DivX
®
/picturelediscontothetraywithlabelside
up.
4. Close the disc door.
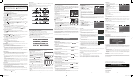
5. A selection menu will appear on the screen.
6. Press or button to select the picture or video icon, and then press OK.
If picture mode is selected, use below to nevigate the menu:
/ :selectsale
/ : page up or down
RETURN : returns to previous menu
ENTER:playsyourselectedle
Note:
• ForplayinglesonUSBashdriveorSDcard,youshould
plugintheUSBashdriveorSDcardwhentheunitisin
STANDBY mode. Press SOURCE button, select USB or
Card mode, then follow step 6 above.
• Youcanpressthe PAUSE button to interrupt playback,
and press the PLAY button to resume playback.
• YoualsocanusetheGOTObuttonorusethenumberedbuttonstoenteraphotonumberand
quickly select any image.
• Duringpictureplayback,youcanpressANGLEbuttonrepeatedlytorotatethepicture.
ABOUT DIVX VIDEO: DivX
®
isadigitalvideoformatcreatedbyDivX,Inc.ThisisanofcialDivX
CertieddevicethatplaysDivXvideo.Visitwww.divx.com fo more information and for software tools
toconvertyourlesintoDivXvideo.
ABOUTDIVXVIDEO-ON-DEMAND:ThisDivXCertied
®
device must be registered in order to play
DivX Video-on-Demand (VOD) content. To generate the registration code, go to the DivX VOD section
in the device setup menu. Go to vod.divx.com with this code to complete the registration process and
learn more about DivX VOD.
DivX Certifed
®
to play DivX
®
video, including premium content.
LOCATING A DESIRED SECTION
ENTER
PLAYING DivX
®
VIDEO OR PICTURE FILES
e.g. DVD
e.g. Audio CD
Playing a Disc
1. Press the STANDBY / ON button to turn on the unit. (See CUSTOMIZING THE FUNCTION
SETTINGS before proceeding to step 2).
2. Press the OPEN/CLOSE button to open the disc tray.
3. Place a disc onto the disc tray with the label side up.
4. Press the OPEN/CLOSE button to close the disc tray. It takes a short while for your unit to load
the disc. After loading, for most DVDs, the unit will automatically take you main menu or start
playing.
5. If the unit does not automatically start playing the DVD, press the PLAY button.
Pausing Playback (Still Mode)
Press the PAUSE button on the remote. To resume normal playback, press the PLAY button.
Each time you press the PAUSE button, the picture advances one frame.
Stopping Playback
• Pressthe STOP button at the location where you want to interrupt playback. To resume playback
at the position where the disc was stopped, press the PLAY button.
• Ifyoupressthe STOP button twice, the unit’s memory will be cleared and pressing the PLAY
button will reset the disc to the beginning.
Zooming into an image
While a disc is playing, press the ZOOM button to enlarge the image in several levels.
• Whileanimageiszoomed,youcanusethe , , or CURSOR button to shift the view and
display the part you want.
• Toreturntonormalview,presstheZOOMbuttonrepeatedlyuntilthe is displayed.
• Whenyoureachtheedgeoftheimage,thedisplaywillnotshiftanymoreinthatdirection.
Skipping (Forward / Reverse)
• Pressthe PREV button to go back to current or previous chapters/tracks.
• Pressthe NEXT button to advance chapters/tracks.
• ForaudioCDs,usethenumberbuttonsontheremotecontroltojumpimmediatelytothedesired
track number.
Fast Forward / Fast Reverse
1. Press the SEARCH or SEARCH button when a disc is playing. Each time you press the
SEARCH or SEARCH button, the playback speed changes.
2. Press the PLAY button when you reach the desired point to resume normal playback.
Note:
• TheunitmutessoundandsubtitlesduringreverseandforwardscanofDVDs.
• Thefastplaybackspeedmaydifferdependingonthedisc.
Slow-motion Play
1. Press the SLOW button on the remote in play mode.
•EachtimetheSLOW button is pressed, the speed of slow-motion playback changes.
2. Press the PLAY button to return to normal playback speed.
Audio Selection
On some DVDs, the sound is recorded in two or more formats. Follow the directions below to select
the preferred language and sound system.
1. While a disc is playing, press the AUDIO button to show the current audio format number.
2. Press the AUDIO button repeatedly to select the desired audio format.
Note:
• IfonlyoneaudioformatisrecordedontheDVD,thenumberdoesnotchange.
• SomeDVDsallowyoutochangeaudioselectionsonlyviathediscmenu.Ifthisisthecase,press
the MENU button and choose the appropriate language on the disc menu.
• You can select different audio channels on an Audio CD by pressing the AUDIO button
repeatedly.
Subtitle Selection
1. While a DVD is playing, press the SUBTITLE button to display the current language setting.
2. Press the SUBTITLE button repeatedly to select the desired subtitle language. You can turn
subtitlesoffbypressingtheSUBTITLEbuttonrepeatedlyuntilthe“Off”isdisplayed.
Note:
• SomeDVDsaresettodisplaysubtitlesautomatically,andyoucannotturnthemoffevenifyouset
the subtitle function to off.
• Duringsomescenes,thesubtitlesmaynotappearimmediatelyafteryouselectyourdesired
scene.
• Thenumberofsubtitlelanguagesrecordeddiffersdependingonthedisc.Ifonlyonelanguageis
recorded, the language does not change.
• Thisfunction canonlybeusedfor discsonwhichsubtitleshave beenrecordedinmultiple
languages.
• SomeDVDsallowyoutochangesubtitlesonlyviathediscmenu.Ifthisisthecase,pressthe
MENU button and choose the appropriate subtitle on the disc menu.
Angle Selection
Some DVDs contain scenes which have been shot from a number of different angles. For these discs,
the same scene can be viewed from each of these different angles.
1. While you are playing a DVD with different angles recorded, press the ANGLE button to view the
number of current angles available.
2. Press the ANGLE button repeatedly to change the scene to the next recorded angle.
• Afterapprox.twoseconds,playbackwillcontinuefromthenewangleyouselected.
• Ifnobuttonispressedwithin10seconds,playbackcontinueswithoutchangingthecurrentangle.
Note:
• Thisfunctioncanonlybeusedfordiscsonwhichscenesshotfrommultipleangleshavebeen
recorded.
• Ifonlyoneangleisrecorded, is displayed.
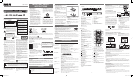
Display Function
While the disc is playing, press the DISPLAY button on the remote control repeatedly to display
information on operation status.
Elapsed Time: Elapsed time from the beginning of the chapter/title which is currently playing.
Remaining Time: Remaining time of the chapter/title which is currently playing.
Language
Player Menu
Subtitle
Audio
Disc Menu
Vid eo
AspectRatio
HDMIRes.
JPEGInterval
Audio
DigitalOut
NightMode
Default
View DivX(R) VOD
Screen Saver
4:3 LB
4:3 PS
16:9
YOU MUST REGISTER YOUR DEVICE TO PLAY
DIVX PROTECTED VIDEOS.
REGISTRATION CODE:
REGISTER AT HTTP://VOD.DIVX.COM
- 6 -
- 7 -
- 8 -
- 9 - - 10 -
Need more help?
Please visit online help at www.RCAav.com
AVC Multimedia
Markham, Ontario L3R 1E3
© 2010 AVC Multimedia
http://www.RCAav.com
Printed in China
811-288S91W011
Specicationsandexternalappearancearesubjecttochangewithoutnotice.
Note: See section 3 (on other side of this sheet) for Troubleshooting Guide.
DRC288SU IB ENG.indd 2 5/12/2010 12:19:17 PM