


Welcome!
The Explorer® 8240C™ and 8300C™ DVRs receive and display
digital signals, and they deliver programs in exceptional picture and
audio quality. Through the 8240C and 8300C you can also access
interactive services, such as video-on-demand and pay-per-view
programs. Contact your service provider for information about these
and other available services. Use the instructions in this guide to
install the 8240C or the 8300C and to access your program services.
Note: The 8240C does not have audio/video inputs on the front
panel.
Safety First
Before using this Digital Video Recorder (DVR), read the
IMPORTANT SAFETY INSTRUCTIONS section of this guide.
Explorer eClub
The online Explorer eClub provides news and information about
consumer products. You can access the Explorer eClub on the
Internet at the following Web address:
www.scientifi catlanta.com/explorerclub
Watch TV
Press the following remote control keys to access services and
programs:
• Guide–Display the on-screen program guide
• Arrows–Highlight a program in the schedule
• Info–Display program description
• Select–Watch a specifi c program in the guide
Automatic Software Updates
The TV screen displays a message that indicates the DVR is
automatically updating its software.
Wait for the current time to display on the front panel of the DVR
before continuing. When the front panel displays the time, the
update is complete.
Note: If you need further assistance, contact your cable service
provider.
Performance Tips
If the DVR does not perform as expected, the following tips may
help.
No Picture
• Verify that the M-Card module is installed.
• Verify that the power to your TV is turned on.
• If the DVR is plugged into a wall switch, verify that the switch
is in the ON position. (Avoid plugging into an outlet that is
controlled by a wall switch.)
• Verify that all cables are properly connected.
• The current channel may not be available in your service
package. Try selecting another channel to see if a picture
appears.
No Color
• Verify that the TV program is broadcast in color.
• Adjust the TV color controls.
No Sound
• If your setup includes a VCR or stereo, verify that you have
properly connected them to the DVR.
• Verify that the volume is turned up.
• Verify that the mute function is not on.
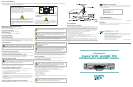
1 Power Turns the DVR on and off
2 Video/Audio Not available on the 8240C. Connects to video and left/right (L/R) audio outputs of an external device to deliver
Input audio and video to a TV or other device
3 List Displays the list of recorded programs
4 Exit Exits menus, the on-screen guide, and program information
5 Info Displays a description of the selected program. This button is available from the on-screen guide and while
viewing a program
6 Guide Accesses on-screen services, such as the on-screen guide, video-on-demand, or pay-per-view
7 IR Sensor Receives the infrared signal from the remote control
8 LED Display Displays the selected channel number and time of day. The LED also displays the following:
• Message (
)
• Power ( )
• RECORD
9 VOL+/VOL- Increases and decreases the volume
10 CH+/CH- Scrolls up and down through the channels
11 Select Provides access to your on-screen selection
12 USB Port Connects to external equipment, such as a keyboard or mouse
(reserved for future use)
Note: This illustration may vary from the actual product.
Explorer 8300C DVR Front Panel
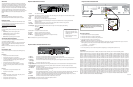
Explorer 8240C and 8300C DVR Back Panel
1 Cable In Connects to a coaxial cable that delivers the signal from your service provider
2 Cable Out Connects to a coaxial cable that sends analog audio and video signals to a TV or VCR. These signals are
standard- defi nition TV (SDTV) video and stereo audio
3 Audio Out Connects to RCA cables that send analog audio signals (left and right) to the stereo inputs on an HDTV
(Left, Right)
4 Video Out Connects to video input of TV or VCR
5 Digital Audio Out Connects an RCA cable to send a digital audio signal to a surround-sound receiver or other digital audio device
6 Secondary Video Connect to either a VCR for archiving saved content from the DVR or connect to another set of inputs
and Audio Out (composite) on your TV
7 S-Video Out Connects to an S-Video cable that sends an S-Video signal to your TV or VCR. This signal is standard defi nition,
but higher quality than other SDTV connections
8 IR Connector reserved for future use
9 M-Card Slot for Multi-Stream CableCARD
TM
(M-Card
TM
) module, which decrypts subscription digital channels. This DVR will
Interface not operate correctly without an M-Card module. Obtain an M-Card module from your service provider
10 SATA Connects to an external Serial ATA (eSATA) hard disk drive for expanded recording capacity. Ask your service
provider for a list of approved hard drive models for use with the DVR
11 AC Outlet Connects to the AC power cord from another device, such as a TV
12 AC Power Input Connects to the power cord to deliver power to the DVR
Note: This illustration may vary from the actual product.
U.S. Patents
A patent notice is affi xed to this product. In addition, this product could be covered by one or more of the following patents.
4,498,169; 4,636,852; 4,641,181; 4,651,208; 4,691,353; 4,692,919; 4,698,598; 4,719,642; 4,748,667; 4,829,569; 4,866,770; 4,885,775;
4,888,799; 4,890,319; 4,922,456; 4,922,532; 4,924,498; 4,965,534; 4,991,011; 5,003,384; 5,012,510; 5,029,207; 5,045,816; 5,053,883;
5,054,071; 5,058,160; 5,142,575; 5,142,690; 5,146,526; 5,155,590; 5,214,390; 5,225,902; 5,225,925; 5,235,619; 5,237,610; 5,239,540;
5,241,610; 5,247,364; 5,255,086; 5,257,403; 5,267,071; 5,270,809; 5,271,041; 5,272,752; 5,282,028; 5,285,497; 5,287,351; 5,301,028;
5,309,514; 5,317,391; 5,319,709; 5,341,425; 5,347,388; 5,347,389; 5,357,276; 5,359,601; 5,361,156; 5,367,571; 5,379,141; 5,379,145;
5,381,481; 5,390,337; 5,400,401; 5,406,558; 5,418,782; 5,420,866; 5,420,923; 5,425,101; 5,428,404; 5,430,568; 5,434,610; 5,436,749;
5,438,370; 5,440,632; 5,442,472; 5,455,570; 5,457,701; 5,471,492; 5,477,199; 5,477,262; 5,477,370; 5,481,389; 5,481,542; 5,485,221;
5,493,339; 5,497,187; 5,500,758; 5,502,499; 5,506,904; 5,519,780; 5,539,822; 5,550,825; 5,579,055; 5,579,057; 5,583,562; 5,592,551;
5,596,606; 5,600,378; 5,602,933; 5,640,388; 5,657,414; 5,675,575; 5,684,876; 5,715,515; 5,724,525; 5,740,300; 5,742,677; 5,754,940;
5,757,416; 5,771,064; 5,774,859; 5,825,829; 5,826,167; 5,850,305; 5,854,703; 5,870,474; 5,892,607; 5,920,626; 5,923,755; 5,930,024;
5,930,515; 5,937,067; 5,963,352; 5,966,163; 5,982,424; 5,991,139; 5,999,207; 6,005,631; 6,005,938; 6,016,163; 6,028,941; 6,029,046;
6,052,384; 6,055,244; 6,072,532; 6,105,134; 6,148,039; 6,157,719; 6,188,729; 6,195,389; 6,212,278; 6,215,530; 6,219,358; 6,240,103;
6,243,145; 6,246,767; 6,252,964; 6,272,226; 6,292,081; 6,292,568; 6,320,131; 6,374,275; 6,405,239; 6,411,602; 6,417,949; 6,424,714;
6,424,717; 6,433,906; 6,438,139; 6,463,586; 6,467,091; 6,476,878; 6,493,876; 6,510,519; 6,516,002; 6,516,412; 6,526,508; 6,538,595;
6,546,013; 6,560,340; 6,567,118; 6,570,888; 6,622,308; 6,629,227; 6,664,984; 6,667,994; 6,671,879; 6,674,967; 6,678,891; 6,714,598;
6,721,352; 6,721,956; 6,725,459; 6,738,982; 6,744,892; 6,744,967; 6,751,271; 6,760,918; 6,795,972; 6,802,077; 6,804,708; 6,811,447;
6,817,028; 6,822,972; 6,823,385; 6,832,386; 6,845,106; 6,868,473; 6,874,075; 6,889,191; 6,909,471; 6,917,622; 6,917,628; 6,922,412;
6,927,806; 6,928,656; 6,931,058; 6,937,729; 6,969,279; 6,971,008; 6,971,121; 6,978,310; D348065; D354959; D359737; D363932;
D390217; D434753; D507240; D507535; RE36368; RE36988
20051216PL
LIST
AUDIO VIDEOLR
EXIT
INFO
GUIDE
CH +
CH - SELECT
POWER
VOL +VOL -
1 2 11 123 4 5 96 7
T12850
8 10
AUX
INPUT
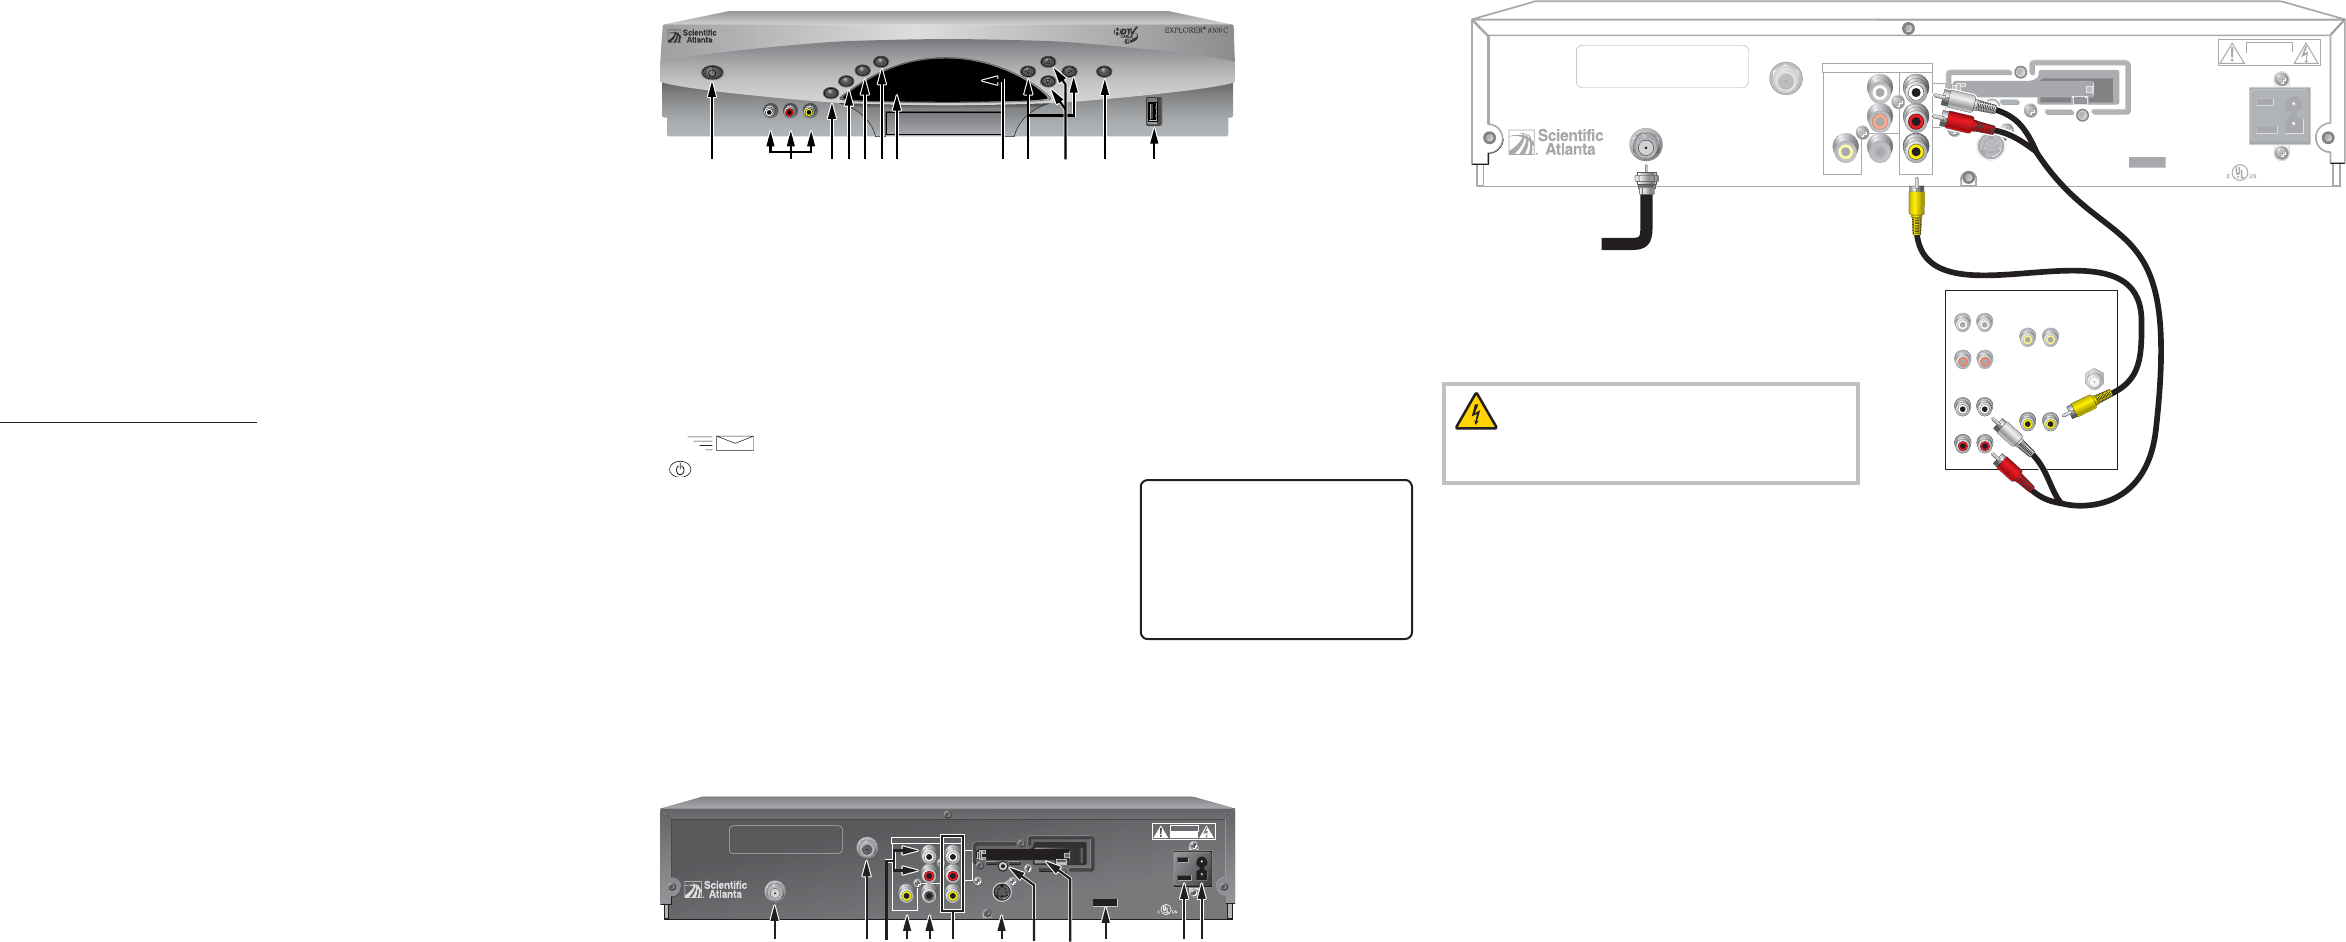
Connecting the DVR
1. Insert the M-Card module if not already installed.
2. Connect the DVR to the TV as shown in the diagram.
3. Connect the DVR to the coaxial cable coming from the wall.
4. Plug the DVR and the TV into an AC power source.
Important! Do not press the Power key on the DVR yet.
5. Wait several minutes for the DVR to receive the latest software, programming, and service information. When you see one of the
following displays on the front panel of the DVR that indicates that the update is complete:
• Current time • Four dashes (----)
6. Press the Power key on the DVR.
7. Turn on the power to your TV, and set the input channel assigned by your service provider (channel 3 or 4).
WARNING: Electric shock hazard! Unplug all
electronic devices before connecting or disconnecting
any device cables to the receiver.
Safety and Performance Tips
• Keep the top of the DVR free of
all objects and electronic devices,
including your TV.
• Always set the DVR on its feet,
never on it’s side.
CABLE
OUT
THIS DEVICE IS INTENDED TO BE ATTACHED
TO A RECEIVER THAT IS NOT USED TO
RECEIVE OVER-THE-AIR BROADCAST
SIGNALS. CONNECTION OF THIS DEVICE
IN ANY OTHER FASHION MAY CAUSE
HARMFUL INTERFERENCE TO RADIO
COMMUNICATIONS AND IS IN VIOLATION
OF THE FCC RULES, PART 15.
120 VAC
60HZ 5A
LISTED 14H1
CABLE EQUIP.
120 VAC
60HZ 80W
CAUTION
RISK OF ELECTRIC SHOCK
DO NOT OPEN
CABLE
IN
SATA
S - VIDEO
OUT
CATV CONVERTER
MADE IN MEXICO
VIDEOVIDEO
TV
OUT 1 OUT 2
A
U
D
I
O
DIGITAL
AUDIO OUT
L
R
AVI S:
RISQUE DE CHOC
ELECTRIQUE NE PAS OUVRIR
1103
T12774
IR
MULTI-STREAM
8 9
11 124 5 6 72
Explorer 8240C and 8300C DVR
CABLE
OUT
THIS DEVICE IS INTENDED TO BE ATTACHED
TO A RECEIVER THAT IS NOT USED TO
RECEIVE OVER-THE-AIR BROADCAST
SIGNALS. CONNECTION OF THIS DEVICE
IN ANY OTHER FASHION MAY CAUSE
HARMFUL INTERFERENCE TO RADIO
COMMUNICATIONS AND IS IN VIOLATION
OF THE FCC RULES, PART 15.
120 VAC
60HZ 5A
LISTED 14H1
CABLE EQUIP.
120 VAC
60HZ 80W
CABLE
IN
SATA
S - VIDEO
OUT
CATV CONVERTER
MADE IN MEXICO
VIDEOVIDEO
TV
OUT 1 OUT 2
A
U
D
I
O
DIGITAL
AUDIO OUT
L
R
AVI S:
RISQUE DE CHOC
ELECTRIQUE NE PAS OUVRIR
IR
MULTI-STREAM
CAUTION
RISK OF ELECTRIC SHOCK
DO NOT OPEN
RIGHT
INOUT
LEFT
AUDIO 1
INOUT
CABLE/
ANTENNA
VIDEO 1
INOUT
Stereo
TV
RIGHT
INOUT
LEFT
AUDIO 2
INOUT
VIDEO 2
INOUT
T12851
Cable Input