


ENFORCER DR-1 Series H.264 Network DVR Quick Setup Guide
6 SECO-LARM U.S.A., Inc.
Continued from page 5.
4. To adjust the time and date:
Note: Changes to time and date settings may cause inconsistency or data loss in previously
recorded material. Back up all data before making changes. For more information on how to
back up data, please see Exporting Video on pg. 11 of this guide.
a. Enter the system menu and select System.
b. Select Date/Time.
c. Select Date and adjust the values as needed. Repeat for Time.
d. Select Time Zone. Adjust the time difference to match the UTC (Coordinated Universal
Time) offset in your area. For example, Los Angeles is 8 hours behind UTC, so the UTC
offset is -8:00.
e. For other features such as Daylight Saving Time and Network Time Protocol, please see the
User’s Manual section 3.4 System Date / Time Setting.
5. To adjust the system language:
a. Enter the system menu and select SYSTEM.
b. Select Language. As soon as a new language is selected, the language displayed on
screen will change. There are 24 different language options.
Basic Network Setup:
1. Enter the system menu and select SYSTEM. Be sure the DVR is connected to a network via
an Ethernet cable.
2. Select Network Setup.
a. Select LAN Select. If the DVR connects to a local area network, choose LAN (default).
b. If the DVR connects directly to the internet, choose PPPoE. PPPoE users must configure
the following options: PPPoE Account, PPPoE Password, and PPPoE Max Idle.
c. If a connection to a network is not desired, choose None. The DVR will still record data.
d. If a connection to a network is desired, it may be necessary to adjust LAN settings via the
LAN setup menu (Network SetupLAN Setup). Contact your network administrator for
details about your network.
e. To connect to a network based on DHCP, set the DHCP to ON. The IP address, Netmask,
Gateway, and DNS setting will be retrieved from network servers.
f. For non-DHCP users, set DHCP to OFF. Enter an IP address, Netmask, Gateway, and DNS
settings. This information may be obtained from the network service provider.
3. Press ENTER or left click to confirm your selections, or press ESC or right click to cancel.
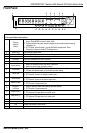
Connecting a PTZ (Pan / Tilt / Zoom) Camera
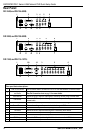
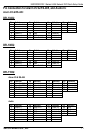
Note: For pin configurations, please see Pin Connection for Alarm I/O & RS-485 and Audio In
on page 12 of this guide.
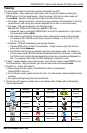
1. Make sure the RS-485 connector from the PTZ camera is configured correctly. See pg. 12.
2. Connect the PTZ camera’s RS-485 cable to the DVR’s Alarm I/O input.
3. Press MENU to access the OSD main menu and select Camera Setup.
a. Select Dome Protocol to choose the corresponding protocol.
b. Select Dome ID to choose an ID number. The ID number must match the ID address
defined by the PTZ camera.
4. Select SYSTEM from the system menu, and then select RS485 Setup to configure the
RS-485 parameters.
5. For instructions on how to control the PTZ camera’s functions, please see the User’s Manual
section 4.5 Dome Control.