40
Dimension: 140 X 215 mm
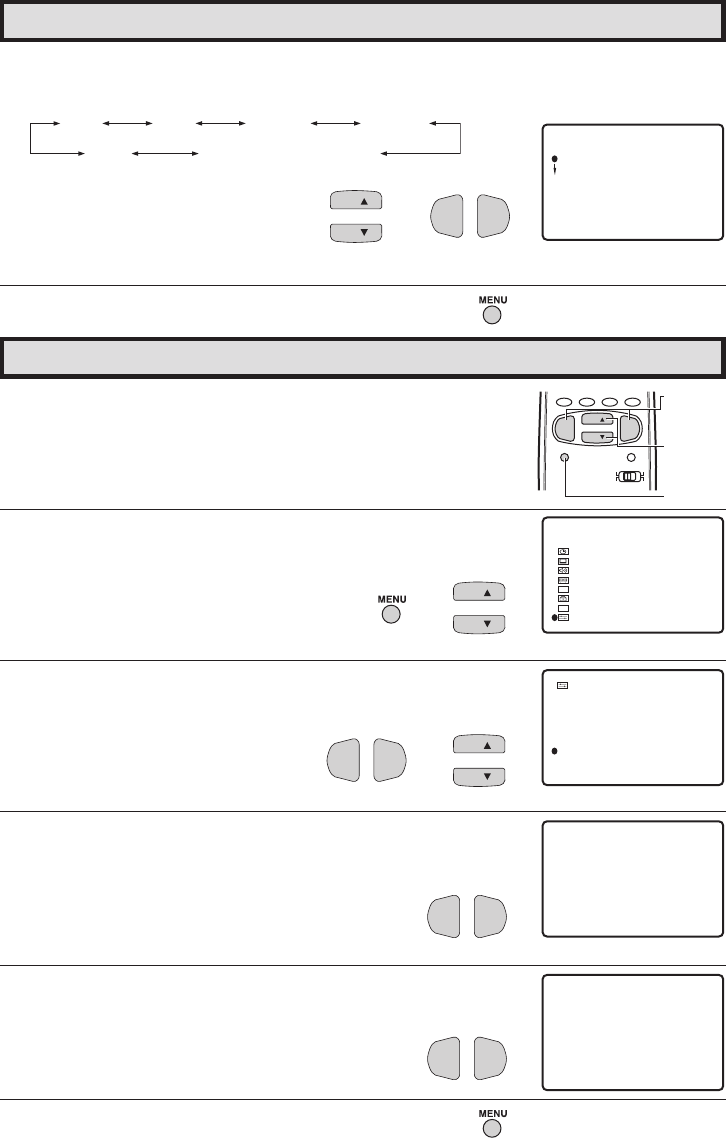
Auto Input
•
The unit is preset to switch to the INPUT 2 screen automatically
when VIDEO equipment is connected to the INPUT 2 terminal. Do
the following to switch this feature AUTO or OFF:
1 Press MENU to access the MAIN MENU screen.
2 Press CH a/s to move the “E” mark to “SET UP”.
3 Press VOL k/l to access the SET UP screen, then press CH a/s
to move the “E” mark to “AUTO INPUT”.
4 Press VOL k/l to access the AUTO INPUT select screen.
Press VOL k/l to select “AUTO”.
5 You may turn off “AUTO INPUT” when it is not in use.
Press VOL k/l to select “OFF”.
6 Press MENU to exit.
VOL
—
VOL
+
VOL
—
VOL
+
CH
CH
→
SLEEP TIMER
AUDIO SELECT
CLOSED CAPTION
PARENT CONTROL
ENERGY
SET UP
SAVE
VIDEO ADJUST
MENU
DIGITAL
AUDIO
CC
ES
BLUE SCREEN
PERSONAL PREF.
UNIVERSAL
LANGUAGE
CH SETTING
CH/ INPUT ID
AUTO INPUT
SCREEN FORMAT
PLUS
SET
UP
(MAIN MENU screen)
(SET UP screen)
AUTO INPUT
(INPUT2)
: AUTO
CH
CH
→
VOL
—
VOL
+
(AUTO INPUT select screen)
AUTO INPUT
(INPUT2)
: OFF
CHANNEL
UP (a)/
DOWN (s)
VOLUME
(k)/(l)
MENU
PERSONAL PREFERENCE
MENU MUTE
CATV TV
DVD
VCR
VOL
—
CH
CH
VOL
+
ABCD
6 Press CH a/s to select the VCR or DVD, and press VOL k/l to
select “CH3”, “CH4”, “INPUT 1”, “INPUT 2”, “INPUT 3
(COMPONENT)” or “OFF”.
Switch to the input mode your VCR or
DVD is connected to. If connected
through RF (antenna terminal), select
either CH3 or CH4 to match the setting
of the VCR or DVD.
7 Press MENU to exit.
Set Up (Continued)
CH3 CH4 INPUT 1
OFF
INPUT 3 (COMPONENT )
INPUT 2
→
VOL
—
VOL
+
CH
CH
DVD :OFF
:CH3VCR
UNIVERSAL PLUS
32SF560(40-42).p65 29/11/05, 6:44 PM40
