19
Connecting to External Equipment
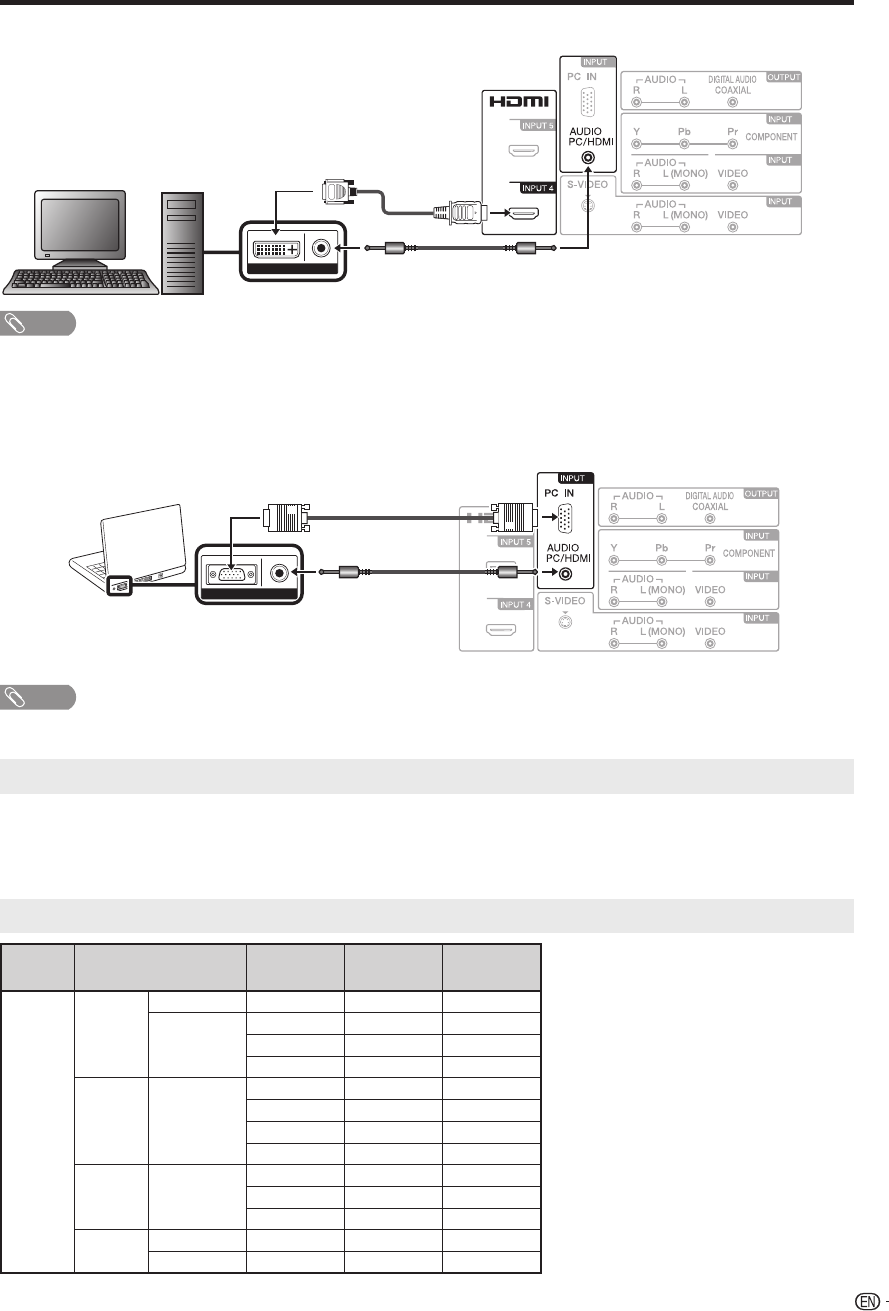
■ When using DVI-HDMI conversion cable (INPUT 4):
1
2
3
6
AUDIODVI OUT
DVI-HDMI conversion cable
Ø 3.5 mm stereo minijack cable
(Illustration is LC-26DV28UT.)
Rear of the TV
NOTE
When using an DVI-HDMI conversion cable, you should make an analog audio connection. In this case, in addition to
connecting an DVI-HDMI conversion cable to the INPUT 4 (HDMI1) terminal, connect an audio cable to the AUDIO PC/
HDMI terminal and set “HDMI1 Audio” to “DVI”. (See page 28.)
■ When using analog RGB cable (INPUT 6):
1
2
3
6
AUDIORGB
(Illustration is LC-26DV28UT.)
Rear of the TV
Ø 3.5 mm stereo
minijack cable
Analog RGB cable
(D-sub 15pin cable
or VGA cable)
NOTE
When using an analog RGB cable, input the audio signal to the AUDIO PC/HDMI terminal of INPUT 6.
Displaying an image from a PC
To view an image from a PC, perform the following procedure.
①
Select the Input 6 (PC) mode using INPUT on the remote control or the TV/DVD set. (See page 15.)
②
Adjust the “Picture” items if the PC image does not come in clearly. (See page 28.)
PC compatibility chart
PC Resolution
Horizontal
Frequency
Vertical
Frequency
VESA
Standard
PC
VGA
720 x 400 31.5 kHz 70 Hz -
640 x 480
31.5 kHz 60 Hz ○
37.9 kHz 72 Hz ○
37.5 kHz 75 Hz ○
SVGA 800 x 600
35.1 kHz 56 Hz ○
37.9 kHz 60 Hz ○
48.1 kHz 72 Hz ○
46.9 kHz 75 Hz ○
XGA 1,024 x 768
48.4 kHz 60 Hz ○
56.5 kHz 70 Hz ○
60.0 kHz 75 Hz ○
WXGA
1,280 x 768 47.8 kHz 60 Hz ○
1,360 x 768 47.7 kHz 60 Hz ○
•
•
54P0331A.indb 1954P0331A.indb 19 19/4/2553 10:24:3919/4/2553 10:24:39


