


– 2 – – 3 –
• When moving the stand, follow the precautions below.
- Turn off the power of the monitor and any connected
devices, and disconnect the power cord and external
cables.
- Unlock the casters.
- This work requires 2 or more people.
- Do not place any items on the shelf board.
• After moving the stand, make sure that the casters and
stand rods have not become loose.
• When using the stand, orient the front casters so they face
forward and the rear casters so they face backward, and
lock them.
• When transporting (by truck, etc.), remove the monitor.
- For removal and reassembly after transport, consult your
dealer. The customer should not attempt this work.
• The load capacity of the shelf board is 15 kg (33.1 lbs.).
Usageprecautions
Unlock
Installation procedure (forSHARPdealersandserviceengineers)
Caution
• Our company will bear no responsibility for accidents or injuries caused by improper installation or mishandling.
• Installation requires at least 4 people. To prevent damage, remove watches and jewelry such as rings.
• Connect the cables to the monitor before installing the monitor.
• Take care not to catch or pinch the cables.
• Tighten all screws rmly with a screwdriver.
• Keep the grip xing brackets and grips in a safe place, as they are necessary for installing and removing the monitor.
1.Preparethemonitor.
(1) Spread a soft thick cloth (such as a blanket) on a stable level surface on which the entire monitor can be placed, and place
the monitor on it with the LCD panel facing down.
(2) Move the attachment position of the lower left and right handles (x1 each) one level up on the
monitor.
• For details, refer to the manual for the monitor.
(3) If the tray is to be installed, attach the tray mounting ttings to the monitor.
• For details, refer to the manual for the monitor.
• Do not install the tray yet.
(4) Secure the mounting brackets (x2) with the screws (M6x14) (x4).
• Adjust the height of the monitor using the attachment
positions [A], [B], [C] and [D] as shown.
* Be sure to attach the mounting brackets in the indicated
positions. If attached in different positions, the stand or
monitor may fall or topple.
(5) Place the monitor back in the shipping box and stand it upright.
(6) Remove the left and right handles (x2 each) from the monitor.
• For details, refer to the manual for the monitor.
(7) Remove the grips from the handles. (x4)
Grip
(7)
A
ttachment
position of
handles
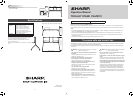
(8) Attach the removed grips (x4) to the grip fixing brackets (x2) with
the screws (x8) removed in Step (7).
• Attach the grips so they are oriented toward the front of the
monitor.
(9) Attach the grip fixing brackets (x2) with the screws (x8) removed in
Step (6).
• The position for attaching the grip xing brackets varies depending
on the position of the mounting brackets.
2.Assemblethestand.
(1) Attach the casters (x4) to the left and right
stand rods and lock the casters.
• Insert the spring washers (x4) between
the rods and casters, and tighten rmly
with the spanner (supplied).
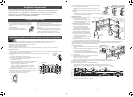
(2) Provisionally attach the screws (M6x14)
(x2) to the shelf board bar, and hang the
bar on the left and right stand rods.
* Hang the bar so that the side with
3 screw holes in the center faces upward.
(3) Provisionally attach the shelf board bar
with the remaining screws (M6x14) (x6).
(4) Provisionally attach the screws (M6x14)
(x2) to the upper mounting bar, and hang it
on the left and right stand rods.
* Hang the bar so that the side with screw
holes faces upward.
(5) Provisionally attach the upper mounting
bar to the left and right stand rods with the screws (M6x14) (x6).
(6) Provisionally attach the lower mounting bar to the left and right stand rods in the same way as the upper mounting bar.
(7) Firmly tighten the screws (x24) attached in Steps (2) to (6) to secure the shelf board bar and the mounting bars.
(8) Attach the reinforcement angle with the screws (M4x10) (x9).
(9) Attach the shelf board.
• The shelf board can be attached on either the left or right
side.
Provisionally attach the screws (M4x10) (x2) to the shelf
board bar, and hang the shelf board on it.
Securely tighten the screws provisionally tightened in
and secure the remaining 3 positions with the screws
(M4x10) (x3).
(10) Lift the monitor by the grips on the grip fixing brackets, and
hang the monitor on the mounting bars.
* Take care not to pinch your hand.
• 4 or more people are required to lift the monitor. Lift the monitor straight up without tilting it.
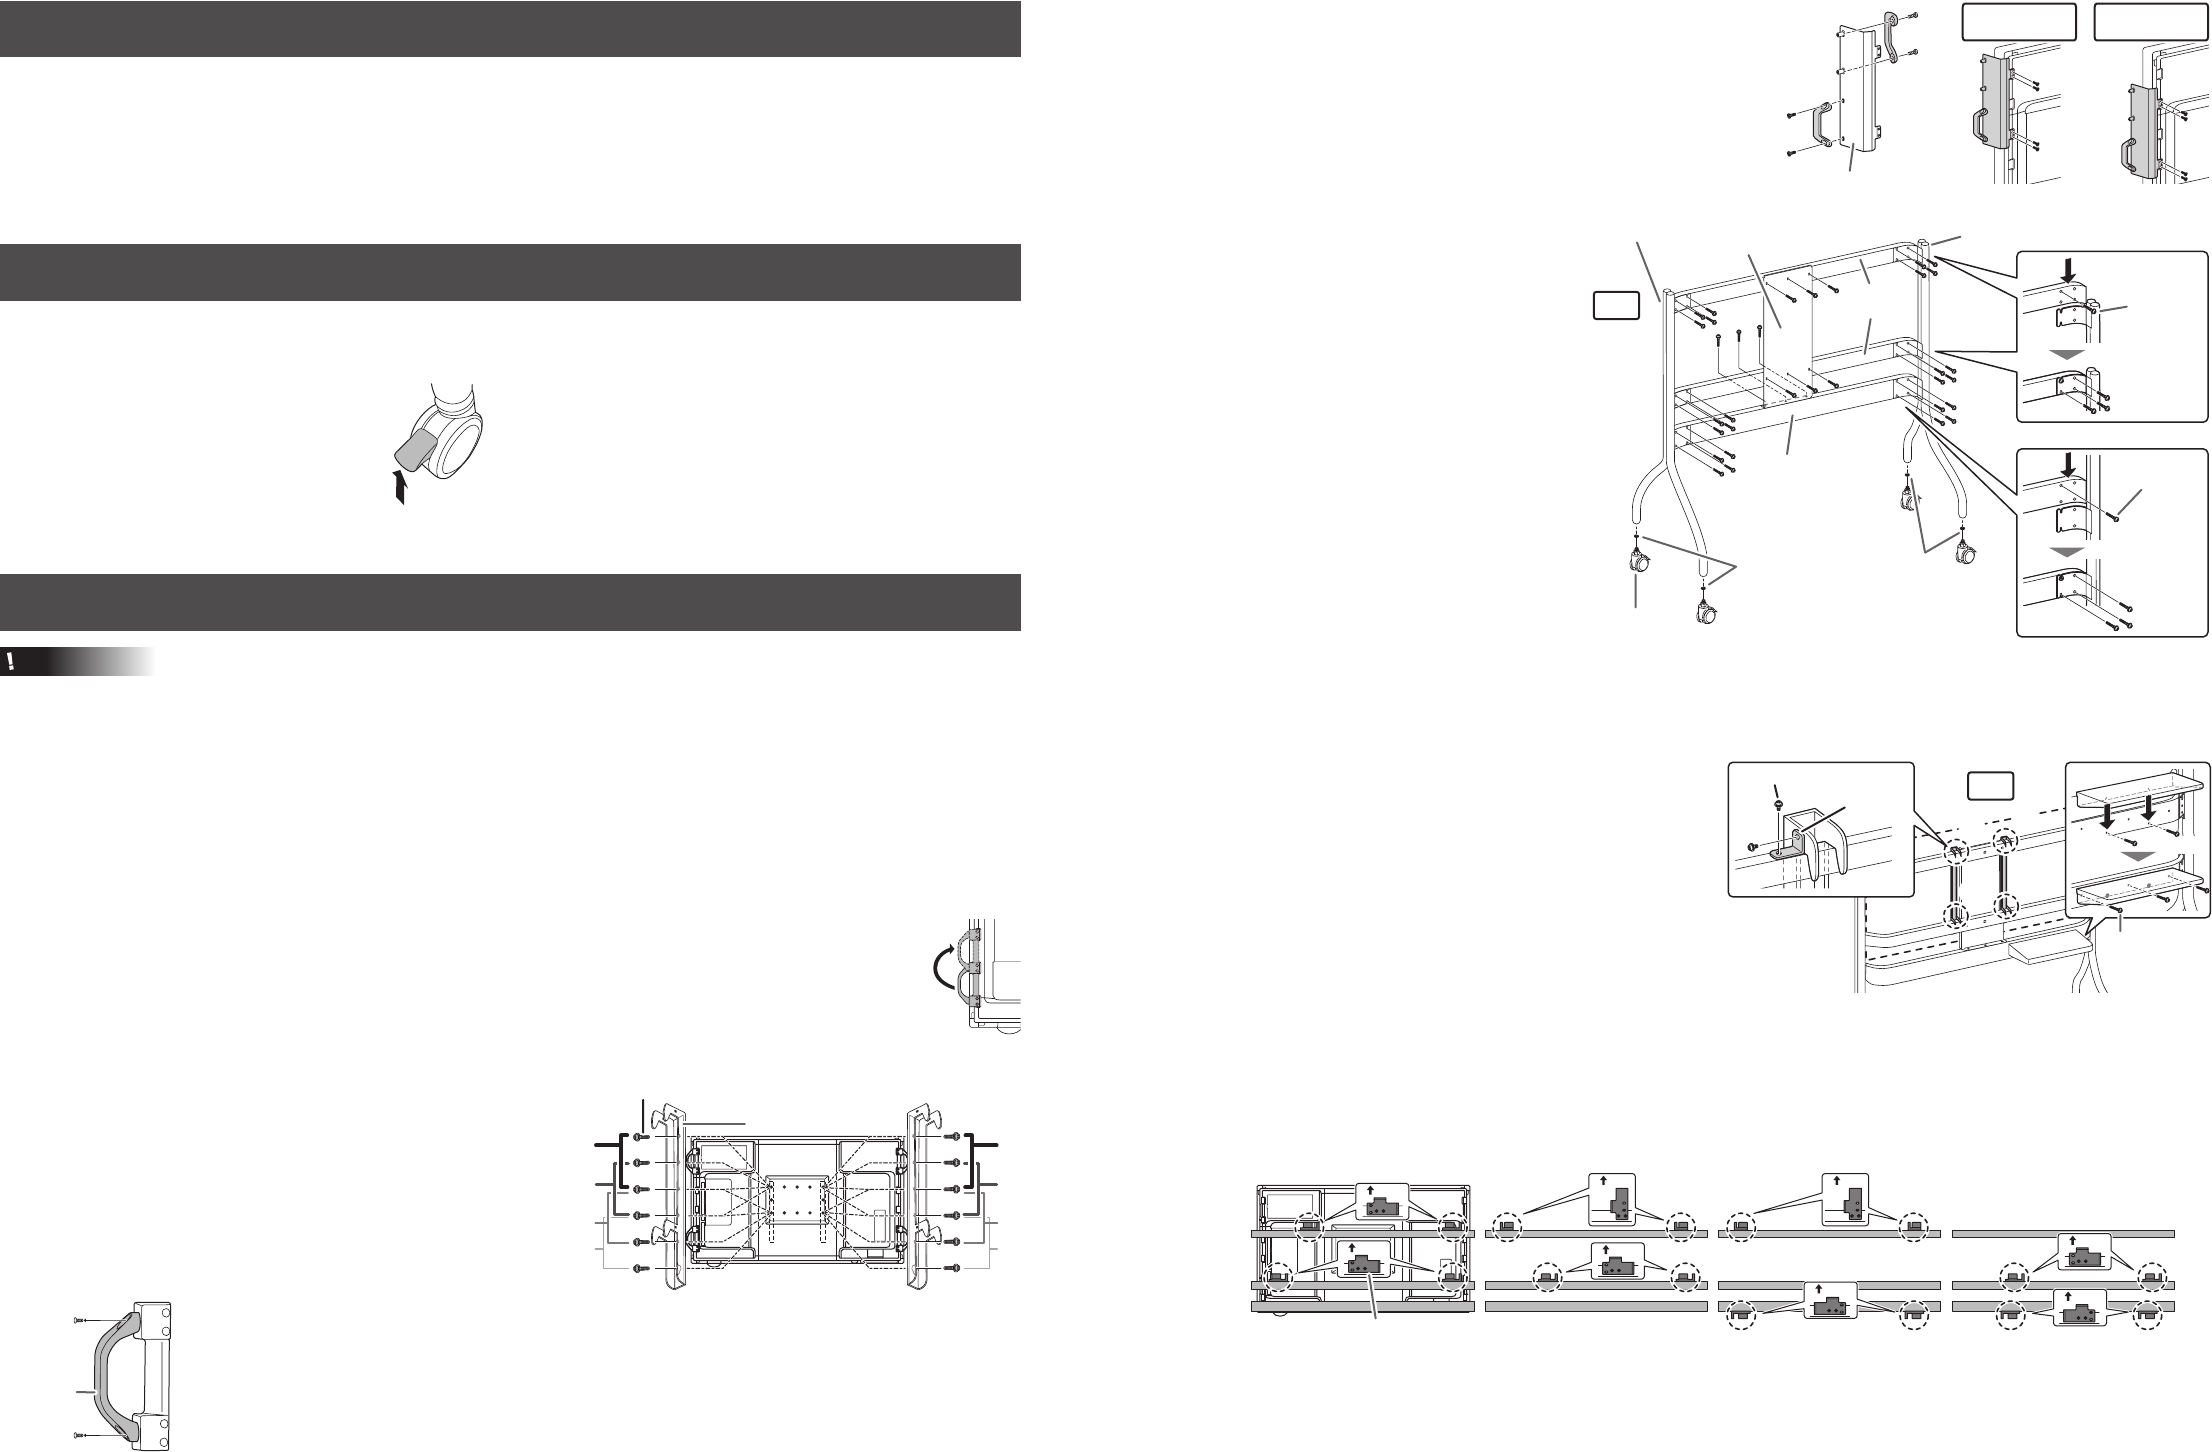
(11) Secure the mounting brackets and mounting bars with the fixed angles (x2) and screws (M4x10) (x4).
(12) Remove the grip fixing brackets.
(13) Secure the spacer angles (x4) with the screws (M4x10) (x8).
• Make sure that the spacer angles touch the back of the monitor before securing them.
• The orientation and position of the spacer angles vary depending on the height of the monitor.
Mounting
bar
Mounting
bar
Shelf
board bar
Front Front
Position [A] Position [B] Position [C] Position [D]
Front
Front
Front
Front
Front
Spacer angle
Front
(14) If the tray is to be attached, attach the tray onto the tray mounting fittings.
• For details, refer to the manual for the monitor.
Mounting bracket
[D] [D]
[C]
[B]
[A]
[C]
[B]
[A]
Screw (M6x14)
(4) (4)
Mounting bracket
positions [B], [C]
Mounting bracket
positions [A], [D]
(8)
Grip fixing bracket
(9)
(9)
Spring
washers
Stand rodStand rod
Caster
Shelf board bar
(1)
(1)
(1)
(5)
(4)
(3)
(2)
(8)
(1)
Mounting
bars
Spring
washers
Reinforcement
angle
Front
Screw
(M6x14)
Screw
(M6x14)
Screw
(M4x10)
Fixed
angle
Screw (M4x10)
(11)
(9)
(10)
(10)
(10)
(10)
Back
Suppliedcomponents
If any components should be missing, please contact your dealer.
□
Leftandrightstandrods(x1each)
□
Mountingbars(x2)
□
Shelfboardbar(x1)
□
Mountingbrackets(x2)
□
Reinforcementangle(x1)
□
Shelfboard(x1)
□
Fixedangles(x2)
□
Casters(x4)
□
Springwashers(x4)
□
Spacerangles(x4)
□
Screws(M4x10)(x26)
□
Screws(M6x14)(x28)
□
Gripxingbrackets(x2)
□
Clamps(x6)
□
Spanner(x1)
□
OperationManual(thismanual)