


Chapter 3 Dubbing/Editing
Chapter 3 Setting the Time Code 51
4 Press J/j buttons to select [PRESET], then press
EXEC button.
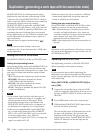
The following menus are displayed.
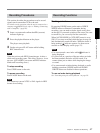
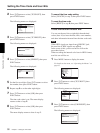
UB PRESET
00 00 00 00
[
MENU
]
: END
OK
PRESET
RESET
5 Set the first two digits. Press J/j buttons to select
the number, then press EXEC button.
6 Repeat step 5 to set the rest of the digits.
7 Press J/j buttons to select [OK], then press
EXEC button.
The user bit value is set. The menu display returns
to that of step 2.
8 Press J/j buttons to select [OK], then press
EXEC button.
The menu display returns to that of step 1.
To cancel the user bits setting
Select [CANCEL] in step 7, then press EXEC button.
To reset the user bits
Select [RESET] in step 4, then press EXEC button.
Note
The user bit is recorded at three-frame intervals for a
tape recorded in HDV1080i format.
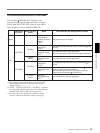
To select the time code when you record a
signal input to HDV/DV format
Set [HDV/DV IN TC] in [TC/UB SET] menu to select
whether to record the internal time code or an external
one.
INTERNAL: Records the time code internally
generated.
EXTERNAL: Records the time code with video and
audio signals input via
HDV/DV jack.
Notes
•When this item is set to [EXTERNAL], the time code
input via
HDV/DV jack and the user bits set in [UB
PRESET] are recorded.
•When HDV signals are input from
HDV/DV jack
the user bit value is also recorded, regardless of
[HDV/DV IN TC] setting.
•When this item is set to [EXTERNAL], INPUT
SELECT switch on the front panel is set to HDV/DV,
and no signal is input via
HDV/DV jack, or the
software of the editing controller does not output a
time code. If you start recording, bars (– –:– –:– –:– –)
are recorded as the time code. When time code
signals are input, the bars disappear to record the time
code signals.
•When this item is set to [EXTERNAL], if you input
time code to
HDV/DV jack that is not continuous or
does not advance correctly, the value of the recorded
or displayed time code may not be equal to the actual
value of the input one. If you use a tape with this
problem, you may not perform search or edit,
depending on the devices you use.
To set the time code when the recording
starts
Set [TC MAKE] in [TC/UB SET] menu to select the
time code to be recorded when recording starts.
REGENERATE: The time code value is set to
continue the time code from the time code already
recorded on the tape. If you start recording from a
blank portion of the tape, the time code starts from
“00:00:00:00”.
PRESET: The time code starts from the value set in
[TC PRESET] in [TC/UB SET] menu.
To set the advancement mode
Set [TC RUN] in [TC/UB SET] menu to switch the
advancement mode (counting up).
REC RUN: Time code advances only while
recording.
FREE RUN: Time code advances even when the
unit is not recording and the time indicator is
paused. Use this setting to adjust the default time
code to the current time and so on.
(Continued)