


9
Hookups
Hookups
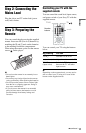
When unpacking, check the supplied accessories by referring to page 37.
b
• Plug cables securely to prevent unwanted noise.
• Refer to the instructions supplied with the components to be connected.
• Be sure to disconnect the mains lead of each component before connecting.
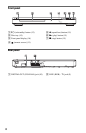
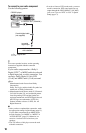
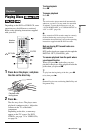
Step 1: Connecting to Your TV
Connect this player to your TV monitor, or projector using an audio/video (SCART) cable. This
connection will use your TV speakers for sound.
Be sure to make the connections firmly to
avoid hum and noise.
When using this connection, check that the
TV conforms to RGB signals. Refer to the
operating instructions supplied with the TV to
be connected. Also, when you set “LINE” to
“RGB” under “SCREEN SETUP” in the
Setup Display (page 29), use a SCART cable
that conforms to RGB signals.
When connecting to a standard 4:3 screen TV
Depending on the disc, the image may not fit
your TV screen. To change the aspect ratio,
see page 29.
b
• Do not connect a VCR, etc., between your TV and
the player. If you pass the player signals via the
VCR, you may not receive a clear image on the
TV screen.
• When you connect the player to your TV via the
SCART jack, the TV’s input source is set to the
player automatically when you start playback. In
this case, press TV t (input select) on the
remote to return the input to the TV.
LINE
(RGB)
-TV
DIGITAL OUT
COAXIAL
TV
: Signal flow
CD/DVD player
to LINE (RGB)-TV
SCART cable
(not supplied)
When you play a disc recorded in the NTSC
colour system, the player outputs the video
signal or the Setup Display etc. in the NTSC
colour system and the picture may not
appear on the PAL colour system
televisions. In this case, open the disc tray
and remove the disc.
,continued