


19
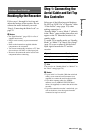
Hookups and Settings
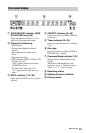
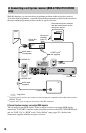
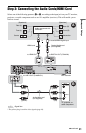
A SCART input jack
When setting “LINE 3 Out” to “S-Video” or
“RGB” in the “Video In/Out” setup
(page 122), use a SCART cord that
conforms to the selected signal.
B Video input jack
You will enjoy standard quality images.
C S VIDEO input jack
You will enjoy high quality images.
D Component video input jacks (Y, PB/
C
B, PR/CR)
You will enjoy accurate colour reproduction
and high quality images.
If your TV accepts progressive 525p/625p
format signals, use this connection and set
“Progressive” to “Compatible” in the “Easy
Setup” setup (page 25). Then set
“Component Video Out” to “Progressive” in
the “Video In/Out” setup to send progressive
video signals. For details, see “Component
Video Out” on page 122.
E HDMI input jack
Use a certified HDMI cord to enjoy high
quality digital picture and sound through the
HDMI OUT jack.
When connecting a Sony TV that is
compatible with the “Control for HDMI”
function, see page 20.
To see the signals from the connected set top
box receiver when the set top box receiver is
connected to the recorder using a SCART
cord only, turn the recorder on.
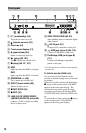
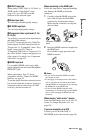
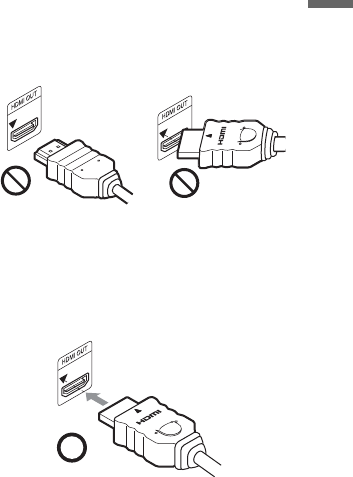
When connecting to the HDMI jack
Follow the steps below. Improper handling
may damage the HDMI jack and the
connector.
1 Carefully align the HDMI jack on the
rear of the recorder and the HDMI
connector by checking their shapes.
Make sure the connector is not upside
down or tilted.
2 Insert the HDMI connector straight into
the HDMI jack.
Do not bend or apply pressure to the
HDMI connector.
b Notes
• Be sure to disconnect the HDMI cord when
moving the recorder.
• Do not apply too much pressure to the cabinet
wall, if you place the recorder on the cabinet
with the HDMI cord connected. It may damage
the HDMI jack or the HDMI cord.
• Do not twist the HDMI connector while
connecting to or disconnecting from the HDMI
jack to avoid damaging the HDMI jack and
connector.
When playing “wide screen” images
Some recorded images may not fit your TV
screen. To change the picture size, see
page 128.
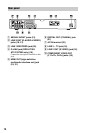
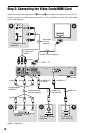
If you are connecting to a VCR
Connect your VCR to the LINE 1/
DECODER jack on the recorder (page 29).
Not straightConnector is upside
down
,continued