


Attaching an Interface Board
GB
6
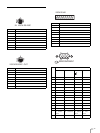
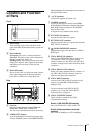
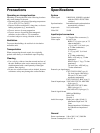
Switches 3 to 5 (Camera address selectors)
Set the address of the camera.
Normally set to "0". With this setting, addresses are
assigned to the cameras automatically in the
connected order by pressing the POWER button
while holding down the RESET button on the RM-
BR300 Remote Control Unit (not supplied).
You can assign the camera address "1" to "7"
manually by setting these selectors as follows:
Switch 6 (59.94i/50i signal format selector)
Set to ON for output of 50i signal format, or OFF
for output of 59.94i signal format.
The camera connected to this unit operates in the
same signal format as that of this unit regardless of
the signal format set on the camera.
Note
Set the switches before you turn on the power of the unit.
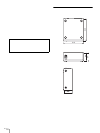
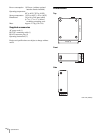
Attaching an Interface
Board
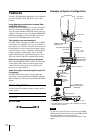
Attach an interface board such as BRBK-301 or BRBK-
302 (not supplied) to the card slot on the rear of this unit.
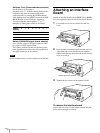
1
Loosen the two screws to remove the card slot
cover.
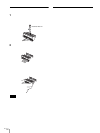
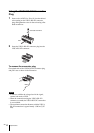
2
Insert an optional interface board into the card slot.
Align both ends of the interface board with the
sliders inside the slot, then insert the board securely
as far as it will go.
3
Tighten the two screws on the interface board.
To remove the interface board
Loosen the two screws on the interface board and pull
the board out straight and slowly.
Camera
address
01234567
Switch 3 OFF ON OFF ON OFF ON OFF ON
Switch 4 OFF OFF ON ON OFF OFF ON ON
Switch 5 OFF OFF OFF OFF ON ON ON ON
Interface board (not supplied)