


3
GB
Introduction
Thank you for choosing this Sony “Grand Wega” model.
Before operating the set, please read this manual thoroughly and retain it for future reference.
• Symbols used in the manual:
• Informs you of possible hazards.
• Important information.
• Information on a feature.
• 1,2... Sequence of instructions.
• Shaded buttons on the remote control show the
buttons you have to press to follow the sequence
of instructions.
• Informs you of the result of the instructions.
Safety Information
All TV’s operate on extremely high voltages. To prevent fire or electric shock, please follow the safety guidelines indicated in the
blue sheet supplied.
Table of Contents
Introduction ...................................................................................................................................................................................................................... 3
Safety Information............................................................................................................................................................................................................ 3
Overview
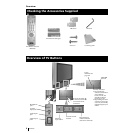
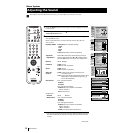
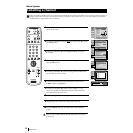
Checking the Accessories Supplied.................................................................................................................................................................. 4
Overview of TV Buttons .................................................................................................................................................................................... 4
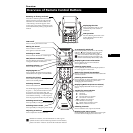
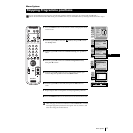
Overview of Remote Control Buttons.............................................................................................................................................................. 5
Installation
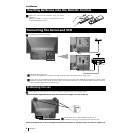
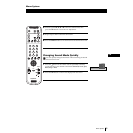
Inserting Batteries into the Remote Control.................................................................................................................................................... 6
Connecting the Aerial and VCR ....................................................................................................................................................................... 6
Stabilizing the set ................................................................................................................................................................................................ 6
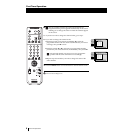
First Time Operation
Switching on the set and Automatically Tuning............................................................................................................................................ 7
Menu System
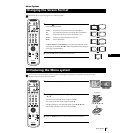
Changing the Screen Format............................................................................................................................................................................. 9
Introducing the Menu System........................................................................................................................................................................... 9
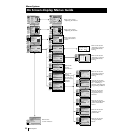
On Screen display Menus Guide.................................................................................................................................................................... 10
Using the Menu System:
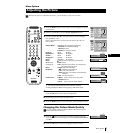
Adjusting the Picture..................................................................................................................................................................................... 11
Adjusting the Sound...................................................................................................................................................................................... 12
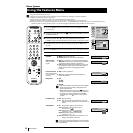
Using the Features menu............................................................................................................................................................................... 14
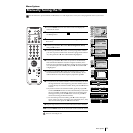
Manually Tuning the TV............................................................................................................................................................................... 15
Labelling a channel ........................................................................................................................................................................................ 16
Skipping programme positions.................................................................................................................................................................... 17
Using the “Further Programme Preset” function...................................................................................................................................... 18
Inputting your personal ID........................................................................................................................................................................... 19
Using the Demo Mode................................................................................................................................................................................... 20
Adjusting the H Centre picture for an RGB source................................................................................................................................... 21
Labelling and Selecting the screen format of Input Sources.................................................................................................................... 22
Using Multi PIP (Picture In Picture)............................................................................................................................................................ 23
Using PAP (Picture And Picture)................................................................................................................................................................. 23
Teletext...................................................................................................................................................................................................................... 24
NexTView................................................................................................................................................................................................................. 26
Optional Connections
Connecting Optional Equipment.................................................................................................................................................................... 28
Using Optional Equipment.............................................................................................................................................................................. 29
Smartlink............................................................................................................................................................................................................ 30
Remote Control of other Sony Equipment.................................................................................................................................................... 30
Additional Information
Optimum Viewing Area .................................................................................................................................................................................. 31
Replacing the Lamp.......................................................................................................................................................................................... 32
Specifications..................................................................................................................................................................................................... 33
Troubleshooting................................................................................................................................................................................................ 34
MENU
K
•When moving the set two persons are needed. DO NOT push
speaker nets placed on the both side of the screen to prevent these
parts from deformation and do not grasp the front panels to
prevent these parts from breaking off. Support screen bottom
with one hand while grasping the top part with the other hand.
•Do not block or cover the ventilation opening placed on the left
bottom rear side of the set. For ventilation, leave a space of at least
10 cm from the wall.
•After transporting the set directly from a cold to a warm location,
or if the room temperature has changed suddenly, pictures may
be blurred or show poor colour over portions of the picture. This
is because moisture has condensed on the mirrors or lenses inside
the set. Let the moisture evaporate before using the set.
•To obtain a clear picture, do not expose the screen to direct
illumination or direct sunlight. If possible, use spot lighting
directed down from the ceiling.
• This set incorporates the latest high-precision LCD technology. Even
though the highest standards are applied in manufacture it is still
possible that a few black dots or bright points (red, green or blue)
may be visible on the screen under certain picture conditions. It is
not possible to remove them and this is not a fault condition.
• The screen of this set has an anti-reflection screen coating. To avoid
screen degradation, follow the mentioned below:
• To remove dust from the screen surface, wipe with the suplied
cleaning cloth or a soft cloth.
• Clean the screen and cabinet with a soft dampened cloth. Do not
use any abrasive cleaners. As a safety precaution, unplug the set
before cleaning it.
• Avoid touching the screen, and take care not to scratch the surface
with hard objects.