


66
Additional Information
Troubleshooting
If you have any questions or problems not covered below, please consult your nearest
Sony service facility.
Additional Information
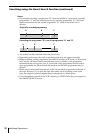
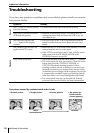
• Normal picture
• No picture (or
black & white
screen appears)
• Unclear picture• Rough picture
Symptoms caused by contaminated video heads
initial
contamination
terminal
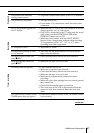
Symptom
The I/u ON/STANDBY switch
does not function.
The power is turned on but the
VCR does not operate.
The clock has stopped and
“–:– –” lights in the display
window.
The playback picture does not
appear on the TV screen.
The picture is not clear.
PowerPlayback Clock
Remedy
• Connect the mains lead to the mains securely.
• Moisture condensation occurs. Turn the power off,
unplug the mains lead and leave the VCR to dry for
over three hours.
• The clock stops if the VCR is disconnected from the
mains for more than one hour. Reset the clock (and
timer).
• Make sure the TV is set to the video channel. If you are
using a monitor, set it to video input.
• If the VCR is connected to the TV only with the aerial
cable, make sure that RF MODULATOR in the
OPTIONS-2 menu is set to ON.
• Adjust the tracking with the TRACKING +/– buttons.
• The video heads are dirty (see below). Clean the video
heads using the Sony T-25CLD, E-25CLDR, or
T-25CLW video head cleaning cassette. If these
cleaning cassettes are not available in your area, have
the heads cleaned at your nearest Sony service facility
(a standard service charge will be required). Do not use
a commercially available liquid type cleaning cassette
other than Sony’s, as it may damage the video heads.
• The video heads may have to be replaced. Consult
your local Sony service facility for more information.