


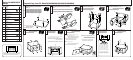

Attach the casters (A) to the bottom
board (B).
######################################
######################################
######################################
######################################
1
1
3
5
5
#
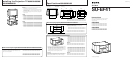
Parts list/########/
#####
Assembling the AV Rack/################/#########
2
Attach the side boards (C,D) and dividers
(E,F).
############################################
############################################
2
#
Attach the top board (H).
######################
######################
#
3
4
#
4
Attach the front panels (I, J).
######################
######################
Attach the rear panel (K).
#################
#################
3 While pushing upward, slide the glass into
the hinge, then tighten the screws.
################################ #
###############################
# ################################
################################
#
8
8
9
9
#
Adjust the glass door.
#################
#################
Attach the stoppers (P).
#################
#################
#
1 Loosen the screw of the lower hinge and
insert it to the bottom board.
################################ #
###############################
# ################################
################################
2 Insert the upper hinge.
################################ #
# ################################
Attach the glass door (O).
#################
#################
7
#
7
You can choose the shelf level according to the
height of the VCR or other equipment.
#####################################################
####################
#####################################################
Attach the shelf (M).
#################
#################
6
#
6
Symbol Parts name Q’ty
##### ### ### ###
##### ### ### ###
Casters 4
A ### ### #
### ### 4
Bottom board 1
B ### ### #
### ### 1
Side boards (left/right) 2
C, D ### ### #
### ### 2
Dividers (left/right) 2
E, F ### ### #
### ### 2
Screws (large) 24
G ### ### #
### ### 24
Top board 1
H ### ### #
### ### 1
Front panels (left/right) 2
I, J ### ### #
### ### 2
Rear panel 1
K ### ### #
### ### 1
Screws (small) 12
L ### ### #
### ### 12
Shelf 1
M ### ### #
### ### 1
Dowels 4
N ### ### #
### ### 4
Glass door 1
O ### ### #
### ### 1
Stoppers 2
P ### ### #
### ### 2
The shaded part of the rear panel may be removed for the
wiring.
################################################
##############################################
Arrow direction shows front.
######################
#######################
A
B
G
H
I
J
G
L
K
N
O
3
2
Loosen the screws and adjust
the angle of the glass door if it
does not open or close smoothly.
Loosen the screws and adjust
the angle of the glass door if it
does not open or close smoothly.
Loosen the screws and adjust
the angle of the glass door if it
does not open or close smoothly.
L
P
C
G
E
F
D
M
1