


– 6 – EN
You can make copies of video tapes made by friends or relatives
for your enjoyment.
Warning: Unauthorized recordings of copyrighted video tapes
may be an infringement of copyright laws.
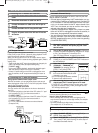
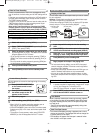
Connect the recording VCR(this unit), the playing VCR (another
source) and your TV using the following diagram.
1
Insert a pre-recorded tape into the playing VCR.
2
Insert a tape with its safety tab into the recording
VCR.
3
Press [SPEED] on the remote control of the recording
VCR to select the desired recording speed (SP/SLP).
4
Select the “L1” or “L2”position on the recording VCR.
See page 3, under “Using AUDIO/VIDEO Input Jacks”.
5
Press [REC/OTR] on the recording VCR.
6
Begin playback of the tape in the playing VCR.
• For best results during dubbing, use the VCR’s front panel
controls whenever possible. The remote control might affect
the playing VCR’s operation.
• Always use video-quality shielded cables with RCA-type con-
nectors. Standard audio cables are not recommended.
• You can use a video disc player, satellite receiver, or other
audio/video component with A/V outputs in place of the play-
ing VCR.
ANT in
[TV set]
(Use for monitoring)
RF cable
(supplied)
[Playing VCR]
(another source)
Audio/Video cables
(not supplied)
IN
OUT
AUDIO
VIDEO
[Recording VCR]
(this unit)
IN
OUT
ANT
AUDIO
VIDEO
IN
OUT
OUT IN
When a tape has reached the end during recording, playback,
or fast-forward, the tape will automatically rewind to the begin-
ning. After rewinding finishes, the VCR will eject the tape and
turn itself to off.
• The VCR will not rewind the tape automatically during timer
recording or One Touch Recording.
• This shows the elapsed recording or playback time in hours,
minutes, and seconds. (The displayed time will not change dur-
ing blank portions on the tape.)
• The indication will appear when the tape is rewound further
than “0:00:00” on the tape counter.
SPECIAL FEATURES
Auto Rewind
Copying a Video Tape
Real Time Tape Counter
1
Turn on the TV and set the TV to channel 3. If channel 3
is already occupied for broadcasting, change the RF output
to CH 4, and change the TV channel to CH4.
(See “RF Output Channel” on page 3 for the detail.)
2
Press [VCR/TV] on the remote control of the recording
VCR so that the VCR/TV indicator comes on.
To Monitor the Recording
• If there is a power failure or the VCR is unplugged for more
than 30 seconds, the clock setting and all timer settings will be
lost.
• If the tape runs out before the end time, the VCR will switch to
the Stop mode immediately, eject the tape and be turned off.
The TIMER indicator will flash.
• If a tape is not in the VCR or does not have the safety tab, the
TIMER indicator flashes and timer recording cannot be per-
formed. Please insert a recordable tape.
•
When all the Timer Recording are completed, the TIMER
indicator flashes.To play or eject the recorded tape, press
the POWER button first, and then press [PLAY] or [EJECT] .
Press [STOP/EJECT] on the VCR.
1
Turn the power on by pressing [POWER].
2
Select main menu by pressing [MENU].
3
Select "TIMER PROGRAMMING" by pressing [PLAY] or
[STOP]. Then, press [F.FWD].
4
Select the program number which you want to check
by pressing [PLAY] or [STOP]. The details of the selected
program appears on the TV screen.
• Go to the digit you want to change by pressing [F.FWD] or
[REW]. Then, enter correct numbers by pressing [PLAY] or
[STOP].
• You may cancel the entire program by pressing [REW] dur-
ing the program number flashes.
5
Press [COUNTER RESET/EXIT] to exit.
6
Press [POWER] to return to timer stand-by mode.
To Check, Correct, or Cancel an Automatic Timer Program
To Stop an Automatic Timer Program already started
Hints for Timer Recording
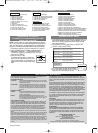
Use this feature to memorize the beginning of recording
start point.
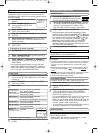
1
Press [COUNTER RESET/EXIT]
on the remote control to reset
the counter.
2
Press [COUNTER MEMORY] on
the remote control so that “M”
appears on the TV screen.
3
Record the program.
4
After recording, press [STOP] then [REW].
• When “0:00:00” is reached, rewinding operation goes to
stop. And you can view the recording program.
• [COUNTER MEMORY] does not function if the Auto repeat
mode is set to [ON]. In this case, set the Auto repeat mode
to [OFF].
• To cancel the Counter memory mode, press [COUNTER
MEMORY] so that “M” disappears from the TV screen.
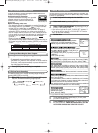
Counter Memory Function
REC
SP M0:00:00
M0:00:00
M0:00:00
HD235UD(SL220D)EN_v1.QX3 03.12.20 0:23 AM Page 6