


345
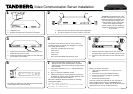
Connect the serial cable from the DATA port on the 1.
VCS to the serial port on a PC.
Connect the Ethernet LAN cable from the LAN1 port 2.
on the VCS to your network.
Connect the power cable and turn the power on 1.
using the power switch on the back right of the unit.
Press the soft power button on the back left of the 2.
unit.
6
The default IP Address of 192.168.0.100 will be visible
in the display shortly after power-up.
1
Unpack the unit.1.
Remove the protective foil from the front panel.2.
VGA
o
I
192.168.0.100
2
Mount the rack ears and/or rubber feet, if applicable.1.
Turn the unit back on its feet or mount it in the rack.2.
Video Communication Server Installation
8
Restart the system as follows:
Login with the username 1. admin and your new
password.
Press Enter to skip the installation wizard.2.
Reboot the system by typing the command3.
xcommand boot.
Disconnect the serial cable. 4.
Once the system has restarted you are now ready to
begin configuring and using your TANDBERG Video
Communication Server. Please refer to the CD that was
shipped with your unit for full documentation.
116347 rev. 6
To connect to the VCS from the PC, start a terminal
emulator program on the PC and configure it to use the
PC’s serial port as follows:
baud rate: 115200 bits per secondsä
data bits: 8sä
parity: nonesä
stop bits: 1sä
flow control (hardware and software): nonesä
The terminal emulator program on the PC will
display the unit’s start up information, and after
approximately 4 minutes you will get a login prompt.
At the prompt:
Login with a username of 1. admin and the password
TANDBERG.
Type 2. Y to start the installation wizard.
Follow the prompts to set the password, IP protocol, 3.
IP Address, IP subnet mask, IP default gateway, ether-
net speed, SSH and Telnet options.
When the installation wizard is finished, the following
message will appear:
Setting other settings...
OK. The system must be restarted for new
settings to take effect.
TANDBERG recommends that if this
product is mounted in a rack you use
additional support accessories such
as rack side support angles (rack
angle brackets) or rack shelves due
to the unit’s weight and depth.
Please contact your rack supplier to
request the accessories best fitted
for your rack.
7
o
I
12