4
3
1
6
5
2
7
8
11
5
4
3
1
10
6
2
8
9
12
7
3. AUDIO SETUP
3.1 VOLUME SETUP
AUDIO SETUP
DYNAMIC RANGE
PROLOGIC II
FRONT RIGHT
0DB
EXIT SETUP
VOLUME SETUP
• Once you select the Volume Setup and press OK, you will hear the calibrating
sound from the front left speaker for a few seconds. Then this sound will move
from speaker to speaker as follows : Front Left -> Center -> Front Right -> Subwoofer
-> Rear Right -> Rear Left. If the calibrating sound is either too small or too loud,
exit the Volume Setup and then adjust the volume control until the calibrating
sound is more clear. Let the calibrating sound cycle throngh all the speakers
at least once.
• If the calibrating sound level from all speakers is approximately the same, no
further adjustment is necessary.
• If any speaker sound level appears unbalance to the rest, you can increase or
decrease the level of the speaker by pressing
or to increase or decrease the
speaker level when that speaker is highlighted.
• When you have copmpleted the level adjustments, press OK to exit the Volume
Setup and return to the previous menu.
Note : We recommend to set Volume = 30 before entering this Volume Setup to
further calibrating any unbalance speaker level output.
3.2 DYNAMIC RANGE
AUDIO SETUP
VOLUME SETUP
ON
PROLOGIC II
EXIT SETUP
DYNAMIC RANGE
OFF
Dynamic Range Control enables you to control the dynamic range so as to achieve
a suitable sound for your equipment.
ON: Loud sound such as explosion is toned down slightly when playback.
OFF: It plays back at the recording level on the disc.
3.3 PROLOGIC II
AUDIO SETUP
VOLUME SETUP
DYNAMIC RANGE
MOVIE MODE
MUSIC MODE
EXIT SETUP
PROLOGIC II
OFF
The Dolby Pro Logic II Surround System is a specially encoded 2 channels analog
format which will reproduce 5 channels output when a Dolby Pro Logic II Decoder
is used.
MOVIE MODE : The Movie mode is for use with stereo television shows and all
programs encoded in Dolby Surround. The result is enhanced soundfield
directionality that approaches the quality of discrete.
MUSIC MODE : The Music mode is for use with any stereo music recordings, and
provides a wide and deep sound space. The Music mode includes different controls
that allow the sound to be tailored to individual listening perference.
3.4 PANORAMA /CENTER WIDTH / DIMENSION
AUDIO SETUP
VOLUME SETUP
DYNAMIC RANGE
MOVIE MODE
OFF
EXIT SETUP
PROLOGIC II
MUSIC MODE
AUDIO SETUP
VOLUME SETUP
DYNAMIC RANGE
PROLOGIC II
ON
CENTER WIDTH
DIMENSION
EXIT SETUP
PANORAMA
OFF
AUDIO SETUP
VOLUME SETUP
DYNAMIC RANGE
PROLOGIC II
PANORAMA
DIMENSION
EXIT SETUP
90
CENTER WIDTH 69
54
28
0
AUDIO SETUP
VOLUME SETUP
DYNAMIC RANGE
PROLOGIC II
PANORAMA
CENTER WIDTH
EXIT SETUP
DIMENSION +1
-1
-3
+3
The above options are available only when the player is in Music Mode. These
options let you to customize the ProLogic II Music Mode Sound Effect.
PANORAMA: Extends the front stereo image to include the surround speakers for
an exciting “wraparound” effect with side-wall imaging.
CENTER WIDTH: With Pro Logic decoding, dominant center signals can come
only from center speaker. If no center speaker is present, the decoder splits the
center signals equally to the left and right speakers to create a “phantom” center
image. The Center Width allows variable adjustment of the center image so it may
be heard only from the center speaker; only from the left/right speakers as a phantom
image; or from all three front speakers to varying degrees.
DIMENSION: A simple control that alters the ratio of L+R to L-R for the two-chanel
input signals. It allows the user to gradually adjust the sound field either towards
the front or towards the rear. If a recording is too spacious or strong from the
surrounds,it can be adjusted ”forward” to get a better balance. Likewise, if a stereo
recording is somewhat too ”mono” or “narrow” sounding, it can be adjusted toward
the rear to get a more enveloping, immersing result.
4. VIDEO SETUP
4.1 TV SYSTEM
VIDEO SETUP
NTSC
VIDEO
TV TYPE PAL 60
AUTO
EXIT SETUP
TV SYSTEM
PAL
This player supports different TV output, including NTSC and PAL system. You
may change the setting of the unit to match your TV.
NTSC : Select this if your TV supports NTSC colour system.
PAL : Select this if your TV supports PAL colour system.
PAL 60 : Select this if your TV supports PAL 60 colour system.
AUTO : Select this if your TV supports Multi-colour system.
Note : If you TV supports only NTSC or PAL and had you inadvertently selected the
wrong TV type, the TV screen will become flickering and/or black-and-white.
4.2 VIDEO
VIDEO SETUP
TV SYSTEM
TV TYPE RGB-OFF
EXIT SETUP
VIDEO TV-RGB
Choose the type of video output that matches the video connection between the unit
and TV.
TV-RGB : The RGB signal is enabled from TV Scart Output to TV.
RGB OFF : The RGB signal is disabled from TV Scart Output to TV.
ADVANCED PLAYBACK FUNCTION
PLAYING DVD / VCD / CD DISC
PLAYING MP3 / WMA / JPEG / MPEG
3.2 CD / VCD / SVCD Programming
• Enter the track numbers in
--
.
• Use
, , or button to move to another field.
• Repeat the above steps.
• Press
or highlight PLAY on the screen and press OK to start the programmed
playback.
• Highlight the current input on the screen and press CLEAR to delete the track
you input.
Note :
• Highlight CLEAR on the PROG screen and press OK to delete all inputs.
• The function is only available when PBC is OFF.
4. Random Playback
The chapter in DVD and track in CD can be played in random order.
• Press the PLAYMODE button.
PLAY MODE
MODE OFF
REPEAT OFF
PLAY MODE
MODE PROG
REPEAT OFF
PLAY MODE
MODE PROG
REPEAT OFF
PLAY MODE
MODE RANDOM
REPEAT OFF
• When MODE is highlighted, use or to select option into RANDOM mode.
Then press OK to confirm.
5. Repeat Playback
You can play a specific title, chapter or track repeatedly. Press the PLAYMODE
button to access the play mode menu.
Note : During VCD / SVCD playback, the function is only available when PBC is OFF.
5.1 Repeating a Title / Chapter / Track / Whole disc
PLAY MODE
MODE OFF
REPEAT ALL
PLAY MODE
MODE PROG
REPEAT OFF
PLAY MODE
MODE PROG
REPEAT OFF
PLAY MODE
MODE PROG
REPEAT OFF
• Press the PLAYMODE button, use or to select the REPEAT option.
• Use
or button to select differen repeat mode and press OK to confirm.
Selected mode will be highlighted on the screen.
For DVD Disc : Off > REP All > Chapter > Title
For CD / VCD / SVCD Disc : Off > REP 1 > REP All
For MP3 / JPEG / WMA Disc : Off > REP DIR > REP 1 > REP ALL
5.2 Repeating a Specific Section
• While the disc is playing, press A-B to set the beginning of the section you want
to play repeatedly.
REPEAT A-
• Press A-B again to set the end of the section you want to play repeatedly.
REPEAT A-B
• Then the unit will immediately begin replaying your section repeatedly.
• Press A-B again to clear the programmed repeat playback and return to the
normal playback.
A-B CANCEL
Note :
• The A-B repeat function can only be used within the same title. If the start and
end of the section to be repeated are in at different titles, it will be reset.
• The A-B repeat function does not operate in scenes where different camera
angles are recorded.
6. PBC (VCD / SVCD Playback Control)
• When a VCD / SVCD is playing, press PBC repeatedly to switch between PBC
(Playback Control) ON and OFF.
[ON]
PBC:
• If you select PBC ON, the disc menu (if available) will appear on the TV. Use
or Numberic keys (0-9) to select a play operation.
[ OFF ]
PBC:
• If you select PBC OFF, the unit will skip the disc menu and playback directly.
PLAYMODE button will be available when playing VCD.
7. BOOKMARK Function
MARK - - - - - ------- TT1 CH 1 00:03:21
The Bookmark feature allows you to mark a point on the screen that you want to
watch again.
7.1 Creat a Bookmark
• During DVD / CD playback, press BOOKMARK to access the bookmark
menu.
• Use
or button to navigate and press OK to bookmark your desired point.
7.2 Recalling a Bookmark Screne
• During playback, press BOOKMARK to access the bookmark menu.
• Use
or button to highlight the bookmark you want and press to play from
the Bookmark point. Press CLEAR to reset the highlighted bookmark.
8. TONE (Selecting Different EQ Modes) and TREBLE / BASS Control
8.1 EQ Modes
There are totally 5 EQ modes available. Press TONE repeatedly on the remote
control for different EQ modes : FLAT, ROCK, POP, CLASSIS and JAZZ.
8.2 Treble / Bass Control
Press TONE once and follows by pressing OK, then the Treble Control is
enabled. Then press
or to switch to enable Bass Control.
TREBLE 0
While Treble Control or Bass Control is enabled, press or to adjust the
Treble / Bass Level.
BASS +5
TREBLE -3
1. (Open / Close)
• Press to open the disc tray.
Note : Load the disc on the disc tray with disc label facing upward.
• Press again to close the disc tray. It will start playback automatically.
2.
(Play)
• Press to start playback.
3.
(Pause / Frame-by-Frame Advance)
You can freeze the image and advance frame by frame.
• For CD, press
to pause the playback. Press again or directly press will
resume the normal playback.
• For DVD / VCD, press
to pause the playback. Press again will go to
STEP
mode. Each press button will advance the frame in STEP mode.
Press
will resume the normal playback.
4.
(Backward / Forward Serach, Slow Motion)
• Press
to search backward or forward. Press will resume the normal
playback.
Each time when
or button is pressed, the speed of backward / forward
search changes accordingly.
• In “pause” mode, press
to start forward or backward slow motion play.
Press
to resume normal playback.
Each time when
or button is pressed, the speed of slow-motion
playback changes accordingly.
Note: Slow motion step by step is not applicable to CD Playback. Backward
slow motion is not applicable to VCD playback.
5.
(Skip to the Beginning of a Chapter / Track)
When a disc is playing, you can skip backward / forward a chapter / track.
• Press the
button to skip to the beginning of the previous chapter or track.
• Press the
button to skip to the beginning of the next chapter or track.
• For audio CD disc, use the numeric buttons (0 - 9 on the remote control only) to
directly jump to a track number.
6.
(Stop)
• Press
once to stop the current playback instant and enter the Resume Play
mode.
Press
again to resume playback from the point at which you last stopped the
disc.
• Press
twice to stop playback completely. No resume playback.
Press
again to start playback from the beginning of the disc.
7. MENU
• Press to display the Disc Menu.
Note : Playback will be stopped to display the menu. For CD, no function. For
VCD, it is only available when PBC is set to ON.
8. TITLE
• Press to display the Title Menu if present on disc (DVD only).
9. ZOOM (To Zoom In the Image)
You can magnify pictures during playback.
• When a disc is playing, press the ZOOM / CLEAR button. Each time ZOOM /
CLEAR button is pressed, the ZOOM settings will be changed as follows :
ZOOM 2 --> ZOOM 3 --> ZOOM 4 --> ZOOM 1/2 --> ZOOM 1/3 --> ZOOM 1/4 -->
ZOOM : OFF
• While an image is magnified, you can use
, , and keys to shift image
for viewing.
• To return to the original normal view, press the ZOOM key until the ZOOM : OFF
symbol shows. The screen will return to normal.
• When you reach the edge of the image, the display will not shift anymore in that
direction.
1.
(Open / Close)
• Press to open the disc tray.
Note : Load the disc on the disc tray with disc label facing upward.
• Press again to close the disc tray. It will start playback automatically.
2.
(Play)
• Press to start playback.
3.
(Pause)
• Press to pause playback.
• Press
again or will resume normal playback.
4.
• Press to skip a track or picture backward or forward.
5.
(Stop)
• Press to stop playback.
• Press to display the selection menu during playback (for JPEG file only).
• Press
will resume normal playback.
6. ROTATE (for JPEG file only)
• During the playback of JPEG file, press ROTATE to rotate the picture.
7. ZOOM / CLEAR
ZOOM
• Press to zoom in picture during JPEG file slideshow or MPEG playback.
CLEAR
• Press to delete the information you input.
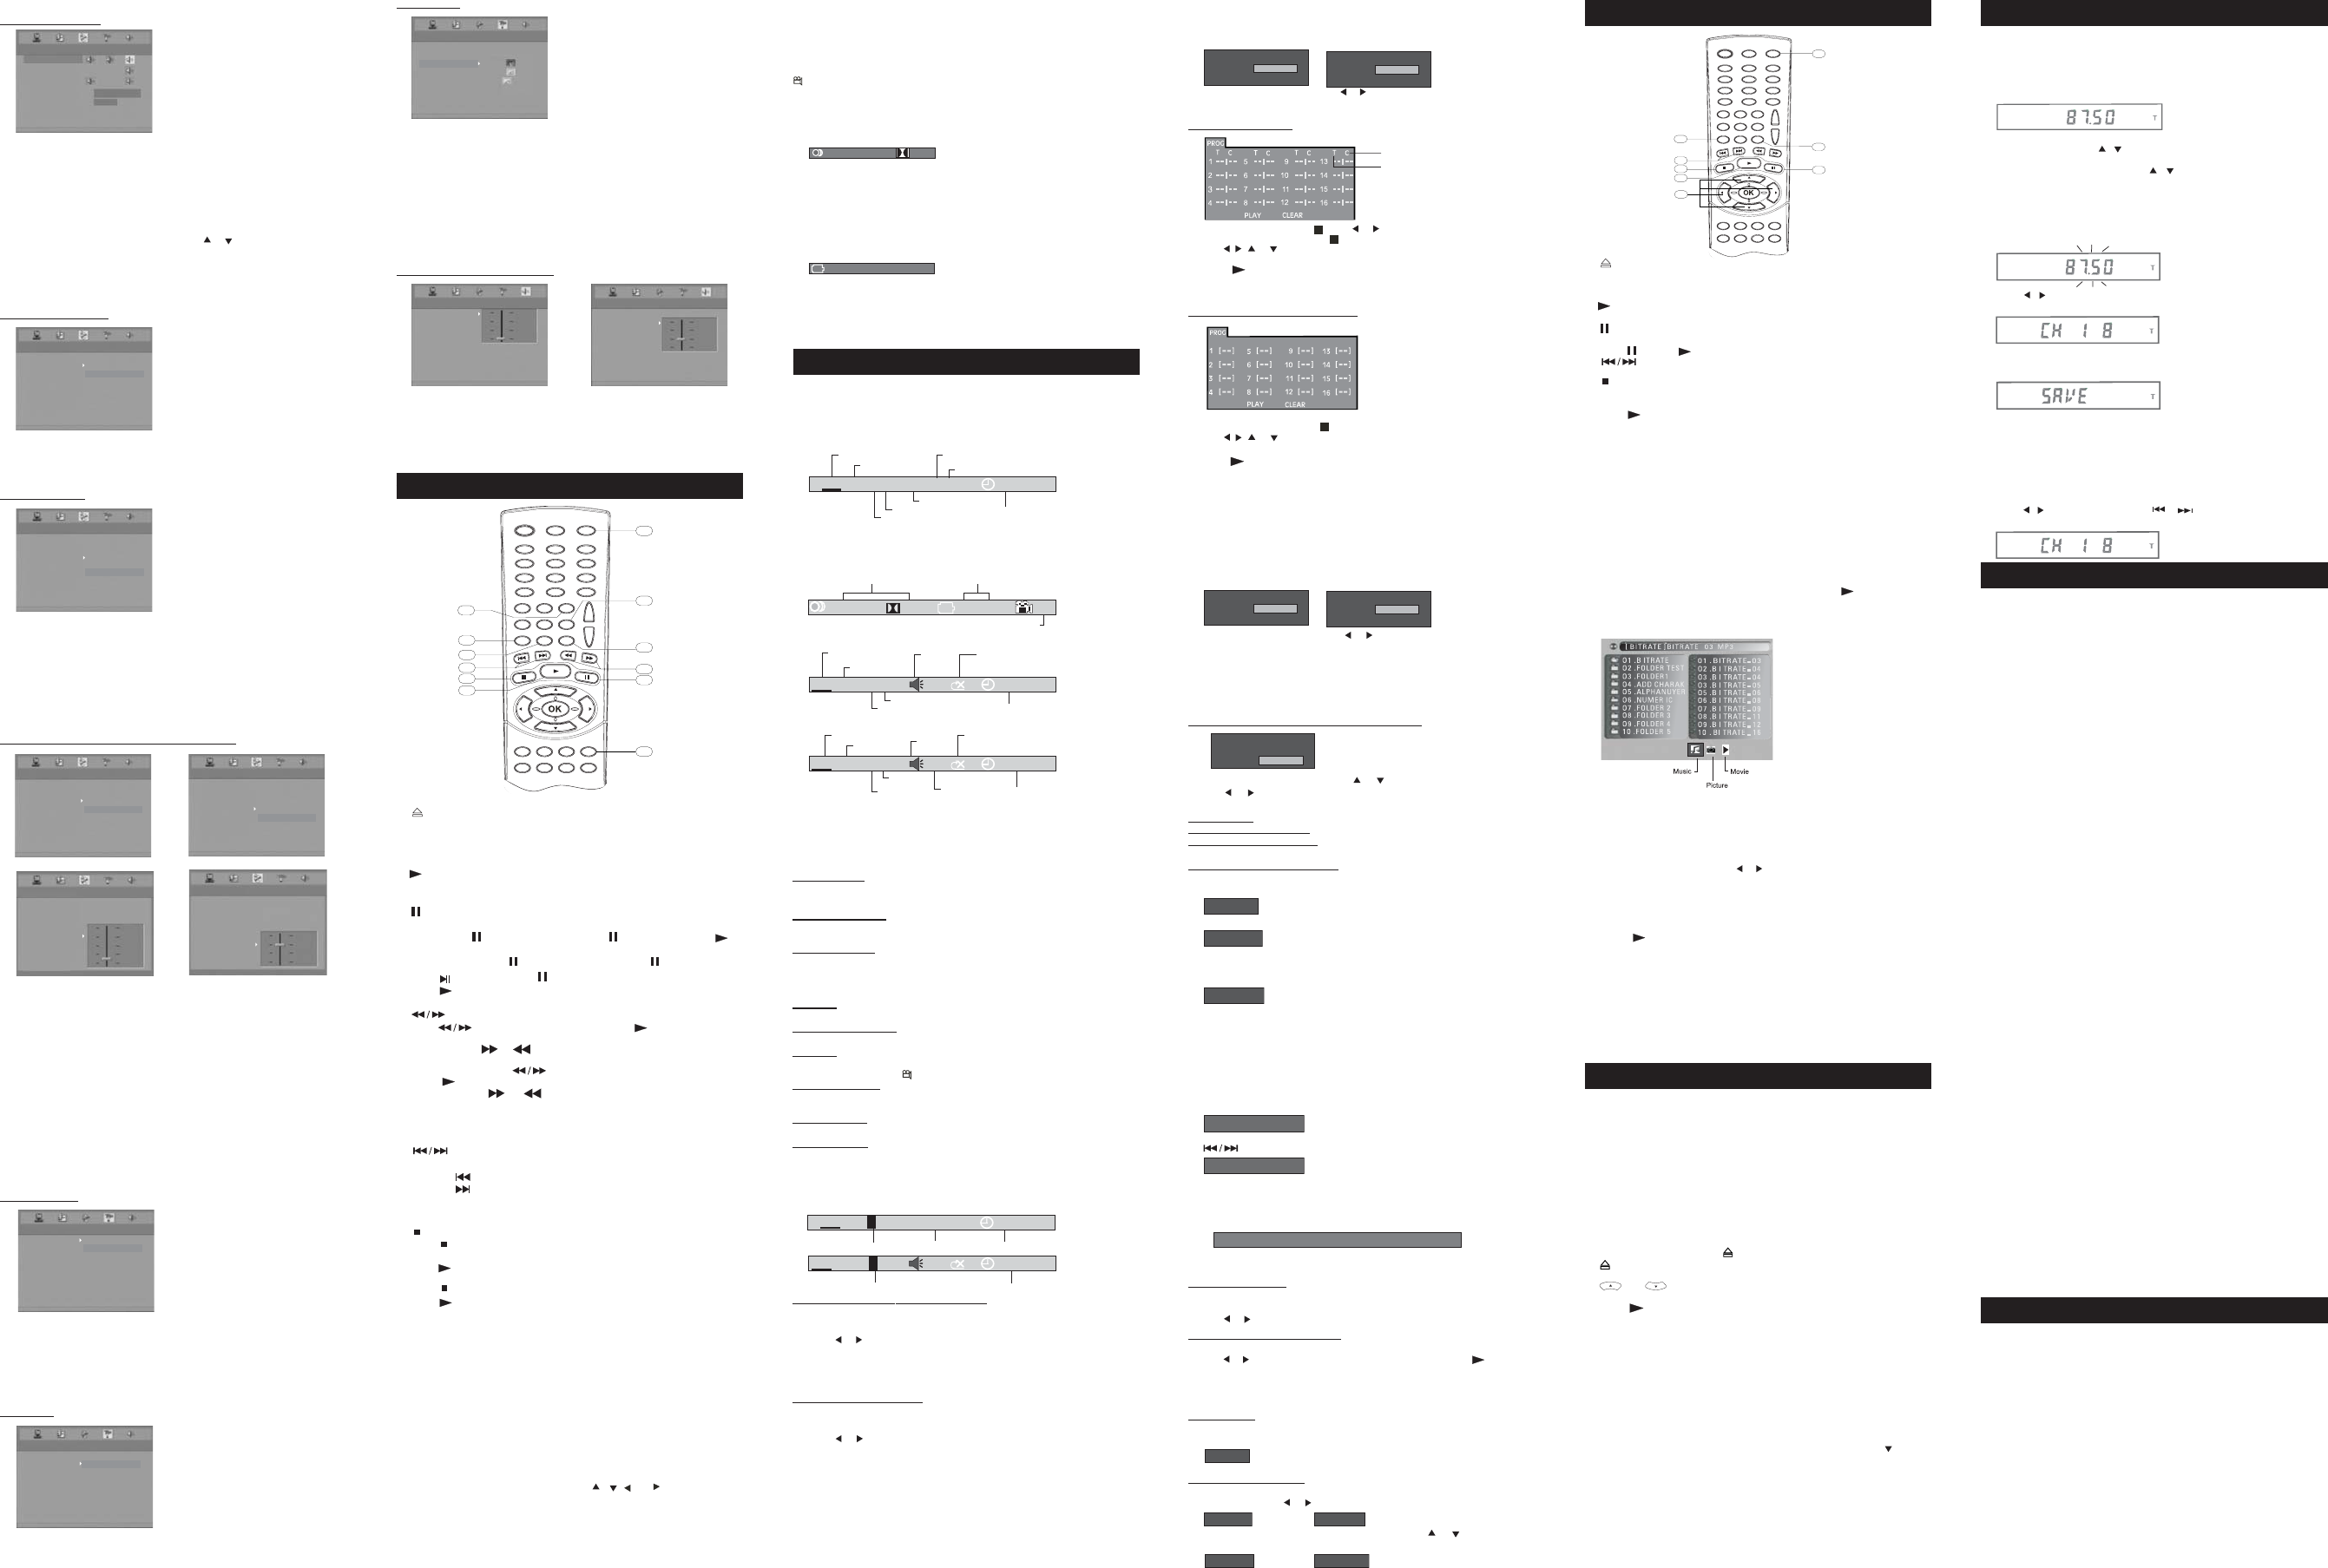
8. Active Navigation
• Press to select the file and press OK to start playback.
Selection Menu
The Selection Menu will appear when starting MP3 / WMA / JPEG / MPEG playback.
There are all folders in the left side Menu, from the top to the bottom the folder will
be numbered as Folder No.1/No.2/No.3.... When you highlight one of the folders, all
the contents of this folder will be displayed in the right side. All the tracks/pictures/
movies will be numbered from top to bottom as No.1/No.2/No.3....just like the folder.
Use active navigation keys to select the files. Press OK or
to start playback.
Active navigation keys can also be used to select the folder contains MP3 / WMA
/ JPEG / MPEG files. When the folder is selected, it will play the first file
automatically.
[MUSIC] --- MP3 / WMA Files
The unit begins playing all the MP3 / WMA file currently selected. Then it plays
all the files in the subfolders contained within its parent folder. After that, the unit
plays the remaining folders on the disc.
To Program MP3 song follow these steps:
1. Press PLAYMODE button on the remote control, the Play Mode Menu will display
on the screen.
2. When MODE is highlighted, use
or to select option into PROG mode. Then
press OK to enter MP3 program menu. In this menu, the letter F means Folder,
T means Track.
3. Input the Folder number below F and track number below T with two digital
number.
4. Use the Navigation keys to move to another field and repeat step 3 for the next
song.
5. Press
or highlight PLAY on the screen and press OK to start program
playback.Highlight CLEAR on the PROG screen and press OK to delete all
inputs. You can progam up to 16 songs total.
[PICTURE] --- JPEG Files
The unit starts the slideshow for the JPEG file currently selected. Then it proceeds
to display all other remaining JPEG files in the same folder. After that, the unit plays
the JPEG files in the subfolders contained in the same folder.
[MOVIE] --- MPEG Files
The unit starts to play the whole file currently selected.
Note : You cannot play WMA and JPEG files simultaneously.
• Press INFO once to display the playback informaiton and playing time of current
track.
• Press INFO twice to check the remaining time of current track.
• Press INFO thrice to check the playing time of current disc.
• Press INFO four times to check the remaining time of current disc.
1.1 TT (Title Info)
• It displays the current playing Title Number and the Total Number of Title recorded
on the disc.
1.2 CH (Chapter Info)
• It displays the current playing Chapter Number and the Total Number of Chapter
recorded on the disc.
1.3 Elaspsed time
• It displays the elasped time from the beginning of the title/chapter/disc/track
playback.
Note: If there is a ”-” displaying on the front of time, now the time will be the
remaining time of current title/chapter/disc/track.
1.4 Audio
• The audio track currently selected is displayed.
1.5 Language (Subtitle)
• The language (subtitle) number currently selected is displayed.
1.6 Angle
• The angle viewing currently selected is displayed. When a disc without multi-
angle is played back,
OFF is displayed.
1.7 TRK (Track Info)
• It displays the current playing Trace Number and the Total Number of Track
recorded on the disc.
1.8 Unmute Icon
• When the sound is unmuted, the icon will be displayed.
1.9 Repeat Mode
• It displays any repeat mode set.
Note : After checking the settings, press INFO again to return to the exit the display.
PROBLEMS
If it appears that the DVD Home Cinema System is faulty, please first consult this
checklist. It may be something simple that has been overlooked.
Note : Under no circumstances should you try to repair the unit yourself as this
will invalidate the warranty. Only qualified service personnel can remove the
cover or service this unit.
NO POWER
• Check if the ON / STANDBY button on the front panel of the unit is set to on.
• Check if the unit power cord is properly connected to the power AC outlet.
• Check if there is power at the AC outlet by plugging in another appliance.
NO PICTURE
• Check if the TV is switched on.
• Set the correct AV input on the TV.
• Check the video cable connection.
• Check if channel selector is set to AV on the TV. (Refer your TV manual for
instructions).
• Press the V-SELECT button until stable and correct video output is on the TV
screen.
DISTORTED PICTURE
• Check the disc for fingerprints and clean with soft cloth, wiping from center to
edge.
• Sometimes a small amount of picture distortion may appear. This is not a
malfunction.
• The disc format does not match the TV-set (PAL / NTSC).
NO COLOR IN PICTURE
• The disc format does not match the TV-set (PAL / NTSC).
• Ensure the unit is not connected through VCR.
PICTURE SWING
• Relocate the unit further away from possible interference or emission source
(e.g. Radio, Power Amplifier, Radiator, etc...).
NO RETURN TO START-UP SCREEN WHEN DISC IS REMOVED
• Check to see if the program requires another disc to be loaded.
• Reset by unplugging the unit from the power, then re-connect the power again.
THE PLAYER DOES NOT RESPOND TO THE REMOTE CONTROL
• Aim the remote control directly at the sensor on the front panel of the unit.
• Avoid any obstacle which may block the remote control signal path.
• Inspect or replace the batteries.
NO SOUND ON THE SPEAKERS
• Check speaker cable connections.
• Check if the volume control is NOT at minimum setting.
• Check if it is NOT muted by the remote control.
• Check if the disc is defective by trying another disc
DISC CANNOT BE PLAYED
• Ensure the disc is placed properly onto the disc tray.
RADIO CHANNEL RECEPTION IS POOR
• Check that the antenna is connected correctly.
• Adjust the antenna location and position to obtain the best signal reception.
• Tune to the correct radio channel frequency.
• Place the antenna further away from any equipment that may be causing the
noise or interference.
FORGOTTEN THE PASSWORD
• Under DVD mode with no disc condition, press “76418” on the Remote Control
to clear the password.
FUNCTION DISTURBED
• The normal function of the unit may be disturbed by external interference. Just
reset the unit (disconnecting and reconnecting the power cord might be required
to resume normal operation).
Important : Make sure the antenna is connected correctly.
You can program up to 20 radio channels maximum for easy recall.
Search a Radio Channel
1. Press the ON / STANDBY button on the remote control to turn on the unit.
2. Press repeatedly either the AUX/TV/FM on the remote control or SOURCE on the
front panel until the Tuner Mode is selected.
MHZ
FM
3. Tune to the radio station by either the Manual or Automatic tune as follows :
• Manual Tuning --- Press
/ repeatedly on the remote control until the desired
frequency appears on the display.
• Automatic Tuning--- Press and hold
/ on the remote control for more than
one second to active the AUTO SCAN function. Then release the button. The
AUTO SCAN function will stop on any radio station found. Repeat this process
until it stops on the desired station.
Saving a Radio Channel
1. When the desired radio station is tuned. Press and hold OK until the frequency
is flashing on the front panel LED display.
MHZ
FM
2. Press / or directly use the remote control numeric keys 0 - 9 to select the
channel number that you want the unit to memorize.
FM
3. Press OK again to store into channel number. The word SAVE is displayed
during the saving operation. The radio station is memorized to that channel
number.
FM
4. Repeat the above steps to save up to 20 radio channels.
Note : When you tune at a weak FM station manually, press AUDIO / FM ST on the
remote control to switch from Stereo mode to Mono mode. This will reduce the
background noise.
Recall Memorized Radio Channel
1. Press the ON / STANDBY button on the remote control to turn on the unit.
2. Press repeatedly either the AUX/TV/FM on the remote control or SOURCE on the
front panel until the Tuner Mode is selected.
3. Press
/ on the remote control or / on the front panel to change to
different memorized radio channels.
FM
TECHNICAL SPECIFICATION
General
Main Voltage: AC 230V~ ,50Hz
Power Consumption: Operating, 48W
Standby, 1W
Ambient Temperature: 0°C to +45°C
Dimensions (W x H x D): 360 x 35 x 245 mm
Net Weight: 5.5Kg
Amplifier
Power Output:
- Front Speakers 15W, 4 Ω
- Center Speaker 15W, 4 Ω
- Rear Speakers 15W, 4 Ω
- Subwoofer 25W, 3Ω
Distortion: THD 10% Max.
Radio
FM 87.5 - 108MHz
3. Programming Playback
You can play the contents of the disc in the order you want by arranging the order
of Chapter / Title/ Track
• Press the PLAYMODE button.
PLAY MODE
MODE OFF
REPEAT OFF
PLAY MODE
MODE PROG
REPEAT OFF
PLAY MODE
MODE PROG
REPEAT OFF
PLAY MODE
MODE PROG
REPEAT OFF
• When MODE is highlighted, use or to select option into PROG mode. Then
press OK to confirm.
Note : During VCD / SVCD playback, the function is only available when PBC is OFF.
3.1 DVD Programming
Title
Chapter
• Enter the title numbers in
--
. Use or to move the highlight to chapter and
enter the chapter numbers in
--
.
• Use
, , or to move to another field.
• Repeat the above steps.
• Press
or highlight PLAY on the screen and press OK to start the programmed
playback.
• Highlight the current input on the screen and press CLEAR to delete the title /
chapter numbers you input.
10. ANGLE (To change the Viewing Angle in DVD)
You can select different angles of viewing when play a DVD video disc that contains
scenes recorded from multiple angles.
• Press ANGLE repeatedly to select different angles of viewing if available on the
disc.
Note : This function can only available when the scenes shot from multiple angles
have been recorded on the DVD disc. If multi-angle viewing is not available,
OFF is displayed.
11. AUDIO / FM ST (To Change Different Audio Language Available on the Disc)
During playback, you can change different audio language or audio output.
• When a disc is playing, press AUDIO / FM ST to show the current playback audio
track number.
• Press repeatedly to select the desired audio track.
Note : If there is only one audio track available on the disc, the number does not
change.
12. SUBTITLE (To Change Different Subtitle Language Available on the Disc)
During playback, you can change different subtitle language or disable subtitle.
• When a disc is playing, press SUBTITLE to show the current playback language
subtitle.
• Press repeatedly to select the desired subtitle language.
Note :
• This function can only be used for disc on which different subtitle languages
have been recorded.
• The number of languages recorded may be different depending on the disc.
4.3 TV TYPE
VIDEO SETUP
TV SYSTEM
VIDEO
4:3 PS
4:3 LB
16:9
EXIT SETUP
TV TYPE
• 4:3 PS This is selected when the unit is connected with a normal TV. Wide-
screen images are shown on the screen, but with some parts cut automatically.
• 4:3 LB This is selected when the unit is connected with a normal TV. Wide-
screen images are shown on screen, with black belts on the top and bottom
• 16:9 This is selected when the unit is connected with a wide-screen TV.
Notes:
1. The factual effect of playing rely on the picture recorded in disc. Some disc could
not be played according to your selection.
2. As for the disc recorded in 4:3 mode, the disc will only be played in 4:3.
3. The TV TYPE should be set correspondingly with the TV screen.
5. SPEAKER SETUP
5.1 CENTER / REAR DISTANCE
SPEAKER SETUP
REAR DIST.
EXIT SETUP
CENTER DIST. +
1.5 M
0.5 M
0M
SPEAKER SETUP
CENTER DIST.
EXIT SETUP
REAR DIST. +
4M
2M
0M
1. If the Center speaker is placed close to the Front speakers, choose CENTER
DIST. to set the Center distance value minimum to achieve the best listening
effect.
2. If the Surround speakers are placed close to the listening position than the Front
speakers, choose REAR DIST. to set the Rear distance value larger to achieve
the best listening effect.
1. INFO Function
While the disc is playing, press INFO to display playback information present on
the disc.
For DVD :
DVD
7/36
1/41
00:03:12
TT
CH
Disc format
Title
Current title
Total title
Chapter
Current chapter
Total chapter
Elapsed time
• Press INFO twice to check the remaining time of current chapter.
• Press INFO thrice to check the playing time of current title.
• Press INFO four times to check the remaining time of current title.
• Press INFO five times to further display more playback informaiton as following:
Audio
Language
Angle
1/4
5.1CH
OFF
CH 1
1/2ENG
---
For CD :
Disc format
Track
Current track
Total track
Elapsed time
Repeat Mode
Unmute
CD
00:03:12
TRK
2/2
For VCD :
Disc format
Track
Current title
Total title
Elapsed time
Repeat Mode
Unmute
PBC status
VCD
PBC
00:03:12
TRK
2/2
• Press INFO once to display the playback informaiton and playing time of current
chapter as below:
Your player is an Official DivX Certified product that Plays DivX 5, DivX 4, DivX 3,
and DivX VOD video content, in compliance with DivX Certified technical
requirements. The correct playing of DivX in your player, depends on the preparation
and production of the audio and video files, the codecs used, the type of recording
equipment employed and the parameters of your computer. It is therefore possible
that you cannot play a DivX file or that part or all of it is defective. It also sometimes
happens that you can play the image (video) but not the sound (audio).
Note: To guarantee playback of DivX files the audio must be mp3 format. DivX
Certified devices can play back any interleaved mp3 audio at any bitrate, both CBR
and VBR. The audio must be sampled at standard frequencies, such as 32 kHz, 44.1
kHz, and 48kHz, and must conform to the AVI file specification. Apart from mp3, the
audio formats recognised by your player are MPEG layer 1/2, AC3, DTS, PCM.
Formats such as AAC and Ogg Vorbis are not supported by this player.
1. Open the tray by pressing the
button, insert the disc and then press again the
button to close the tray.
2. The disc’s contents are displayed. Select the DivX file that you wish to play with
and buttons and press OK to select it.
Noted: To delete your selection, press the CLEAR button.
3. Press
to start playback.
A note on copying: Before making use of DivX or mpeg4 files, please be sure of their
origin and that you have legally purchased or rented the contents. Pirate copying is
illegal and may result in sanctions. Private copies of your own material for your own
use may be legal in some countries. Make sure you are aware of applicable laws.
To rent (purchase) DivX VOD files
DivX VOD files are similar to DVD video rental discs. The difference lies in the access
to the media. DivX VOD files are downloaded after paying a rental from certain
commercial web sites. Prior to downloading a VOD you need to input the registration
number of your DVD player on the purchase form of the site.
Follow the instructions below to find the registration number of your player:
1. Insert a disc.
2. Press SETUP/EXIT button to enter the System Setup Menu, press
to select
DIVX [R] VOD,then press OK. The registration number is displayed on the screen
of the television set.
3. Write down this VOD 8-character registration number in order to fill in the form on
the web site you purchase your DivX VOD files from.
Note: If you cannot play a DivX VOD file recorded on a CD-R disc after downloading
it, the rental period allocated during purchasing from the web site may have expired.
It may also be that the recorded file is not compatible with your player because of
different versions or incorrect download parameters. The parameters used during
the copying to CD-R may also be a cause. Since it is not possible here to supply all
the information, parameters and advice relating to the use of DivX VOD files, we
recommend that you visit specialised web sites such as www.divx.com/vod.
PLAYING DIVX DISC
LISTENING TO THE RADIO CHANNEL
2.1 Select a Specific Title / Chapter / Track
You can select any specific Title / Chapter / Track to start playback by directly
selecting the Title / Chapter / Track number.
• Press GOTO .
• Press
or to highlight a Title / Chapter / Track and press the corresponding
numeric key 0 - 9.
• Press OK to confirm. Then the unit will start playback from the position you
select.
Note : Press CLEAR to reset the Title / Chapter / Track it is highlighted.
2.2 Locating a Specific Time
You can select any specific location by directly entering the time (hours, minutes,
seconds).
• Press GOTO.
• Press
or to highlight time.
• Directly key in the numberic key 0 - 9 for the time to start playback.
- The first two digits for the hours setting.
- The next two digits for the minutes setting.
- The last two digits for the seconds.
• After entering the time, press OK to confirm. Then the unit will start playback
at time you select.
Note :
• Some discs may not allow you to use this function.
• Some scenes may not be located as precise as you specified.
• This method for accessing specific location is available only within the current
title of the DVD disc.
• Press CLEAR to reset the time when the time is highlighted.
2. GOTO function
This function allows you to directly select any instant of the disc to start playback.
DVD
1/41
00:03:12
TT
CH
Current title
chapter
time
7 /36
Track
time
CD
00:03:12
TRK
2 /2
Tocom: 56267130


