


9EN
INTRODUCTION
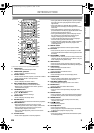
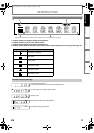
(*) The unit can also be turned on by pressing these buttons.
1. HDMI button
• Press to set the HDMI output mode.
2. OPEN/CLOSE A button*
• Press to open or close the disc tray.
3. Number buttons
• Press to enter the title, chapter, track or file number.
• Press to enter values in the input field.
4. SEARCH button
• Press to display the search menu.
5. RED / GREEN / BLUE / YELLOW button
• Press to select items on some BD contents.
• When file list / thumbnail list is shown, press to
switch between pages.
6. TOP MENU button
• Press to display the top menu.
7. K / L / s / B buttons
• Press to select items or settings.
8. SETUP button
• Press to display the setup menu.
9. REV E button
• During playback, press to fast reverse the playback.
10. SKIP H button
• During playback, press once to return to the
beginning of the current title, chapter, track or file.
• During playback, press twice to return to the
previous title, chapter, track or file.
• During the JPEG playback, press to return to the
previous file.
11. PLAY B button*
• Press to start playback or resume playback.
12. MODE button
• During BD, DVD or AVCHD playback, press to display
the setting for the rapid playback and the picture
adjustment.
• During BD, DVD, CD, AVCHD, MP3 and WMA
playback, press to display the setting for the virtual
surround.
• During BD playback, press to turn the picture-in-
picture feature on or off (only applicable to BD-video
which supports the PIP function).
• During the JPEG playback, press to display menus
for changing the visual effect for switching the
image or changing the size of the image.
• In stop mode with BD inserted, press to display a
menu for setting the BD audio mode.
• In stop mode with audio CD or MP3 / WMA / JPEG files
inserted, press to display menus for program and
random playback.
13. REPEAT button
• Press to toggle between various repeat modes.
14. PIP button
• Press to switch picture-in-picture feature on or off
(only applicable to BD-video which supports the PIP
function).
15. ON/STANDBY Q button
• Press to turn on the unit, or to turn the unit into the
standby mode. (To completely turn off the unit, you
must unplug the AC power cord.)
16. ANGLE button
• Press to access various camera angles on the disc.
• Press to rotate the JPEG files clockwise by 90 degrees.
17. AUDIO button
• Press to display the audio menu.
18. SUBTITLE button
• Press to display the subtitle menu.
19. DISPLAY button
• Press to display the on-screen display menu.
20. CLEAR button
• Press to clear the information once entered or to
cancel the programming for audio CD, etc.
21. POP MENU / MENU button
• Press to display the pop-up menu / disc menu.
22. ENTER button
• Press to confirm or select menu items.
23. RETURN button
• Press to return to the previously displayed menu
screen.
24. FWD D button
• During playback, press to fast forward the playback.
• In pause mode, press to slow motion the playback.
25. SKIP G button
• During playback, press to skip to the next title,
chapter, track or file.
26. STOP C button
• Press to stop playback.
27. PAUSE F button
• Press to pause playback.
• When playback is in pause mode, press repeatedly
to forward the playback step by step.
28. A-B button
• Press to play back a defined section between point
A and B repeatedly.
Remote Control
16
17
18
2*
3
19
21
23
24
26
25
27
28
6
4
5
8
9
12
13
10
11*
7
1
14
15
20
22
INTRODUCTION C
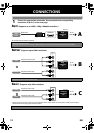
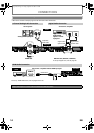
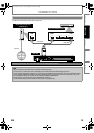
ONNECTIONS
P
LAYBACK
F
UNCTION
SETUP
O
THERS
E5PJ3CD_EN.book Page 9 Friday, September 18, 2009 2:45 PM