


Consult the electronic User's Guide
Call Toshiba Customer Support Center
If you are experiencing a technical problem or have questions with
regards to operation, authorized service centers, warranty or
parts, Toshiba Customer Support Center is ready to help.
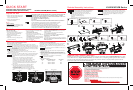
3. DVI to HDMI
®
Your HD cable box or HD satellite receiver
may have a DVI connection. This will be
connected to the HDMI
®
jack on the TV using an
HDMI
®
cable and an HDMI
®
to DVI converter.
DVI carries digital video only.
Initial Setup
You must select a Language, either Home/Store mode, before you can exit out of the Setup Menu. The EXIT button will not function until these selections have
been made.
1. Menu Language
Select a language.
2. Time Zone
Select a time zone
Press ENTER.
3. Store / Home Mode
Select Store or Home Mode.
Press ENTER.
4. ANT/CABLE in
Select Antenna or Cable.
Press ENTER.
Navigating the menu system
You can use the buttons on the remote control to access
and navigate your TV’s onscreen menu system.
• Press MENU to open the menu system.
• When a menu is opened, use the arrow buttons ( )
on the remote control, to move in the corresponding
direction in the menu.
• Press ENTER to save your menu settings or select a
highlighted item. (A highlighted menu item appears in a
different color in the menu).
• All menus close automatically if you do not make a
selection within 60 seconds.
• To close a menu instantly, press EXIT.
Initial Setup
Menu Language
Time Zone
English
Eastern
Initial Setup
Menu Language
Time Zone
English
Eastern
ANT / CABLE in
Antenna
5. Start Scan
Select Start Scan.
Press ENTER.
Channel Program
Press EXIT for no change.
Start Scan
Store / Home Mode
Home
To use this TV for display in a store showroom, please select [ Store ].
[ Home ] mode is recommended for normal use.
Connecting to a High-Definition Input on your TV
2. HDMI
®
to HDMI
®
HDMI
®
is the best connection
for HDTV. This is a digital
connection that carries both
digital video and digital audio.
4. Component Video Input
ColorStream
TM
HD component may also be used
to receive HDTV. Use if no HDMI
®
or DVI jack
is available. There are three jacks color-coded
with red-green-blue on the back of the TV and
HD cable box or HD satellite receiver. This
connection will require a separate analog audio
connection (use the red and white audio
connections).
1. Antenna Input
To connect directly from
an antenna or basic cable:
connect the cable directly
to the antenna input on the
back of the TV.
You can connect directly from an antenna, or if you are using an HD cable box or HD satellite box, there are three standard connections that can be used to receive an HD signal.
INPUT
TV
OUTPUT
Cable box/Satellite box
INPUT
TV
OUTPUT
Cable box/Satellite box
INPUT
TV
Receiving an HDTV Signal
There are three basic ways to receive an HDTV signal on your new TV:
1. Over-the-Air (Antenna)
Connect a high quality outside antenna (not
supplied) directly to the antenna input on
the TV (reception cannot be guaranteed and
is based on proximity to the local signal).
2. Cable or Phone Company HDTV Service
Cable or phone company HDTV service customers
will need to subscribe to High-Definition service from
your local provider. (Additional monthly subscription
cost may apply).
3. Satellite
Satellite customers will need a High-Definition
satellite receiver and appropriate dish hardware.
(Additional monthly subscription cost may apply).
Back
Front
©2013 Toshiba America Information Systems, Inc.
Need Help?
Quick Tour
If you want to stop scanning,
press EXIT while scanning.
INPUT
TV
• GMA501281011 • 12/13
OUTPUT
Cable box/Satellite box
L1400U series: (800) 631-3811 From inside the United States
(949) 583-3050 From outside the United States
L1400UC series:
L1400UM series:
Picture
Sound
Installation
Get Help
Picture
Picture Mode Standard
Reset
Backlight 55
Contrast 95
Brightness 0
Color 0
Tint 0
Sharpness 0
Advanced Picture Setting
Display Setting
Options
Timers
ColorStream is a trademark of Toshiba America Information Systems, Inc.
The terms HDMI and HDMI High-Definition Multimedia Interface, and the HDMI Logo are trademarks
or registered trademarks of HDMI Licensing LLC in the United States and other countries.
All other brand and product names are trademarks or registered trademarks of their respective
companies.
Printed on recycled paper
Visit Toshiba's Support Web site
L1400U series: To access the electronic User’s Guide please visit
support.toshiba.com
Type in your product model or serial number, press GO, and then
click Manuals & Specs.
L1400UC series: To access the electronic User’s Guide please visit
www.toshiba.ca/support/ceg
L1400UM series: To access the electronic User's Guide please visit
http://www.toshiba.com.mx/tdmConsumo/Informacion/Contacto.
aspx?ID=SPT"
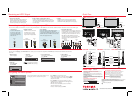
32L1400U/UC/UM Series
32L1400U/UC/UM Series
Back
Front
40/50L1400U/UC/UM Series
40L1400U/UC/UM Series
Back
50L1400U/UC/UM Series
Power On/Standby LED
Remote sensor
Power On/Standby LED
Remote sensor
POWER button
Switches the function
of the VOL +/- buttons
to select the volume,
channel, or input mode.
Channel/
Volume increase/
decrease
Left side
USB port
POWER button
Switches the function
of the VOL +/- buttons
to select the volume,
channel, or input mode.
Channel/
Volume increase/
decrease
USB port
For more information about the CH/INPUT button,
refer to the User's Guide.
32L1400U/UC/UM Series
Left side
40L1400U/UC/UM Series
Left side
50L1400U/UC/UM Series
(Sample Image)
1-800-268-3404 From within Canada
9126-5165 and 9126-5166 For Mexico
01-800-712-67-64 lada 800 For Mexico
L1400U series: support.toshiba.com
L1400UC series: www.toshiba.ca/support/ceg
L1400UM series: http://www.toshiba.com.mx/
tdmConsumo/Informacion/Contacto.aspx?ID=SPT"
Most problems are easy to correct. Save time with one of these simple
solutions
Power Cord Power Cord