


62
Others
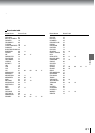
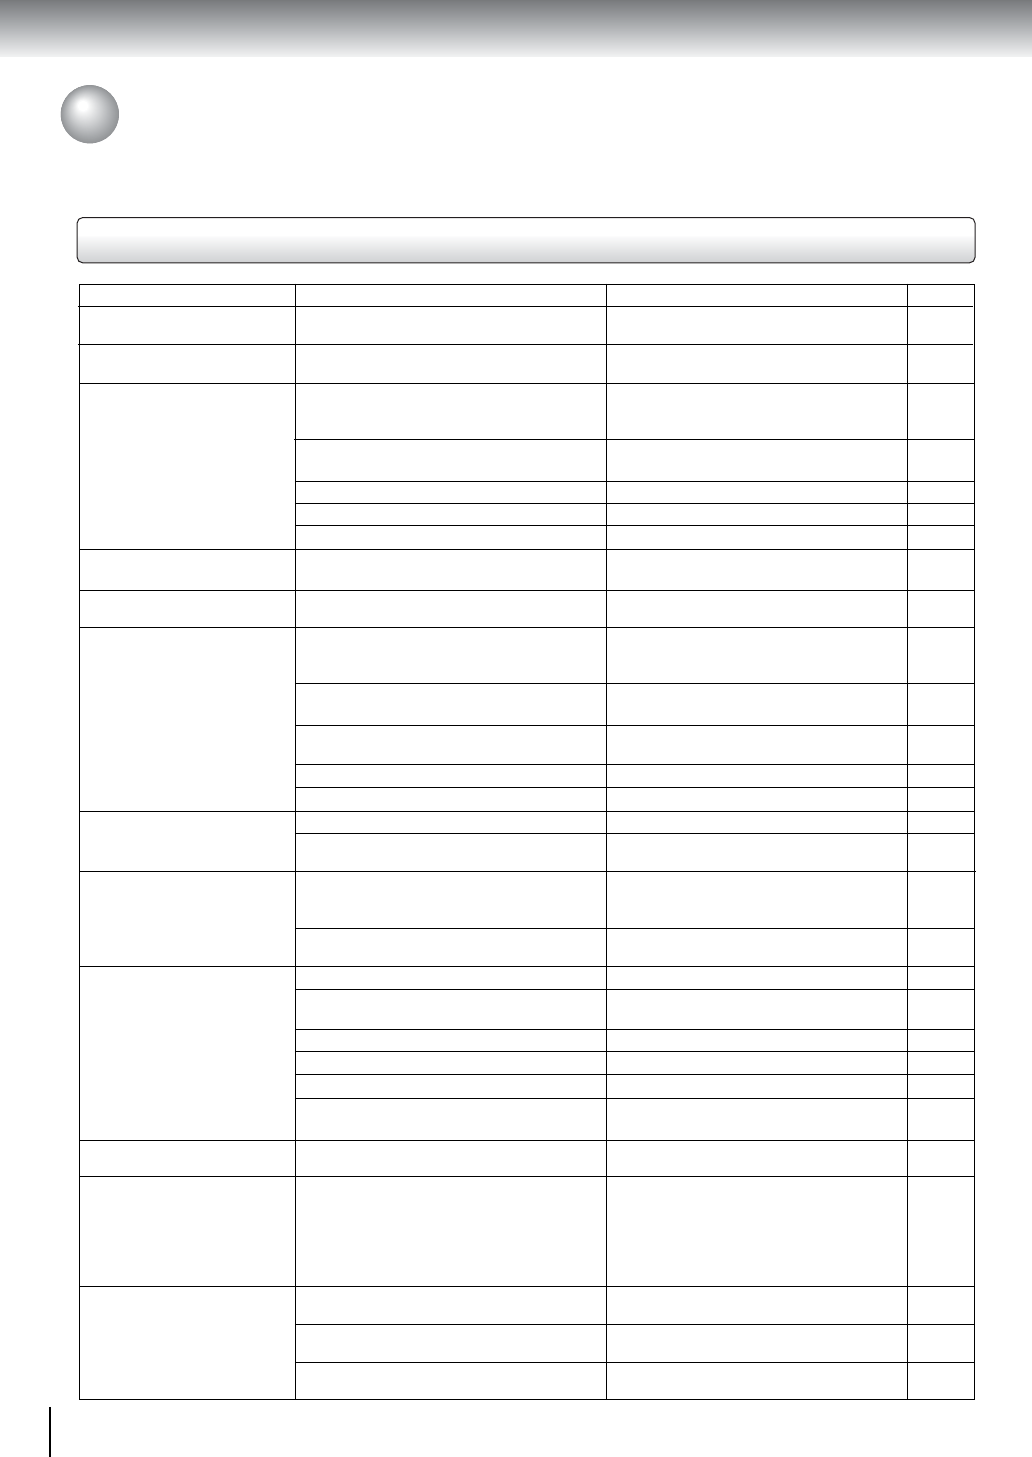
Symptom
No power.
The DVD video player turned
off by itself.
No picture or abnormal color
(pinkish, greenish, etc.).
Before Calling Service Personnel
Check the following guide for the possible cause of a problem before contacting service.
Symptoms and correction
Cause
• The power plug is disconnected.
• The automatic power off function turned the
unit off.
• The TV is not set to receive DVD signal
output.
• The video/HDMI cable is not connected
securely.
• Video switch not set to correct position.
• Mismatch setting between TV and this unit.
• Wrong connection.
• HDMI mode was off accidentally.
• TV does not support the selected picture
resolution.
• The equipment connected with the audio
cable is not set to receive DVD signal output.
• The audio/HDMI cable is not connected
securely.
• The audio receiver or TV is turned off.
• The setting of output sound format is incorrect.
• In HDMI mode, Digital Out is not set to PCM.
• The disc is dirty.
• It is in fast forward or fast reverse playback.
• The effect of copy protection.
• The effect of multi video output connections.
• No disc is inserted.
• An unplayable disc is inserted.
• The disc is placed upside down.
• The disc is not placed within the guide.
• The disc is dirty.
• The parental lock function is set.
• It is in the mode of repeat playback, memory
playback, etc.
• Power supply fluctuations or other
abnormalities such as static electricity may
interrupt correct operations.
• The remote control is not pointed at the
remote sensor of the DVD video player.
• The remote control is too far from the DVD
video player.
• The batteries in the remote control are exhausted.
Correction
• Connect the power plug securely into the
wall outlet.
• Press the PLAY button.
• Select the appropriate video input mode on
the TV so the picture from the DVD video
player appears on the TV screen.
• Connect the video cable securely into the
appropriate jacks.
• Select correct video mode, ANALOG or HDMI.
• Select the correct Video Output setting.
• Check the connection.
• Select HDMI mode through the ANALOG/
HDMI switch on the front panel.
• Press HDMI button to select another picture
resolution.
• Select the correct input mode of the audio
receiver so you can listen to the sound from
the DVD video player.
• Connect the audio cable securely into the
appropriate jacks.
• Turn on the equipment connected with the
audio cable.
• Select the proper audio setting.
• Change Digital Out to PCM.
• Eject the disc and clean it.
• Sometimes a small amount of picture distortion
may appear. This is not a malfunction.
• Connect the DVD video player directly to
the TV. Avoid connecting the DVD video
player to a VCR or TV/VCR combination.
• Connect only the cable for the output mode
that you want to use.
• Insert a disc.
• Insert a playable disc. (Check the disc type
and color system.)
• Place the disc with the playback side down.
• Place the disc correctly inside the guide on the disc tray.
• Clean the disc.
• Cancel the parental lock function or change
the parental lock level.
• These operations may prevent a proper
progress of the contents.
• Press and hold the ON/STANDBY button on
the front panel for more than about 3 seconds.
The DVD video player turns off. Press the
button again to turn it on. If the buttons still do
not work, disconnect the power plug and insert
it into the wall outlet again.
• Point the remote control at the remote
sensor of the DVD video player.
• Operate the remote control within about
7 m.
• Replace the batteries with new ones.
The remote control does not
work properly.
Buttons do not work.
Playback does not follow the
course of the disc’s program.
The DVD video player does
not start playback.
Brightness or picture is
unstable or noises are
present in the pictures.
The playback picture has
occasional distortion.
No sound.
Only portion of the picture is
displayed in HDMI mode.
Dotted lines or green lines in
HDMI mode.
Page
18
27
26
18-20
20
54
18-20
20
20
26
18-23
26
41,50,55
9
-
18
18-20
26
10
26
26
9
50,55
-
-
15
15
15
55