


DVD Functions Information EspañolPrecautions Setup VCR Functions
EN
–
11
–
L R
DIGITAL
AUDIO OUT
COAXIAL
AUDIO
OUT
DVD VCR
DVD/VCR
S-VIDEO
OUT
COMPONENT
VIDEO OUT
AUDIO IN
VIDEO IN
AUDIO OUT
VIDEO OUT
L
LY
R
L
R
R
C
B
/
P
B
C
R
/
P
R
V
C
R
AU
DI
O
IN
V
IDE
O
I
N
L
R
DI
G
ITAL
A
UDIO OU
T
CO
AXIAL
VCRDVD/VCR
AUDIO OUT
L
R
AUDIO
OUT
DVD
L
R
DIGITAL
AUDIO OUT
COAXIAL
AUDIO
OUT
DVD
S-VIDEO
OUT
COMPONENT
VIDEO OUT
COAXIAL
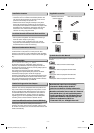
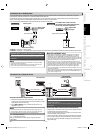
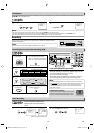
Connection to an Audio System
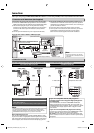
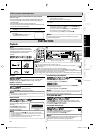
Connection to an External Tuner
Using the unit with an external tuner
1. Connect RCA audio and video cables to the audio and video
output jacks of your external tuner and to the audio and video
input jacks at the rear of the u
nit
.
2. Press [INPUT SELECT] on your remote control until “L1” is
displayed on your TV.
L1: Rear panel terminals
L2: Front panel terminals
Refer to “Front Panel” and “Rear Panel” on page 7 for more
information.
DIGITAL
AUDIO OUT
COAXIAL
AUDIO
OUT
DVD VCR
DVD/VCR
S-VIDEO
OUT
COMPONENT
VIDEO OUT
VIDEO IN
AUDIO OUT
VIDEO OUT
L
LY
R
AUDIO IN
L
R
R
AUDIO IN
VIDEO IN
L
R
C
B
/
P
B
C
R
/
P
R
AUDIO IN
VIDEO IN
VCRDVD/VCR
AUDIO OUT
L
VIDEO OUT
R
L
R
VIDEO IN
AUDIO IN
L
R
AUDIO OUT
VIDEO OUT
L
R
RCA audio cable
RCA video cable
RCA audio cable
RCA video cable
rear of TV rear of the unit
external tuner
(cable/satellite box)
L1
Note:
• Your cable/satellite box can be accessed only by connecting it to L1
(rear panel jacks) of the unit. Even if the unit is turned off, the signal
from the external tuner is output to the TV through the unit.
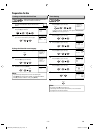
Supplied cables used in this connection are as follows:
• RCA audio cable (L/R) x 1
• RCA video cable x 1
Please purchase the rest of the necessary cables at your
local store.
Special note when connected to an external tuner:
• Only the active channel on your external tuner may be viewed or
recorded when connected to this unit.
Do not change channels during a recording. You cannot record
on channel while viewing another.
• Always use the LEFT (white) audio output jack from the external
tuner to ensure that the audio is mixed down correctly to mono
for this unit. If you use the RIGHT (red) jack, you will record the
right audio only.
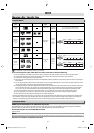
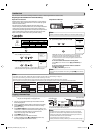
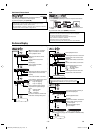
• Method 1 DVD Player + Stereo system
• Method 2 DVD Player + AV amplifier with a built in decoder (AV control center), Dolby Digital decoder, DTS decoder, MD deck or DAT deck
If using this DVD player to play back a DVD in a Dolby Digital Multi-channel surround or DTS surround format, the DVD player outputs a
Dolby Digital or DTS data stream from its COAXIAL DIGITAL AUDIO OUT jack.
By hooking up the player to a Dolby Digital or DTS decoder, you can enjoy more convincing, realistic ambience with powerful and high-
quality surrounding sound of a professional standard which can be heard in movie theaters.
Use a commercially available digital audio coaxial cable for the audio connections.
DIGITAL AUDIO OUT
AV amplifier with a built in decoder
(AV control center), Dolby Digital decoder,
DTS decoder, MD deck or DAT deck
Stereo system
AUDIO
This unit
AUDIO OUT (Analog)
Method 1 Method 2
analog audio
input jacks
RCA audio cable
digital audio
input jack
digital audio coaxial cable
Note:
• Be sure to turn off the power of all components in the system before
connecting another component.
• Refer to the Instruction Manuals for your TV, stereo system and any
other components to be connected to the DVD player.
Note (for method 2 only):
• When using an AV amplifier with a built in decoder (AV control center),
Dolby Digital, or DTS decoder as shown in the Method 2, set “DOLBY
DIGITAL” or “DTS” to “BITSTREAM” accordingly for audio output in the
setup mode (refer to pages 23-24). Set it to “PCM” or “OFF” for the decoder
that is not used currently. Playing back a DVD using incorrect settings may
generate noise distortion, and may also damage the speakers.
• The audio source on a disc in a Dolby Digital Multi-channel surround
format cannot be recorded as digital sound by an MD deck or DAT deck.
• Set “Dolby Digital” to “PCM” and “DTS” to “OFF” for audio output in the setup
mode for connecting to an MD deck or DAT deck (refer to pages 23-24).
• Harsh noise that could harm your ears or the speakers is generated
when a DVD recorded in DTS is played while using a decoder, etc., that
is not DTS-compatible.
• When playing a copyright-protected 96kHz PCM DVD, the digital sound
will be down sampled at 48kHz, even if you set “DOWN SAMPLING” to
“OFF” (refer to pages 23-24).
Supplied cables used in this connection are as follows:
• RCA audio cable (L/R) x 1
Please purchase the rest of the necessary cables at your
local store.
E8EB5UD_SD-V296KU_EN_ES_v1.indd 11E8EB5UD_SD-V296KU_EN_ES_v1.indd 11 2008/07/14 10:36:502008/07/14 10:36:50