


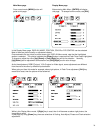
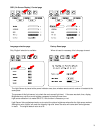

PIP Control page
In this page, Picture-in picture feature is selected.
PIP can insert such as PC image on the base and Video
image in the small window, this is one of the example.
The position and also the size of the inserted image are
possible to modify by selecting the “adjust mode” by
[Up] or [Down] key, then using [Left] or [Right] key to
select.
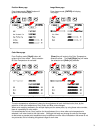
Also, refer to the picture below left, this is indicating
PIP icon and selecting this icon and using [Enter] button,
This picture appears. In this page, adjustments for the
Inserted picture is possible.
When this PIP icon is selected and then [Down] button
Pushed, then, below right picture will appear, indicating
Which signal is selected for the inserted picture.
It is possible to select different input with this page.
Right now, S-Video is selected and highlighted.
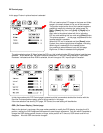
The pictures below show ‘S-Video’ below the PIP icon, this is indicating the PIP small picture input that was
selected. At the below right, the small indication below the Y-C icon, IVP which stands for ‘Input Video
Processor’ indicated and when RGB is selected, this will change to IGP, ‘Input Graphic Processor’.
In this picture above left, PIP Control page is present and this is somewhat doubled the function with the
Previous Picture adjustment page, refer to the top section in this page.
If the new selection has done by PIP page, PIP Control, the new setting will be effective.
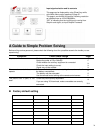
OSD ( On Screen Display ) Control page
Refer to the picture in next page, this page makes possible to modify the OSD display, changing the H/V
position, making the OSD image semi-transparent or see-through adjustment, Time out which is possible to
change the OSD display period, shorter or longer, at the position of 0: time out, OSD remain and will not
disappear. Also the OSD size can be changed.
22