


Assemble (TV set body and stand fix type)
Model applicable : 19AV550 Series
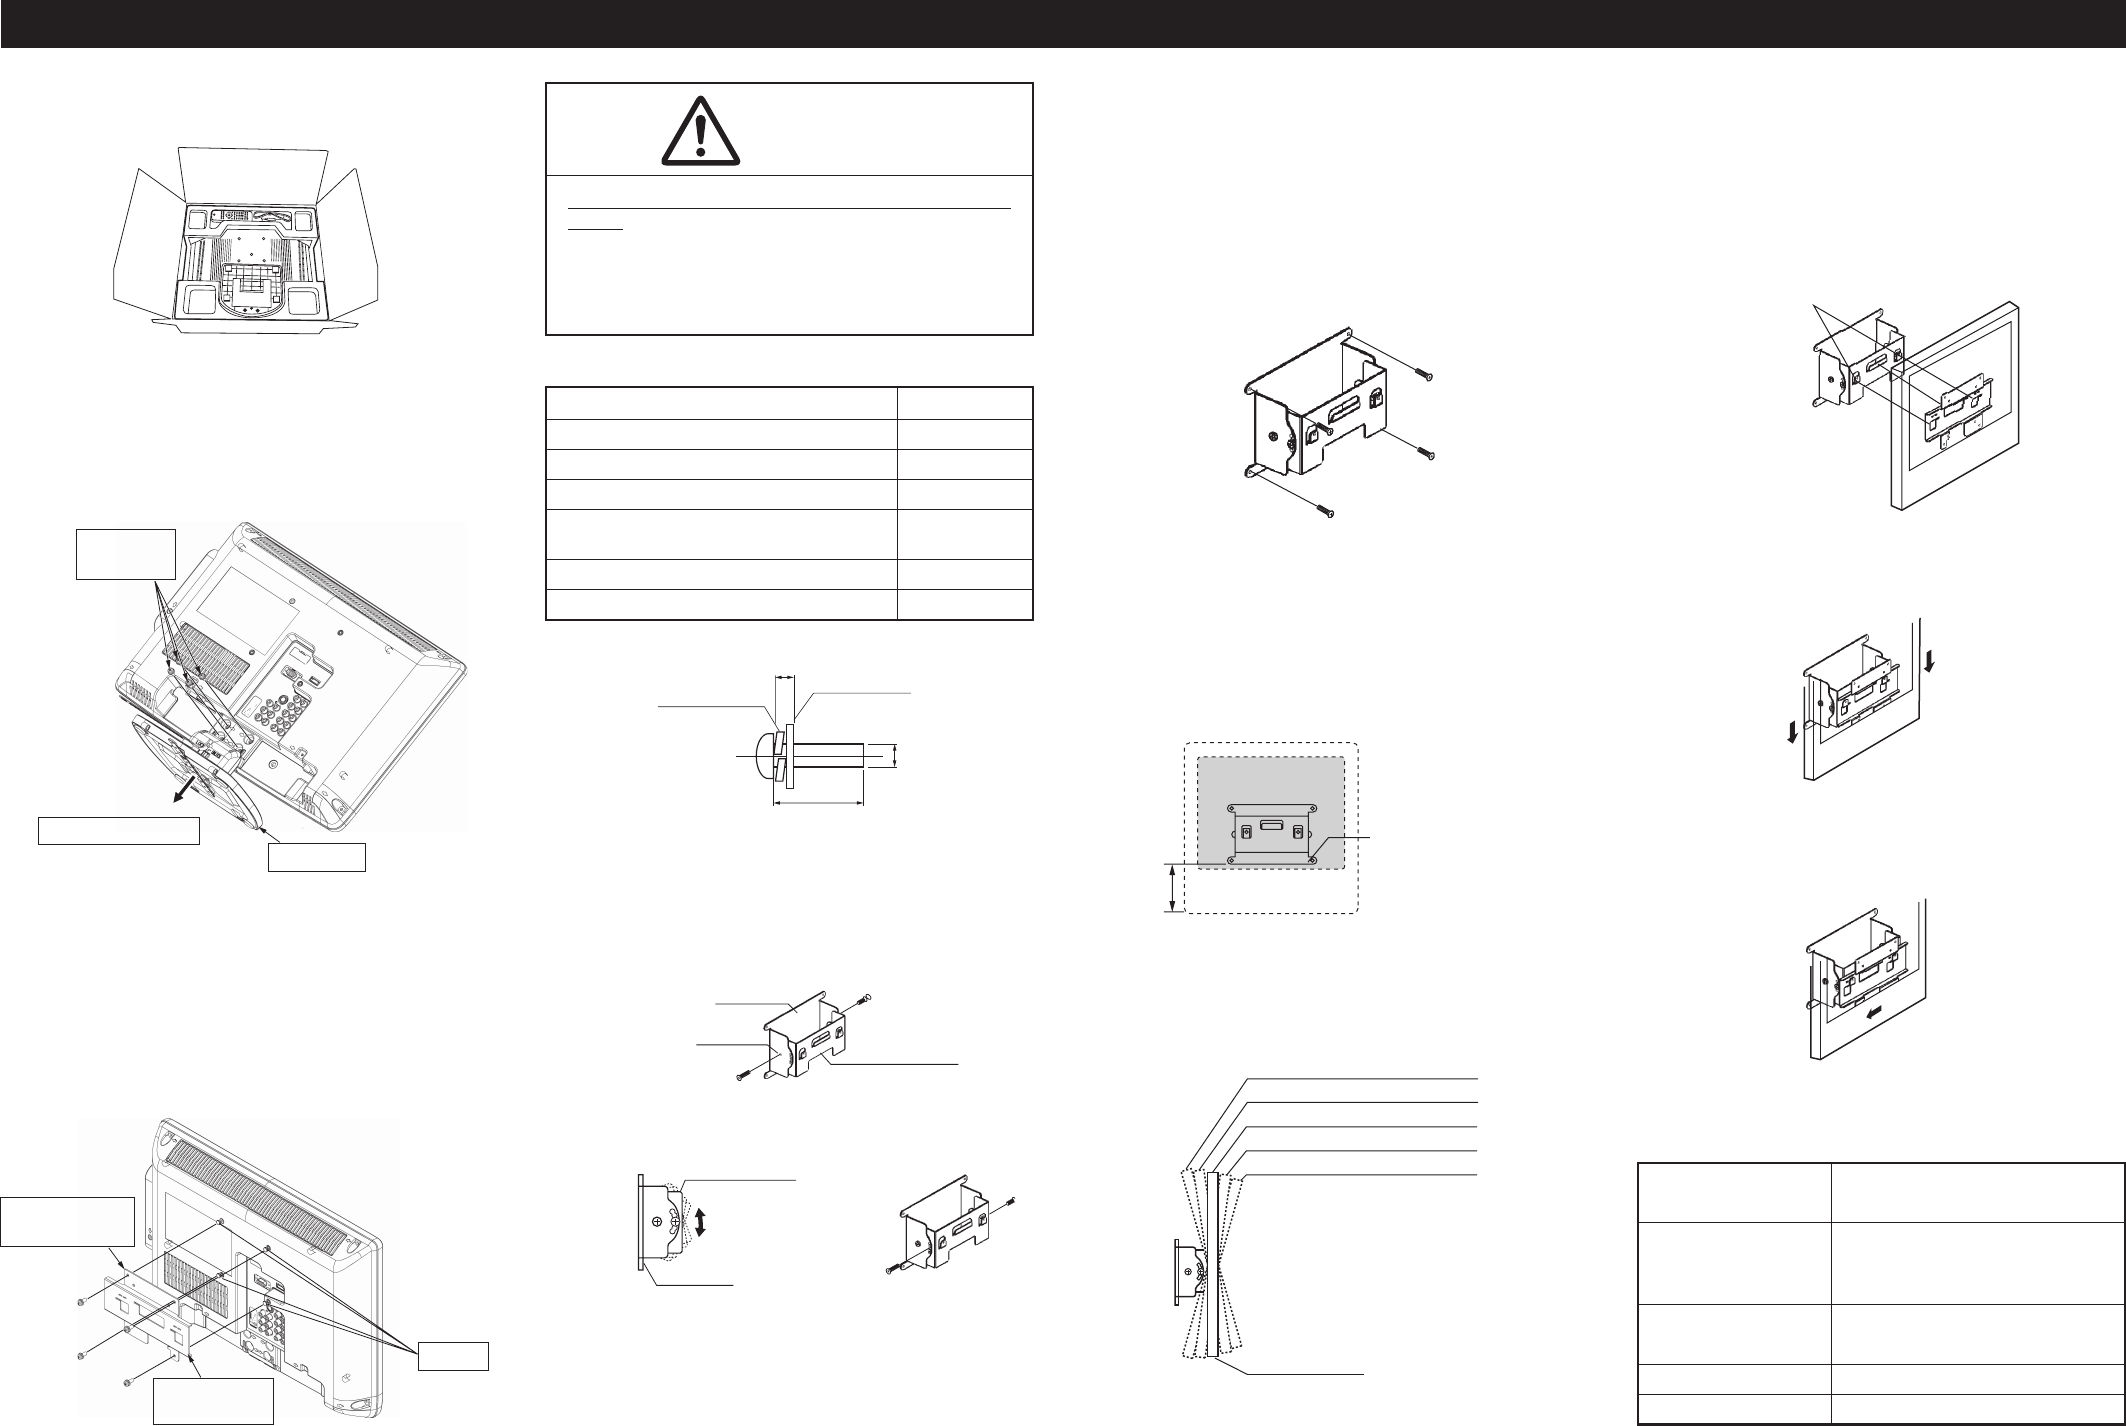
Please take out the LCD color TV from the
LCD TV case.
Remove the stand part from the LCD TV.
1 Rotate the TV stand to its position generally used.
To avoid scratching the LCD screen, please place a
soft cloth on a table etc, and then put the LCD TV
on the cloth with its screen facing down.
2 Remove the 4 screws used to fix the stand.
3 Remove the stand from the TV.
* Please keep to the stand and fix screws.
Attach the bracket of TV side to the LCD
color TV.
1 Tear off adhesive tapes of the supplied (four)
paddings, align its hole with fixing bolts, and affix it
to the screw place of TV side.
2 Align the screw hole of bracket of TV side with which
of the TV, attach the bracket firmly to the TV with
four supplied screws (M4 × 14mm).
4 securing
screws
Remove the stand
Stand part
To fix at 4 outer
side holes
TV mounting
bracket
Spacer
Caution
The supplied screws and paddings should be
used.
Other screws and paddings may cause function
change, electric shock (in case of long screws),
or lead to insufficient strength (in case of short
screws) etc.
■ Parts list
Product name Quantity
TV side bracket 1
Wall-mount bracket 1
Tilt-adjustable bracket 1
Tilt-adjustable bracket securing screw
(M5 × 14mm)
4
Screw (M4 × 14mm) 4
Spacer (with tape attached) 4
Nominal method of screws is as below.
SPRING WASHIER
FLAT WASHER
Assemble the tilt-adjustable bracket,
adjust the angle.
1 Assemble the wall-mount bracket and the tilt-adjust-
able bracket with 2 tilt-adjustable bracket securing
screws threading through the rotation center hole.
(Slightly tighten the 2 screws.)
2 Move the tilt-adjustable bracket to align it with the
closet hole according to your preference angle, then
fix it temporarily with 2 securing screws.
3 After installing the TV, confirm the preference angle
with the customers and make adjustment accord-
ing to the points described in (2) above. After mak-
ing adjustment, tighten firmly the 4 securing screws
mentioned in (1) and (2) above to fix the tilt-adjust-
able bracket fully.
Wall-mount bracket
Rotation center
Tilt-adjustable bracket
Wall-mount bracket
Tilt-adjustable bracket
1
2
3
4
t=1.8
14
M4
■ Wall material/Screw, Expansion Anchor Bolt
Corresponding Table
Wall material Expansion anchor bolt/
screw used
Plasterboard/ fix into the post inside the wall
Complex board the screw firmly fixable into the
(less than 10mm) post inside the wall
Complex board tapping screw (ø 4 × 18)
(above 10mm)
Wood post tapping screw (ø 4 × 18)
Concrete expansion anchor bolt (T-660)
Attach the Wall-mount Bracket.
Attach the wall-mount bracket to the wall with 4 com-
mercial available screws or expansion anchor bolts, re-
ferring to the bottom right table.
(4 positions shown as below)
Be sure to fix the screws into the strong and reliable
wood or post inside the wall firmly.
(Attaching on the boards such as thin complex board/
plasterboard will be very dangerous, so please be sure
to avoid such places.)
■ Determine the Position before Attaching the
Wall-mount Bracket
The relationship of position for the LCD TV and the
Wall-mount bracket is shown as below. Please ask
the customers to decide the position of the TV in
advance, and then attach the bracket.
■ Angle adjustment of the LCD TV is shown as
below
Lower side of Wall-mount
Bracket
149 mm
the 1st hole from the top tilt upwards 20 degrees
the 2nd hole tilt upwards 10 degrees
the 3rd hole tilt 0 degree
the 4th hole tilt downwards 10 degrees
the 5th hole tilt downwards 20 degrees
LCD TV side
Attach the LCD TV to the tilt-adjustable
bracket installed on the wall.
1 Align the bracket holes on the rear of the LCD TV
with the hooks of the tilt-adjustable bracket, and then
hook the TV.
(This illustration is drawn as you can see through
the TV.)
2 By slightly lowering the LCD TV, you can hitch it on
the hook.
3 Move left the LCD TV to lock it. Make sure that the
TV will not fall off.
Hook
Slightly lower to hitch it on
the hook
Move left to lock it
5
6