ViewSonic 41 CD5233
NOTE 3: “PIP”, “POP” and “SIDE BY SIDE”
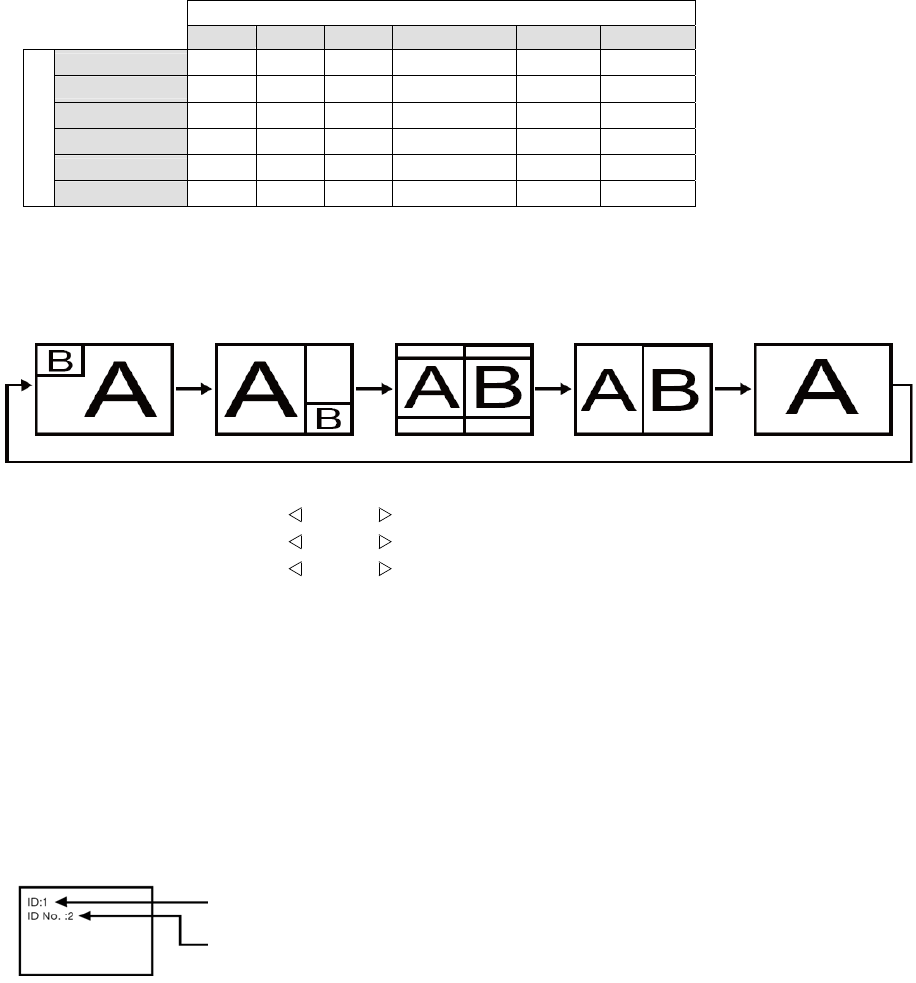
The following table shows the combination of signal inputs under which the “PIP” and “POP” modes function. These modes do not
function, however, when the screen size is “CUSTOM” or “REAL”.
SUB
HDMI DVI-D VGA COMPONENT S-VIDEO VIDEO
HDMI
DVI-D
: Supported
VGA
: Not supported
COMPONENT
S-VIDEO
MAIN
VIDEO
Press the “PIP ON/OFF” buttons on the remote control to change between “PIP”, “POP” and “SIDE BY
SIDE” mode as shown in the diagram below.
PIP POP
SIDE BY SIDE
ASPECT
SIDE BY SIDE FULL
OFF
“PIP”, “POP” mode resolution (Reference)
PIP SIZE
SMALL
MIDDLE
LARGE
POP SIZE
: 450 dots X 338 dots
: 675 dots X 450 dots
: 900 dots X 675 dots
: 450 dots X 338 dots
< Remote control numbering function >
By connecting multiple monitors using RS232C cables, you can control any one monitor or all the monitors by one remote controller.
1. Assign arbitrary ID number to each of multi-connected monitors using MONITOR ID. ID numbers 1 to 26
are selectable.
It is recommended to assign sequential ID numbers from 1 and up.
2. The remote control mode of the first monitor is set to PRIMARY and those of the other monitors are set to
SECONDARY.
3. When you direct the remote controller at the remote control signal sensor of the PRIMARY monitor and press the DISPLAY
button on the remote controller, the ID selection OSD appears at the upper left of the screen.
ID number of the currently viewed monitor
Select the ID number of the monitor you want to control using the ▶/◀ button
on the remote controller.
The ID of the monitor you want to control is displayed at the upper left of its screen.
By selecting ALL, you can control all the multi-connected monitors.
4. Direct the remote controller at the remote control signal sensor of the PRIMARY monitor. OSD
appears on the monitor having the ID number you selected.
NOTE:
When the ID selection OSD is being displayed on the PRIMARY monitor, press the DISPLAY button on the remote controller again to
cancel the ID selection OSD and then control the monitor you selected.
HINT:
If you set the remote control mode wrongly and remote control operation becomes unavailable, press MENU button on the control panel of
the monitor to display the OSD screen and change the remote control mode using ADVANCED OPTION. By pressing
and holding down the DISPLAY button on the remote control for 5 seconds or longer, the remote control mode is initialized to
NORMAL.


