


©2008 VIZIO Inc.
Programming your TV to Receive and Display Channels: All you need is your Remote Control.
Your new TV is now ready
to automatically reproduce the best picture quality from the input
signal. Enjoy your VIZIO HDTV.
Programming Your Cable or
Satellite Box Remote
Consult your Cable or Satellite Owner’s Manual to determine if you
need a 3, 4 or 5-digit code. If your Cable or Satellite Box requires:
sDIGITSPLEASEUSEhv4HISCODEUSUALLYWORKSWITH$)3(.ETWORK
sDIGITSPLEASEUSEhvhvORhv
sDIGITSPLEASEUSEhvhvORhv4HESECODESUSUALLYWORK
WITH$)2%#46
/PTIONAL#OMPONENTS
ENHANCE YOUR VIZIO EXPERIENCE
When it comes to components and accessories, don’t settle for
less than VIZIO. We offer a full line of products specifically
designed to accentuate your VIZIO HDTV. To learn more about
how you can enhance your VIZIO experience, call 888-849-4623
or visit www.VIZIO.com.
VIZIO HIGH-DEFINITION CERTIFIED CABLES
Our VIZIO Certified HD cables carry the same standards of
excellence as all our VIZIO products. Available in: DVI, HDMI
and Component in lengths of 2, 5, and 10 meters.
VIZIO CERTIFIED MOUNTS
FLUSH MOUNT- turn your HDTV into a work of art
TILT MOUNT- adjust your HDTV for the most comfortable
viewing position
ARTICULATING ARM- position your HDTV exactly where
you want it
#OAXIALCONNECTION2&CONNECTORISRECOGNIZEDASTHETHREADEDCONNECTORCOMMONLY
CALLEDCABLESCREWONORCOAXIALCONNECTORWHICHCARRIESTHEIMAGEPICTUREANDSOUND
AUDIOTHROUGHASINGLECABLE
#OMPOSITECONNECTION2#!CONNECTORSARERECOGNIZEDBYTHETHREEYELLOWREDAND
WHITESTANDARDIZEDCOLORCODEDCONNECTORS9ELLOWCARRIESTHEIMAGEPICTUREPLUS2ED
RIGHTCHANNELANDWHITELEFTCHANNELCARRYTHESOUNDAUDIOPORTIONOFTHESIGNAL
#OMPONENTCONNECTION2#!CONNECTORSARERECOGNIZEDBYTHETHREEGREENBLUEAND
REDSTANDARDIZEDCOLORCODEDCONNECTORSFORIMAGEPICTUREPLUSTHETWOREDANDWHITE
STANDARDIZEDCOLORCODEDCONNECTORSFORTHESOUNDAUDIOPORTIONOFTHESIGNAL
($-)(IGH$EFINITION-ULTIMEDIA)NTERFACECONNECTION($-)CONNECTORIS
RECOGNIZEDBYTHESTANDARDIZEDELONGATED$3HAPEDCONNECTORWHICHCARRIESBOTHTHE
IMAGEPICTUREANDTHESOUNDAUDIOTHROUGHASINGLECABLE
36IDEO3EPARATE6IDEOCONNECTIONPIN-INI$).CONNECTORISRECOGNIZEDBYTHE
SMALLCONNECTORSWITHFOURPINSINIT4HISCONNECTIONCARRIESONLYTHEIMAGEPICTURE
SIGNAL4HEAUDIOISSUPPLIEDBYUSINGTHETWOREDANDWHITESTANDARDIZEDCOLORCODED
RCA connectors associated with the S-Video input.
*
For Your Information:
Receiving Channels through DTV/TV
Input using Antenna or Regular Cable Service
.O"OX3IGNALS
STEP 1.1
#ONNECTYOURSIGNALSOURCECABLE
from antenna or cable from the wall for
#ABLE3ERVICEWITHOUTBOXDIRECTLYTO
THE$46462&COMMONLYNAMED
#/!8)!,CONNECTOR
STEP 1.2
Turn on the TV. The Initial Setup menu
screen should appear. If this screen does
not appear, see User’s Manual, Chapter 3
for TV Tuner Setup. Please choose Home
Mode for energy savings.
Press OKKEYTOINITIALIZETHEPROCESS
3ELECT,ANGUAGE%NGLISH%SPA×OLOR&RANCAIS
Press OK button to go to next screen.
Press or once to select Cable or Antenna.
Press OK to continue to next screen.
Press OKKEYONREMOTECONTROL
to scan for channels. Scanning for
AVAILABLECHANNELSCOULDTAKE
several minutes.
Once scanning is finished, programming is
complete. Press the EXITKEYTOQUIT
$ISPLAYING#HANNELSFROMDIFFERENT3IGNAL3OURCES%XTERNAL464UNER6#2#ABLE"OX
OR3ATELLITE2ECEIVERTHROUGHDIFFERENT)NPUTS
STEP 2.1
3ELECTTHEDESIREDINPUTCONNECTION2&$4646
#OMPOSITE9ELLOW2EDAND7HITE
#OMPONENT90B0R'REEN"LUEAND2EDPLUS2EDAND7HITE
($-)OR36IDEO!6PLUS2EDAND7HITE
STEP 2.2
Turn on the TV. The Initial Setup menu screen should appear. Press MENU
ONREMOTECONTROLTOINITIALIZETHEPROCESS)FTHESCREENDOESNOTAPPEAR
PLEASESKIPTO3TEP$
3ELECT,ANGUAGE%NGLISH%SPA×OLOR&RANCAIS
Press EXITKEYTOQUITTHE)NITIAL3ETUPMENU
)FYOUHAVEAN($SERVICEUSETHE($-)BESTOR#OMPONENTCONNECTION
NOTE: #OMPOSITEAND36)$%/#ABLESCANONLYBEUSEDFOR3$I
Turn on your Cable Box, VCR, External TV Tuner or Satellite Receiver and you will see a picture on your TV. If there is no
PICTUREPLEASEMAKESUREYOUHAVESELECTEDTHECORRECTINPUTONTHE46
)FTHESELECTEDINPUTIS2&CONNECTIONPLEASESELECTEITHERCHANNELORCHANNELMATCHINGTHECHANNELWHICHHASBEENSELECTED
ONTHEBACKOFTHE6#2#ABLE"OX%XTERNAL464UNEROR3ATELLITE2ECEIVER0LEASEREFERTOTHE5SERS-ANUALOFTHERESPECTIVE
equipment for details.
NOTE: The TV will be displaying any television station or program selected by the Cable Box, VCR, External Tuner or Satellite Receiver. The TV will
not be able to change programs or channels. This is controlled by the equipment sending the signal. If the service being used includes a box with two
DIFFERENTOUTPUTSFORTWODIFFERENTDISTANTROOMSTHENSCANNINGCHANNELSSHOULDHELPTOFINDTHESIGNAL4HECHANNELTOBESELECTEDVARIESFROMONE
provider to another. It may be necessary to call your Cable or Satellite company so they can provide you with the specific channel to
use with high-definition TV sets.3OMEEXAMPLESOFTHESECHANNELSAREAND
&INE4UNINGYOUR46FOR/PTIMAL0ERFORMANCE
!FTERCOMPLETINGEITHER0ROCEDUREOR0ROCEDURE
PLEASEFOLLOWTHESTEPSBELOWTOOPTIMIZEYOUR46SETDISPLAY
0RESSTHEMENU KEYTOBRINGUPTHE-ENUDISPLAY0RESS
the OK to set the mode to standard.
7ITHPICTUREOPTIONHIGHLIGHTEDPRESSTHEOK button to select.
Press to scroll to the Advanced Video option.
3. Press OK to select it. Press to scroll to the Color Temperature
option.
4. Press OK to select it. Press either or to change the
#OLOR4EMPERATUREOPTIONTO.ORMAL
5. Press the EXIT button to exit the on screen display menu.
NOTE: )FYOUFOLLOWED0ROCEDURETAKETHEFOLLOWINGSTEPSTOENSURE
THATTHECORRECTPROGRAMTIMESARESHOWNWHENPRESSINGTHE'UIDEKEY
Press the MENUKEYTHENPRESSTOHIGHLIGHTTHE46OPTIONAND
press to select. In the next screen, press to highlight Time Zone
ANDPRESSEITHERORTOSELECTTHEPROPERTIMEZONE0RESSTHE%8)4
button to exit the on screen menu.
These small arrows correspond to
the arrows shown in the above Steps.
4HEYSURROUNDTHE-%.5KEY
Legend
-%.5
The mounts shown here are among a wide array of mounting
solutions. Visit www.VIZIO.com to view the entire line.
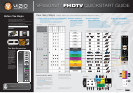
VF550XVT FHDTV
QUICKSTART GUIDE
1A