


Elevation
Loosen the elevation bolts on either side of the back-up/feed support assy. Raise the dish
to the specified elevation angle that you found in step 8 of the receiver setup. The red
line on the back-up/feed support assy., shown next to the elevation bolt, should line up
with the correct angle molded into the back-up/feed support assy.
When searching for the strongest signal, you may need to adjust the elevation angle up/
down a couple of degrees. Refer to the instructions at the bottom of the page if having
trouble finding a satellite. After raising the dish to the correct elevation angle, tighten the
nuts on the elevation bolts.
Azimuth
Loosen the azimuth hex nuts. Standing directly behind (but not too close to) the unit,
align the compass so that it points towards North. Refer to the specified angle that you
found in step 8 of the receiver setup. Adjust the unit so that it points in the general
direction of the specified angle. Then, slowly rotate the dish 3° at a time, and monitor the
signal strength. Repeat until finding the strongest signal. Tighten the azimuth nuts.
Pointing the Home Digital Satellite Antenna
azimuth
bolts
elevation bolt
If you do not come across a satellite on your first attempt at pointing, you may need to
change the elevation angle up or down a couple of degrees. Continue to make slow scans
of the sky until you locate the satellite. Once you find the satellite, make slight adjustments
to both the elevation and azimuth to get the signal as strong as possible. Using a Winegard
signal meter (SF1000) and satellite compass (SC2000, sold separately) can help with this
step. After making adjustments so that the signal is as strong as possible, tighten the azimuth
nuts to prevent the satellite dish from rotating. Keep in mind that buildings, vehicles, people,
trees and various other obstructions can weaken or block the signal from the satellite.
SF1000
SC2000
Sold Separately
Once accurately
pointed, the
signal meter will
turn green. Make
small adjustments
to get the signal
as high as
possible. Check
that the bar at
the bottom of the
screen is green
Press Cancel four
times to exit the
receiver menu. The
receiver setup is
complete. As the
receiver acquires
signal, it will
complete a number
of steps and then
will download your
new program guide.
You are now ready to watch TV!
and that the satellite displayed is the desired satellite.
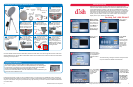
DIRECTV Receiver Setup
In most receivers, the setup is done through the “Repeat Satellite Setup” option in your
receiver menu. The following instructions are based on a D12 receiver. If your receiver
differs from the options shown, you may need to consult your receiver manual. To
access the “Repeat Satellite Setup” option, go through these steps. The wording and
display used in your receiver may differ slightly.
If Switch Type
displays “SWM”
or if given the
option of
selecting a Switch
Type, select
Multiswitch.
Then, set the Dish
Type for Round,
18”, Single LNB,
or 1 SATELLITE,
In your receiver
Menu, you will
need to identify
the Satellite
Menu. The
Satellite Menu
will have an
option for
Satellite Setup.
It may require you
to press the
DASH (-) before
proceeding
(underneath #7
on the remote).
Press Menu on
your remote,
and then select
Parental, Fav’s &
Setup.
Select System
Setup.
For Help, Call 1-800-788-4417
In the box, it now
gives you an
AZIM (Azimuth
Angle) and ELEV
(Elevation Angle).
These are the
pointing angles
you will need
when you go to
point the dish.
Now select
Select Signal
Meters.
Then, select the
Dish Pointing
option. Enter
the Zip Code
for your current
location. Then,
press OK.
depending on the wording used in your receiver. Press
Continue.
Signal Strength to get to the Signal Meter.
Disclaimer: Receiver setup instructions are accurate at time of printing and may
change without notice. Call Winegard tech line for assistance: 1-800-788-4417.
7
9
4
1
6
2
5
3
8
8
10
Input zip code of current location and dish type. On the display, Dish System
should always be Dish 300. Note that whenever you move the satellite antenna
to a new location, you must enter the zip code of your new current location.
Satellite should be whatever satellite you want to point at. Satellite 119 is the
primary satellite, and the majority of programming is located here. If you cannot
find your desired standard programming on Satellite 119, try Satellite 110. For HD
programming, choose Satellite 129 (for HD receivers only).
If using Satellite 119 or 110, use Transponder 11. If using Satellite 129, use
Transponder 21.
With all information entered, an Azimuth Angle and Elevation Angle will be displayed under the Zip Code. Use these
pointing angles to point the dish. If you have selected Satellite 129 as your desired satellite, an azimuth and elevation
angle may not be displayed. In this case, refer to the Satellite Location 129°W Angles Table included with this unit.
If using a 311 or previous model receiver, select Peak Angles to enter your satellite and zip code.
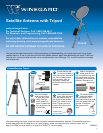
Satellite Antenna with Tripod Kit 54 Satellite Antenna with Tripod Kit